Einleitung
Follow this guide to properly open the fan to perform other repairs or replacements. We recommend another person providing assistance. The tower is quite large and can be difficult to manage by yourself.
Was du brauchst
-
-
Remove the two 3/4" wing screws on the bottom of the fan by rotating them counter-clockwise.
-
-
-
Twist the fan base counter-clockwise until the pins line up as shown.
-
Pull the base straight towards you to remove it, feeding the wire through the base.
-
-
-
-
Remove all of the marked 1/2" Phillips #02 screws on the backside of the fan
-
Remove the two marked 3/4" Phillips #02 screws in the middle.
-
-
-
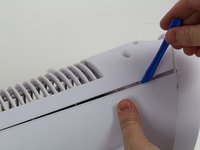
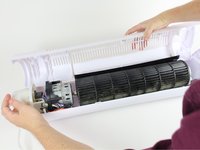
Use a plastic opening tool or screwdriver to pry off the back of the fan, starting from the top down.
-


To reassemble your device, follow these instructions in reverse order.
To reassemble your device, follow these instructions in reverse order.
Rückgängig: Ich habe diese Anleitung nicht absolviert.
2 weitere Personen haben diese Anleitung absolviert.
Team

Cal Poly, Team 11-6, Forte Fall 2015 Mitglied von Cal Poly, Team 11-6, Forte Fall 2015
CPSU-FORTE-F15S11G6
4 Mitglieder
4 Anleitungen geschrieben