Zum Hauptinhalt wechseln

Disassembling Keurig Mini B-31 Top

Grundständige Anleitung
Dies ist eine grundständige Anleitung, die nur als Teil einer anderen Anleitung verwendet werden sollte.

Was du brauchst

  1. Disassembling Keurig Mini B-31 Top, Top: Schritt 1, Bild 1 von 3 Disassembling Keurig Mini B-31 Top, Top: Schritt 1, Bild 2 von 3 Disassembling Keurig Mini B-31 Top, Top: Schritt 1, Bild 3 von 3
    • Open the top lid of the Keurig.

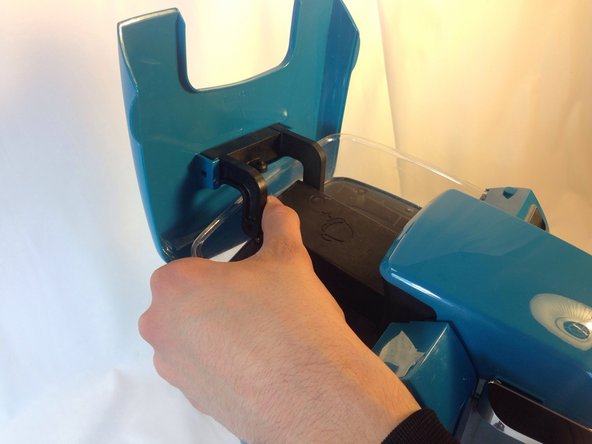
    • Pull directly outwards on one of the arms that holds the top lid in place. It will take some force to get the arm off the peg. Once one side is off, repeat the process on the second arm.

  2. Disassembling Keurig Mini B-31 Top: Schritt 2, Bild 1 von 1
    • Lay the Keurig on its back with the water reservoir pointing away from you.

  3. Disassembling Keurig Mini B-31 Top: Schritt 3, Bild 1 von 1
    • Avoid the top needle as it may puncture your hand.

    • Unscrew the two 9mm #1 Philips screws that hold the top plastic cover in place.

  4. Disassembling Keurig Mini B-31 Top: Schritt 4, Bild 1 von 1
    • Set the Keurig in an upright position with the front side facing you.

    • Pull the cover off the top of the Keurig. It should come off easily with little force.

  5. Disassembling Keurig Mini B-31 Top: Schritt 5, Bild 1 von 1
    • Firmly grasp the hose and pull it off of the plastic nozzle.

Abschluss

To reassemble your device, follow these instructions in reverse order.

Andrew Adriance

Mitglied seit: 01/14/14

1.914 Reputation

7 Anleitungen geschrieben

Team

Cal Poly, Team 17-1, Forte Winter 2014 Mitglied von Cal Poly, Team 17-1, Forte Winter 2014

CPSU-FORTE-W14S17G1

5 Mitglieder

17 Anleitungen geschrieben

0 Kommentare

Kommentar hinzufügen

Seitenaufrufe:

Letzte 24 Stunden: 0

Letzte 7 Tage: 0

Letzte 30 Tage: 0

Insgesamt: 79