Zum Hauptinhalt wechseln

Disassembling Laptop Toshiba Satellite P855 P850 plus Hinge FIX,

Was du brauchst

  1. Disassembling Laptop Toshiba Satellite P855 P850 plus Hinge FIX,, First look: Schritt 1, Bild 1 von 3 Disassembling Laptop Toshiba Satellite P855 P850 plus Hinge FIX,, First look: Schritt 1, Bild 2 von 3 Disassembling Laptop Toshiba Satellite P855 P850 plus Hinge FIX,, First look: Schritt 1, Bild 3 von 3
    • To open the laptop, first you have to unscrew the back-screws.

    • 1. remove the plastic/rubber caps

    • 2. unscrew the 12 screws.

    • ATTN: Do not forget!

    • unplug the laptop from power source & remove the batery

    • unscrew the 3 tiny screws behind the battery

    • keep the lid closed till later on

  2. Disassembling Laptop Toshiba Satellite P855 P850 plus Hinge FIX,, Back - HDD, WIFI card,: Schritt 2, Bild 1 von 3 Disassembling Laptop Toshiba Satellite P855 P850 plus Hinge FIX,, Back - HDD, WIFI card,: Schritt 2, Bild 2 von 3 Disassembling Laptop Toshiba Satellite P855 P850 plus Hinge FIX,, Back - HDD, WIFI card,: Schritt 2, Bild 3 von 3
    • Here you have some details regarding the back of the laptop. After you got read of the back cover you can access the following:

    • 1. WIFI card - Easy to change / replace There are two cables attached to it. Remove them, then unscrew the screw that holds the card in place and lift gently up - DONE.

    • 2. HDD / SSD. All you have to do is grab and pull the ribbon (as in photo). There are a few extra steps to change it.

  3. Disassembling Laptop Toshiba Satellite P855 P850 plus Hinge FIX,, Removing the keyboard: Schritt 3, Bild 1 von 3 Disassembling Laptop Toshiba Satellite P855 P850 plus Hinge FIX,, Removing the keyboard: Schritt 3, Bild 2 von 3 Disassembling Laptop Toshiba Satellite P855 P850 plus Hinge FIX,, Removing the keyboard: Schritt 3, Bild 3 von 3
    • Now to remove or change the keyboard

    • 1. Insert gently the cutte (or other sharp tool) and press towards the screen & flip up slowly.

    • To remove it completely unplug the two connectors.

    • After removing the keyboard you find:

    • 1.ECO Button

    • 2. Sound

    • 3. Power button

    • 4. Mouse pad

  4. Disassembling Laptop Toshiba Satellite P855 P850 plus Hinge FIX,, Removing the screws to open the case: Schritt 4, Bild 1 von 3 Disassembling Laptop Toshiba Satellite P855 P850 plus Hinge FIX,, Removing the screws to open the case: Schritt 4, Bild 2 von 3 Disassembling Laptop Toshiba Satellite P855 P850 plus Hinge FIX,, Removing the screws to open the case: Schritt 4, Bild 3 von 3
    • remove all the screws as shown in the images.

  5. Disassembling Laptop Toshiba Satellite P855 P850 plus Hinge FIX,, Splitting the case an upper side (under theh keyboard): Schritt 5, Bild 1 von 3 Disassembling Laptop Toshiba Satellite P855 P850 plus Hinge FIX,, Splitting the case an upper side (under theh keyboard): Schritt 5, Bild 2 von 3 Disassembling Laptop Toshiba Satellite P855 P850 plus Hinge FIX,, Splitting the case an upper side (under theh keyboard): Schritt 5, Bild 3 von 3
    • Opening the case is easy, follow the steps as shown.

    • To change / remove the speakers remove the screws.

    • To change / remove the Eco/3D button or power button, yo have to remove first the speakers.

  6. Disassembling Laptop Toshiba Satellite P855 P850 plus Hinge FIX,, Change / remove speakers and buttons (Power and Eco/3D): Schritt 6, Bild 1 von 3 Disassembling Laptop Toshiba Satellite P855 P850 plus Hinge FIX,, Change / remove speakers and buttons (Power and Eco/3D): Schritt 6, Bild 2 von 3 Disassembling Laptop Toshiba Satellite P855 P850 plus Hinge FIX,, Change / remove speakers and buttons (Power and Eco/3D): Schritt 6, Bild 3 von 3
    • Still more steps to come :), probably till 12... so min 6 more.

    • I will show you how to repair a broken hinge (plastic broken) - easy.

  7. Disassembling Laptop Toshiba Satellite P855 P850 plus Hinge FIX,, CPU fan cable remove: Schritt 7, Bild 1 von 1
    • Remove the fan cable

    • If you want to change the CPU fan, there are 2 screws that you have to remove (picture)

  8. Disassembling Laptop Toshiba Satellite P855 P850 plus Hinge FIX,, Start repairing the broken hinge: Schritt 8, Bild 1 von 3 Disassembling Laptop Toshiba Satellite P855 P850 plus Hinge FIX,, Start repairing the broken hinge: Schritt 8, Bild 2 von 3 Disassembling Laptop Toshiba Satellite P855 P850 plus Hinge FIX,, Start repairing the broken hinge: Schritt 8, Bild 3 von 3
    • Broken hinge, detailed photo

  9. Disassembling Laptop Toshiba Satellite P855 P850 plus Hinge FIX,, Repairing the broken hinge [detailed photo]: Schritt 9, Bild 1 von 3 Disassembling Laptop Toshiba Satellite P855 P850 plus Hinge FIX,, Repairing the broken hinge [detailed photo]: Schritt 9, Bild 2 von 3 Disassembling Laptop Toshiba Satellite P855 P850 plus Hinge FIX,, Repairing the broken hinge [detailed photo]: Schritt 9, Bild 3 von 3
    • Repairing the broken hinge [detailed photo]

  10. Disassembling Laptop Toshiba Satellite P855 P850 plus Hinge FIX,, Repairing the broken hinge [detailed photo] (2): Schritt 10, Bild 1 von 3 Disassembling Laptop Toshiba Satellite P855 P850 plus Hinge FIX,, Repairing the broken hinge [detailed photo] (2): Schritt 10, Bild 2 von 3 Disassembling Laptop Toshiba Satellite P855 P850 plus Hinge FIX,, Repairing the broken hinge [detailed photo] (2): Schritt 10, Bild 3 von 3
    • do not forget about the grey cable attached on the bottom side.

    • When reattaching the cable, put some thermal paste on the contact (gray cable)

  11. Disassembling Laptop Toshiba Satellite P855 P850 plus Hinge FIX,, Fixing the hinge with plastic dowel pin: Schritt 11, Bild 1 von 3 Disassembling Laptop Toshiba Satellite P855 P850 plus Hinge FIX,, Fixing the hinge with plastic dowel pin: Schritt 11, Bild 2 von 3 Disassembling Laptop Toshiba Satellite P855 P850 plus Hinge FIX,, Fixing the hinge with plastic dowel pin: Schritt 11, Bild 3 von 3
    • insert the plastic dowel pin from bottom-up and level it inside at the same height with other screw holes

  12. Disassembling Laptop Toshiba Satellite P855 P850 plus Hinge FIX,, Detailed img for inserting the plastic dowel pin: Schritt 12, Bild 1 von 3 Disassembling Laptop Toshiba Satellite P855 P850 plus Hinge FIX,, Detailed img for inserting the plastic dowel pin: Schritt 12, Bild 2 von 3 Disassembling Laptop Toshiba Satellite P855 P850 plus Hinge FIX,, Detailed img for inserting the plastic dowel pin: Schritt 12, Bild 3 von 3
    • follow the pics

  13. Disassembling Laptop Toshiba Satellite P855 P850 plus Hinge FIX,: Schritt 13, Bild 1 von 2 Disassembling Laptop Toshiba Satellite P855 P850 plus Hinge FIX,: Schritt 13, Bild 2 von 2
    • add some thermalpaste to the gray cable

  14. Disassembling Laptop Toshiba Satellite P855 P850 plus Hinge FIX,, Outside & inside finishing: Schritt 14, Bild 1 von 3 Disassembling Laptop Toshiba Satellite P855 P850 plus Hinge FIX,, Outside & inside finishing: Schritt 14, Bild 2 von 3 Disassembling Laptop Toshiba Satellite P855 P850 plus Hinge FIX,, Outside & inside finishing: Schritt 14, Bild 3 von 3
    • Cut the excess plastic from the dowel pin

    • Put some super-glue to fix it in place

  15. Disassembling Laptop Toshiba Satellite P855 P850 plus Hinge FIX,, Outside & inside finishing (2): Schritt 15, Bild 1 von 3 Disassembling Laptop Toshiba Satellite P855 P850 plus Hinge FIX,, Outside & inside finishing (2): Schritt 15, Bild 2 von 3 Disassembling Laptop Toshiba Satellite P855 P850 plus Hinge FIX,, Outside & inside finishing (2): Schritt 15, Bild 3 von 3
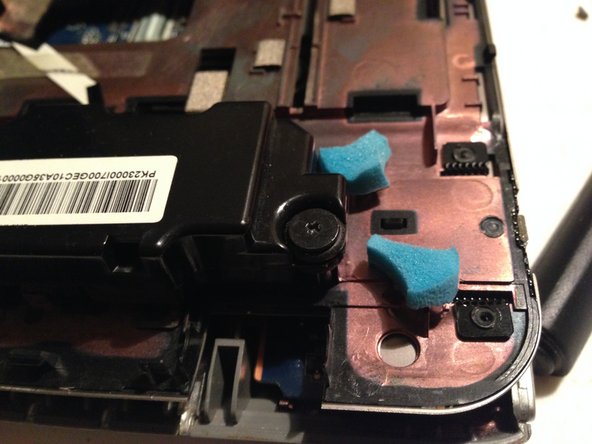
    • I have glued some foam near the speakers in order to protect the aerea

  16. Disassembling Laptop Toshiba Satellite P855 P850 plus Hinge FIX,, Final touches: Schritt 16, Bild 1 von 3 Disassembling Laptop Toshiba Satellite P855 P850 plus Hinge FIX,, Final touches: Schritt 16, Bild 2 von 3 Disassembling Laptop Toshiba Satellite P855 P850 plus Hinge FIX,, Final touches: Schritt 16, Bild 3 von 3
    • Glue inside the plastic dowel pin

    • Use thermal paste to fix the gray cable (i have used silver paste)

Abschluss

To reassemble your device, follow these instructions in reverse order.

10 weitere Nutzer:innen haben diese Anleitung absolviert.

Oscar SOTAN

Mitglied seit: 02/18/15

393 Reputation

1 Anleitung geschrieben

2 Kommentare

I have a slipped HDMI port. At which step would I be able to access that?

Preston Ruottinen - Antwort

My Toshibe C55T-B5349, I want to replace the "lid assembly" which includes the screen and digitizer. Can you give the steps? Thanks

RAM SAINATH - Antwort

Kommentar hinzufügen

Seitenaufrufe:

Letzte 24 Stunden: 2

Letzte 7 Tage: 14

Letzte 30 Tage: 53

Insgesamt: 35,232