Zum Hauptinhalt wechseln

Disassembling Razer Basilisk X Hyperspeed Top Case

Was du brauchst

    • First heat up the underside of the device, so the glue of the stickers softens up.

  1. Disassembling Razer Basilisk X Hyperspeed Top Case, Remove Stickers: Schritt 2, Bild 1 von 3 Disassembling Razer Basilisk X Hyperspeed Top Case, Remove Stickers: Schritt 2, Bild 2 von 3 Disassembling Razer Basilisk X Hyperspeed Top Case, Remove Stickers: Schritt 2, Bild 3 von 3
    • Remove the bottom sticker underneath the switch and the big one in the middle. You can drip isopropyl alcohol along the edges of the stickers to make them even easier to remove.

  2. Disassembling Razer Basilisk X Hyperspeed Top Case, Unscrew: Schritt 3, Bild 1 von 1
    • Remove all 4 screws.

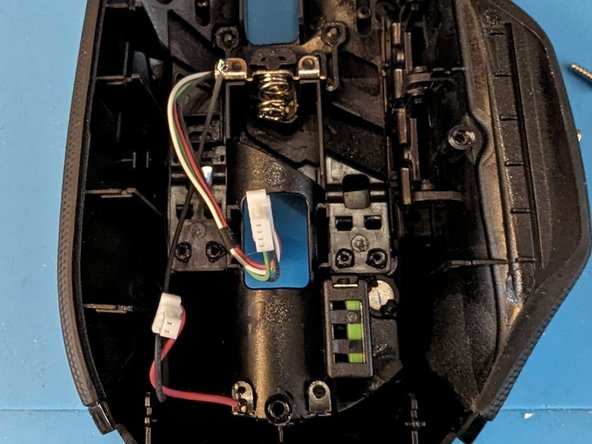
  3. Disassembling Razer Basilisk X Hyperspeed Top Case, Remove the Top: Schritt 4, Bild 1 von 2 Disassembling Razer Basilisk X Hyperspeed Top Case, Remove the Top: Schritt 4, Bild 2 von 2
    • Start by gently prying open the case from the bottom. Once the top case becomes loose, you will notice two white wire connectors. Carefully disconnect these to proceed.

  4. Disassembling Razer Basilisk X Hyperspeed Top Case, Admire your work: Schritt 5, Bild 1 von 1
    • And your done.

Abschluss

To reassemble your device, follow these instructions in reverse order.

Oliver

Mitglied seit: 04/14/23

97 Reputation

1 Anleitung geschrieben

Team

Global Fixers Mitglied von Global Fixers

Community

33 Mitglieder

577 Anleitungen geschrieben

0 Kommentare

Kommentar hinzufügen

Seitenaufrufe:

Letzte 24 Stunden: 4

Letzte 7 Tage: 32

Letzte 30 Tage: 113

Insgesamt: 114