Diese Version enthält möglicherweise inkorrekte Änderungen. Wechsle zur letzten geprüften Version.
Was du brauchst
-
Dieser Schritt ist noch nicht übersetzt. Hilf mit, ihn zu übersetzen!
-
Locate and remove all four black 12mm Phillips #02 screws from the underside of the console.
-
-
Dieser Schritt ist noch nicht übersetzt. Hilf mit, ihn zu übersetzen!
-
Turn the console right side up.
-
Remove the top cover by gently lifting the upper portion of the console.
-
-
Dieser Schritt ist noch nicht übersetzt. Hilf mit, ihn zu übersetzen!
-
Disconnect the white controller cable by gently pulling the the cable while wiggling it back and forth until it detaches from the controller board.
-
-
-
Dieser Schritt ist noch nicht übersetzt. Hilf mit, ihn zu übersetzen!
-
Remove the four 14mm Philips #02 screws located on the controller board.
-
-
Dieser Schritt ist noch nicht übersetzt. Hilf mit, ihn zu übersetzen!
-
Disconnect the white fan header from the controller port.
-
-
Dieser Schritt ist noch nicht übersetzt. Hilf mit, ihn zu übersetzen!
-
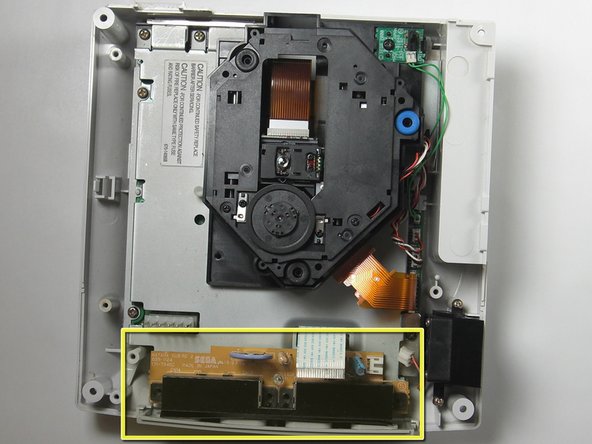
Remove the controller board by lifting it up from the controller port.
-
-
Dieser Schritt ist noch nicht übersetzt. Hilf mit, ihn zu übersetzen!
-
Note where the positive and negative terminals go.
-
Desolder the old CMOS battery from the controller board.
-
-
Dieser Schritt ist noch nicht übersetzt. Hilf mit, ihn zu übersetzen!
-
Solder the replacement battery holder to two electrical wires.
-
Solder the opposite ends of the wires to the controller board. Make sure to match corresponding points on the board with where the previous positive and negative terminals were.
-
-
Dieser Schritt ist noch nicht übersetzt. Hilf mit, ihn zu übersetzen!
-
Reinsert the controller board.
-
Attach the battery holder inside with a self adhesive substance, such as double sided foam tape.
-
Insert the battery into the battery holder.
-
Reverse the disassembly directions to reassemble your Dreamcast.
-
Once your Dreamcast is reassembled, go ahead and connect the Dreamcast to your TV or monitor and power, and reset the clock.
-


Rückgängig: Ich habe diese Anleitung nicht absolviert.
16 weitere Nutzer:innen haben diese Anleitung absolviert.
9 Kommentare
Something that should be noted, even if the pictures kind of hint at it, is that the power board - the large board to the left of the console in Step 3, picture 1 - needs to be removed BEFORE the controller board can be taken out. On my DC the pins that connect the power board to the motherboard have a surprisingly strong grip, so I needed to pull up on that end with some force to get it off. Definitely something to be careful with, as you don't want those pins getting bent out of shape, never mind broken.
Dont use non rechargeble batteries. you can replace it with the little square batteries you found in chinese mp3 headphones… they’re 3.7v, 2000mah and are perfect for the console. This kind of lithium polimer batteries tend to hold charge for as much as six months according to my experience. And they’re easy available, if you can’t find one, just purchase those little chinese micro SD mp3 players/headphones , they’ll have one of this kind inside. Be sure the voltage is 3.7 at a maximum 2.000 mah