Diese Anleitung enthält neuere Änderungen. Wechsel zur neuesten unüberprüften Version.
Einleitung
Diese Anleitung zeigt dir, wie du den 3,7 V Lithium Akku im Dual Shock 4 ersetzen kannst.
Was du brauchst
-
-
Entferne die vier 6,0 mm PH00 Schrauben, die die hintere Abdeckung am Controller befestigen.
-
-
-
Beginne am linken Handgriff:
-
Quetsche den linken Handgriff um einen Spalt zu erzeugen.
-
Zwänge ein Öffnungswerkzeug in die Öffnung und schiebe es in Richtung Joystick.
-
Drücke das Werkzeug nach unten bis der Deckel abspringt.
-
Wiederhole das Ganze für den rechten Handgriff.
-
-
-
-
Zwänge das Öffnungswerkzeug in den Spalt zwischen den Gehäusehälften und drücke ihn nach unten um das Gehäuse in der Nähe folgender Knöpfe zu öffnen:
-
Teilen Knopf
-
Optionen Knopf
-
Nimm die Plastikdeckel auseinander, achte darauf, dass immer noch Flachbandkabel daran hängen.
-
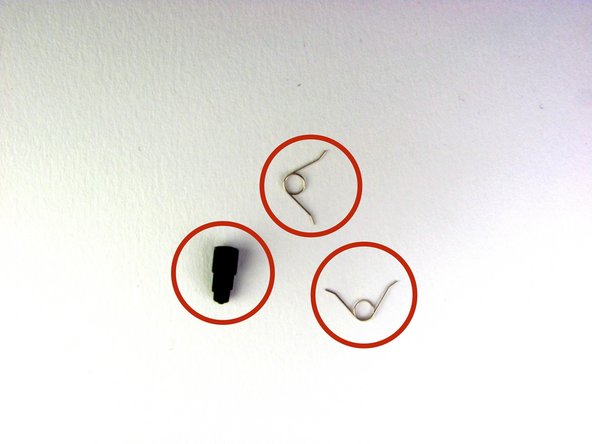
Zwei Federn an den Auslösern.
-
ein graue Verlängerung für den Reset Knopf.
-
-
-
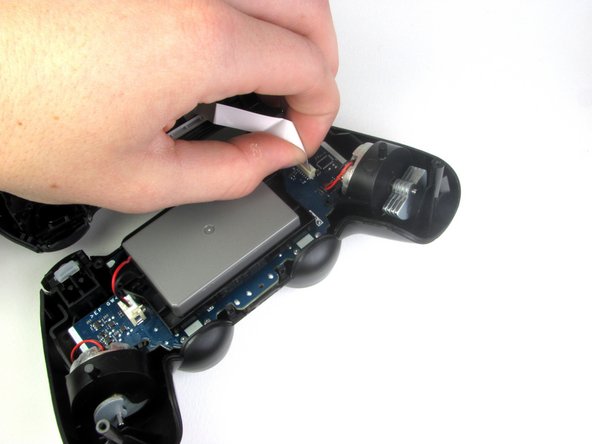
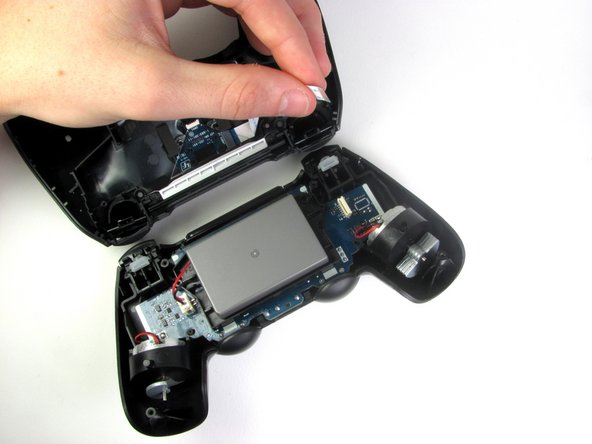
Löse das Flachbandkabel an der Hauptplatine, welches die beiden Hälften des Controllers verbindet, indem du es mit deinen Fingern gerade herausziehst.
-
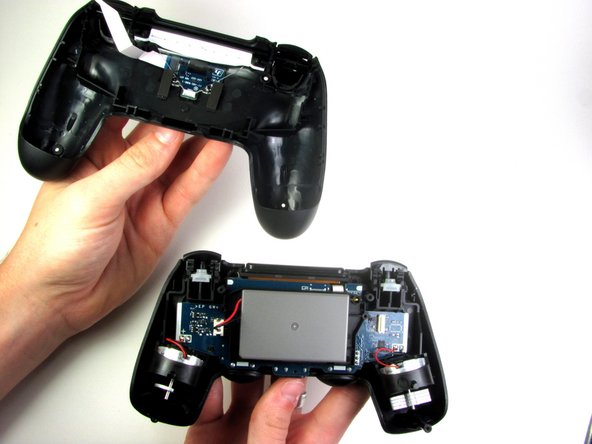
Nachdem du die beiden Teile getrennt hast, lege das Oberteil zur Seite.
-
-
-
Löse den Akkustecker vorsichtig mit einer stumpfen gewinkelten Pinzette, indem du diese an den Seiten des Steckers ansetzt.
-
Wenn der Stecker von der Hauptplatine gelöst ist kannst du den Akku herausheben.
-
Um dein Gerät wieder zusammen zu setzen folge den Schritten in umgekehrter Reihenfolge.
Um dein Gerät wieder zusammen zu setzen folge den Schritten in umgekehrter Reihenfolge.
Rückgängig: Ich habe diese Anleitung nicht absolviert.
206 weitere Nutzer:innen haben diese Anleitung absolviert.
Besonderer Dank geht an diese Übersetzer:innen:
100%
Diese Übersetzer:innen helfen uns, die Welt zu reparieren! Wie kann ich mithelfen?
Hier starten ›
29 Kommentare
My Dualshock 4 wont turn on after the battery replacement.
Any idea on why this happened?
have you tried to charge it?
I found a replacement battery here, you have to mod the tray a little, but it works like a champ and doubles the life.
The x button on my controller want working properly so I ordered new rubber mounts. I followed the guide, taking my time to make sure I didn't damage anything.
With the new rubber in place I put everything back together and the controller was working fine but now I've realised it doesn't charge. The battery goes completely dead and switches off. If I then connect it with usb cable it doesn't charge but will turn on the controller for maybe 10 seconds before switching off again.
Anyone any idea what is going on? Thanks.
my controller is not starting today
Did this fix to the letter, controller works now but the light bar does not and I'm unsure if it charges. It shows it's fully charged. Could it be that the micro-usb connection is frapped?
Ok, so it shows it’s fully charged on the PS4 but the light on the controller is out if I’m reading you right. Method I would use… connect the controller to your computer with a wired cable (eliminating the PS4 from the equation).
Check Device Manager in Windows or System Report on a Mac. Does it show your controller?
Yes = USB port on controller is fine, you may have damaged the LED on it during the repair.
No = USB port may be damaged or the cable may be fried.
Your problem doesn’t seem like it would have anything to do with the USB port. If it works but with no lighting, you should be ok unless you use the controller with the PS4 camera.
Brad S -
The battery outlet got ripped off. Can it still be fixed?
Anything can be fixed. But without knowing how severe the damage is it’s hard to say how difficult it would be, although it may involve cannibalizing another controller. At this point it may be cheaper to just purchase a new Dual Shock.
Brad S -
Hi I have two PS 4 controller that wont charged. I had checked with all the possibilities before purchasing two new 2000 Mah replacement batterries. But after replacing the old batteries, I noticed that one of them stopped charging. I thought it had reached the capacity to the full, but to my surprise it did not work, the light is just blinking when I turned it on. I reset the unit but remmained the same !!!
Could it be the charging port got damaged ??? Kindly advice
my other controller is still charging and I have not tested it.
By the way, I plugged into the computer…the device manager did not read the presence of the PS 4 controller , could it be the USB port is damaged ???Kindly advice
I have a simple question…..I replaced my sons PS4 battery with a replacement battery and charging cable……I plugged it all back in as shown…..Now the controller is working……But the battery level on the console/tv is showing it’s charging…..But it does work…….Any idea or reason why the new battery or controller is showing charging still without being connected to the usb? Ty
Be carefull with 2000mah batteries. I’m talking about V2 Dualshock 4. The original battery : 54mm x 35mm x 8,5 mm and 24g with the hardcase. In this space, you can’t have a 2000mah. Check the size of a true 2000mah 3,7v cell, and you will see a really bigger size. So, these replacement batteries with the same look as the original one, are fake ! If they work, because many are dead and don’t work at all, you will never have 2000mah. I found a true new 3,7v li-ion cell on Ebay, that fits perfectly, but it’s a 1500mah, and without a hardcase. I had to weld the original connector, but it fits perfectly. Not any voltage problem. So, if you need a new battery, don’t bought any hardcase version, and check the dimensions and weight.
so what happens if your controller requires a smaller insert (that is circular and not a square input [which is provided standard in the 2k mah? Same module number but different connectors?
I had trouble with analoge, I fixed that but FPC (flat connector) on mainboard broken and I soldered new 12 pin FPC on mainboard again, but in reverse!
then I put charging cable and the dualshock did not turn on , and I sensed that the dualshock is heating up, I remove charging cable as soon as possible.
problem is this : negative and positive putted in reverse.
I don’t kwow what happen if I solder new FPC in right position .
Does it work or somethings going to out of service?
sorry formy poor English language .
regards,
Hamed
i struggled with the reassembly; its much easier if you attach the L2 and R2 buttons to the upper half of the controller.
follow these steps:
reattach first the battery, then the cable with the blue pull tab.
then assemble the L2 and R2 buttons as follows: make sure to position the springs in their appropriate slots (especially at the hinge receptecle at the upper shell, align the spring and hinges and push it into the holder.
only then assemble the two body halfes together by first guiding the L1&2 and R1&2 buttons in their correct location. finally slightly bend the long studs into the handle grips and tighten all 4 screws.
I can’t get the battery connector cable out of the socket. I tried to remove it for 15 minutes and it wouldn’t come out.
My dualshock 4 is charging but isn't turning on
How can I check which model/version is my controller? (I dont have the back sticker , it fell out a while ago)
Hi! From looking at the V2 guides, I found a couple distinguishing factors in each controller. The body design near the vibration motors, the shape and color of the motherboard, and the shape of the plastic around the triggers are all key features to compare between models. Use photos from our disassembly guides for each model, and compare the parts of your controller to parts sold on this site or elsewhere to identify your model.
As of March 14, 2023, this guide has been updated! Comments regarding step procedures may no longer be relevant.
Will this guide work with the cuh-zct1e PS4 controller model?
It's likely to be physically the same. There may be a minor component missing or added between variations of these controllers. But, for a battery replacement, it will be at least close to the same opening process.
Thanks Clay! I'll give it a go and coment here if I come across any devastating differences or difficulties!
Sure thing, I'll watch my notifications. When you do open it up, be mindful of the small shoulder clips. Everything else can be experimented on, without too much risk of breaking clips.
SWo when I pluggeged un the battery you I bought from you I bnlew up my controlner and it smelt fvery bad


