Einleitung
Use this guide to replace or clean the analog sticks on the Dualshock 4 controller.
Was du brauchst
-
-
Using the Phillips #00 Screwdriver, remove the four 6.0 mm screws securing the rear cover to the controller.
-
-
-
Beginning with the left handle:
-
Pinch the left handle of the controller to introduce an opening.
-
Wedge a plastic opening tool into the opening and slide it up towards the joystick.
-
Pull down on tool to pry open the casing.
-
Repeat these steps for the right handle.
-
-
-
Wedge a plastic opening tool into the case-splittings and pull down to crack open the casing near the following buttons:
-
Share button
-
Options button
-
Split the plastic covers of the controller apart, taking note that they will still be attached by circuit board ribbons.
-
2 Trigger Springs
-
1 Grey Reset Button Extension
-
-
-
Use tweezers or your fingers to grab and disconnect the head of the battery cable from the motherboard.
-
-
-
-
Remove the single 6.0 mm Phillips screw found below the battery retainer with the Phillips #00 Screwdriver.
-
-
-
Gently detach the touchpad ribbon connected to the motherboard using the blunt forceps. The touchpad ribbon is connected to the motherboard by a connector that flips to tighten and loosen. During reassembly, to reattach the ribbon, the plastic tray will need to be gently removed from the motherboard and the flip-lock flipped up.
-
-
-
Carefully dislodge the motherboard assembly from the front cover.
-
Vibration motors are loosely attached to the motherboard assembly. Provide support at the two ends to ease the separation.
-
-
-
Successful disassembly of the controller will result in the following three parts, respectively:
-
Motherboard Assembly
-
Front Cover
-
Rear Cover
-
-
-
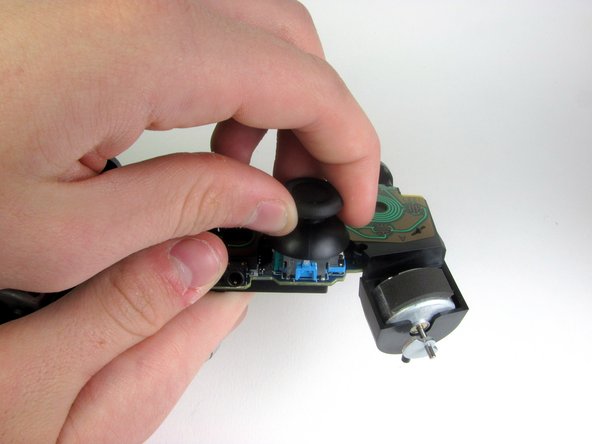
Pull the analog stick covers straight off the joystick posts attached to the motherboard with your fingers.
-


To reassemble your device, follow these instructions in reverse order.
To reassemble your device, follow these instructions in reverse order.
Rückgängig: Ich habe diese Anleitung nicht absolviert.
134 weitere Nutzer:innen haben diese Anleitung absolviert.

Team

Cal Poly, Team 6-21, Maness Winter 2014 Mitglied von Cal Poly, Team 6-21, Maness Winter 2014
CPSU-MANESS-W14S6G21
4 Mitglieder
40 Anleitungen geschrieben
14 Kommentare
So I followed all the steps, got the sticks in. But when I put the controller back together it Wouldent turn on. Do you guys have any clue as to what it could be?
Same exact thing happened to me, just wouldn't turn back on
Me too and all the reconnected cables are connected correctly, but it just won’t work.
Andy Hui -
Hope you guys still keep the parts, since the problem can be resolved by following the post below successfully. :)
Andy Hui -
i think you didn't put a wire in
Does this fix the issue with worn out sticks? Mine currently at idle will get stuck slightly pressing to the left, (in game, I'll be cruising left at a snail's pace) and pressing up/forward or sometimes pressing to the right doesn't fully work (in game this causes me to either not move at all, or move at about 2/3rds speed).
I've had them for about two years now, and they have seen some rigorous use, I tell you what. It is beginning to affect gameplay pretty badly, though.
Thank you for the guide - it helped me fix a beaten up DS4 controller I found on the flea market. However, it would be nice to explain a bit more in detail how to crack the case pieces open. Some detailed pictures with the different inside clips and hinges would be nice. Also, there is no explanation as to how to assemble the L2/R2 triggers back together. Last, but not least, there is no explanation as to how to remove the battery tray, in order to connect the touchpad to the motherboard.
It actually opens quite easily. I'm female with shaky fingers and didn't have a plastic pry tool. Broke the last one opening iPhones. I took a very small flat too screw driver from my electronic tool set, stuck it in at the same spot he showed and just gently pried all around. It opened fairly easily with nothing breaking. When it was almost all the way open I did go to the opposite side and gently loosened up thevither end, just so it would open straight. It's easy as long as you are gentle with it
If parts to the controller should be replaced how would you know? Is there a circuit test proceedure for the mother board? How would you know to replace other items when you are disassembling the controller? Thank you for the assistance with my controller and your time you have taken to help. Have a great one!
Thank you for the guide !
This doesn't look easy and there are opportunities to mess things up. Also, it might be hard to find an unused analog stick cover. I would try silicone joystick caps from eBay before attempting this guide.
Sometimes plastic or rubber items I handle become extremely sticky and can't be cleaned. This is a very annoying problem for me. I remember my stepdad yelling at me because I'd made swimming goggles sticky, and he also thought I'd covered bicycle handlebars with glue to make my hands stick better. Really I think it's just resins and plasticizers leeching out because of my sweat. I had the same problem with my PS4 controller's joysticks. No matter how carefully I wash my hands or clean the controller they're sticky. If I were to sell it for parts I wouldn't want someone to buy my sticky joystick covers.
I bought some silicone joystick caps from eBay and they were easy to install, I just stretched them over my existing joysticks. They've even got some little bumps that help with grip.
As of March 14, 2023, this guide has been updated! Comments regarding step procedures may no longer be relevant.