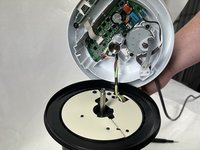
Zum Hauptinhalt wechseln

Dyson Pure Cool AM11 Oscillation Motor Replacement

Was du brauchst

  1. Dyson Pure Cool AM11 Oscillation Motor Replacement, Base: Schritt 1, Bild 1 von 3 Dyson Pure Cool AM11 Oscillation Motor Replacement, Base: Schritt 1, Bild 2 von 3 Dyson Pure Cool AM11 Oscillation Motor Replacement, Base: Schritt 1, Bild 3 von 3
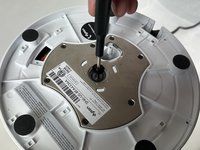
    • With the device flipped upside down, use a Phillips #1 screwdriver to remove the 4 screws holding the 3 tabs down.

  2. Dyson Pure Cool AM11 Oscillation Motor Replacement: Schritt 2, Bild 1 von 3 Dyson Pure Cool AM11 Oscillation Motor Replacement: Schritt 2, Bild 2 von 3 Dyson Pure Cool AM11 Oscillation Motor Replacement: Schritt 2, Bild 3 von 3
    • Remove all 3 tabs that you unscrewed.

  3. Dyson Pure Cool AM11 Oscillation Motor Replacement: Schritt 3, Bild 1 von 2 Dyson Pure Cool AM11 Oscillation Motor Replacement: Schritt 3, Bild 2 von 2
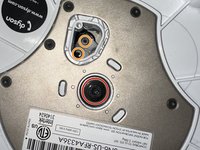
    • Using a Torx T20 Screwdriver, remove the screw in the center of the base.

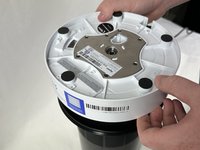
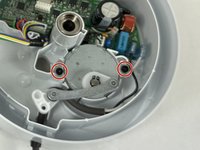
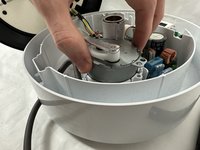
    • Remove the two screws connected to the rotation arm.

  4. Dyson Pure Cool AM11 Oscillation Motor Replacement: Schritt 4, Bild 1 von 3 Dyson Pure Cool AM11 Oscillation Motor Replacement: Schritt 4, Bild 2 von 3 Dyson Pure Cool AM11 Oscillation Motor Replacement: Schritt 4, Bild 3 von 3
    • Lift the base of the housing from the rest of the fan.

    • Be careful not to pull too hard while lifting the lower body housing as there is wires that run throughout the housing that could be damaged if too much force is used.

  5. Dyson Pure Cool AM11 Oscillation Motor Replacement, Oscillation Motor: Schritt 5, Bild 1 von 2 Dyson Pure Cool AM11 Oscillation Motor Replacement, Oscillation Motor: Schritt 5, Bild 2 von 2
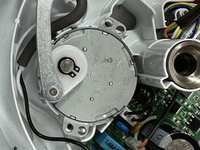
    • Using a T20 Torx screwdriver, remove the two screws on either side of the motor.

  6. Dyson Pure Cool AM11 Oscillation Motor Replacement: Schritt 6, Bild 1 von 2 Dyson Pure Cool AM11 Oscillation Motor Replacement: Schritt 6, Bild 2 von 2
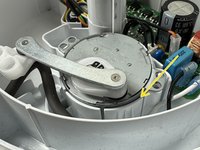
    • (Optionally) Use a jimmy around the edge of the motor to loosen it from its housing.

    • Lift the motor out of its housing.

    • Ensure that you do not grab the motor by the swing arm as you may damage both the motor and surrounding components.

Ziellinie

Eine weitere Person hat diese Anleitung absolviert.

Team

UMass Dartmouth, Team 2-7, Gulbrandsen Fall 2023 Mitglied von UMass Dartmouth, Team 2-7, Gulbrandsen Fall 2023

UMASSD-GULBRANDSEN-F23S2G7

3 Mitglieder

5 Anleitungen geschrieben

2 Kommentare

Where’d you get the motor

Jon Murch - Antwort

any luck finding the proper motor replacement?

Kay -

Kommentar hinzufügen

Seitenaufrufe:

Letzte 24 Stunden: 1

Letzte 7 Tage: 16

Letzte 30 Tage: 47

Insgesamt: 738