Zum Hauptinhalt wechseln

EDCO Floor Stripper TS8 .75L (2017) Power Cord Replacement

Was du brauchst

  1. EDCO Floor Stripper TS8 .75L (2017) Power Cord Replacement, Safety precautions: Schritt 1, Bild 1 von 1
    • Before you begin, ensure the device is powered down and cool to the touch.

    • Ensure the machine is unplugged.

    • Turn the power switch counterclockwise into the OFF position.

  2. EDCO Floor Stripper TS8 .75L (2017) Power Cord Replacement, Remove the screw from the red knob: Schritt 2, Bild 1 von 1
    • Use a Phillips screwdriver to remove the screw from the center of the red on/off knob.

  3. EDCO Floor Stripper TS8 .75L (2017) Power Cord Replacement, Remove the knob: Schritt 3, Bild 1 von 2 EDCO Floor Stripper TS8 .75L (2017) Power Cord Replacement, Remove the knob: Schritt 3, Bild 2 von 2
    • Remove the red knob.

    • This component is keyed. During reassembly, ensure it is reinstalled in the correct orientation.

  4. EDCO Floor Stripper TS8 .75L (2017) Power Cord Replacement, Remove the black cap: Schritt 4, Bild 1 von 1
    • Remove the black plastic cap from the center of the switch assembly.

    • This component is keyed. During reassembly, ensure it is reinstalled in the correct orientation.

  5. EDCO Floor Stripper TS8 .75L (2017) Power Cord Replacement: Schritt 5, Bild 1 von 1
    • Use a Phillips screwdriver to remove the two screws securing the yellow switch guide to the switch assembly.

    • During reassembly, ensure this component is installed in the same orientation, with the circle in the 6 o'clock OFF position.

  6. EDCO Floor Stripper TS8 .75L (2017) Power Cord Replacement: Schritt 6, Bild 1 von 3 EDCO Floor Stripper TS8 .75L (2017) Power Cord Replacement: Schritt 6, Bild 2 von 3 EDCO Floor Stripper TS8 .75L (2017) Power Cord Replacement: Schritt 6, Bild 3 von 3
    • Remove the yellow switch guide from the switch assembly.

    • Remove the black plastic spacer from underneath the yellow switch guide.

  7. EDCO Floor Stripper TS8 .75L (2017) Power Cord Replacement, Remove the upper switch housing: Schritt 7, Bild 1 von 1
    • Use a Phillips screwdriver to remove the four screws securing the upper half of the switch housing to the lower half.

    • These screws may not come out of their recesses in the housing once they are completely unthreaded. If some stay inside once loose, don't lose track of them.

  8. EDCO Floor Stripper TS8 .75L (2017) Power Cord Replacement: Schritt 8, Bild 1 von 3 EDCO Floor Stripper TS8 .75L (2017) Power Cord Replacement: Schritt 8, Bild 2 von 3 EDCO Floor Stripper TS8 .75L (2017) Power Cord Replacement: Schritt 8, Bild 3 von 3
    • Lift the upper half of the switch housing off of the lower half."

    • The rubber gasket may fall out of the upper housing during the removal process. Do not forget to reinstall the gasket upon reassembly.

  9. EDCO Floor Stripper TS8 .75L (2017) Power Cord Replacement, Disconnect the power cord from the frame: Schritt 9, Bild 1 von 1
    • Use a 3/8 inch socket to remove the bolt securing the power cord loom clamp to the switch bracket.

  10. EDCO Floor Stripper TS8 .75L (2017) Power Cord Replacement, Remove the loom clamp: Schritt 10, Bild 1 von 3 EDCO Floor Stripper TS8 .75L (2017) Power Cord Replacement, Remove the loom clamp: Schritt 10, Bild 2 von 3 EDCO Floor Stripper TS8 .75L (2017) Power Cord Replacement, Remove the loom clamp: Schritt 10, Bild 3 von 3
    • Remove the loom clamp from the power cable.

  11. EDCO Floor Stripper TS8 .75L (2017) Power Cord Replacement, Remove the switch housing: Schritt 11, Bild 1 von 3 EDCO Floor Stripper TS8 .75L (2017) Power Cord Replacement, Remove the switch housing: Schritt 11, Bild 2 von 3 EDCO Floor Stripper TS8 .75L (2017) Power Cord Replacement, Remove the switch housing: Schritt 11, Bild 3 von 3
    • Use a socket to remove the four 11/32 inch nuts from the on/off switch bracket.

    • During reassembly, use a Phillips screwdriver in combination with the 11/32 inch socket wrench to tighten the bolts securing the switch to the bracket."

  12. EDCO Floor Stripper TS8 .75L (2017) Power Cord Replacement: Schritt 12, Bild 1 von 2 EDCO Floor Stripper TS8 .75L (2017) Power Cord Replacement: Schritt 12, Bild 2 von 2
    • Lift the switch assembly off of the switch bracket.

    • The switch housing bolts may fall out when you remove the housing.

  13. EDCO Floor Stripper TS8 .75L (2017) Power Cord Replacement, Disconnect the green wires: Schritt 13, Bild 1 von 1
    • Use a flathead screwdriver to remove the screw securing the two green ground wires to the switch housing.

  14. EDCO Floor Stripper TS8 .75L (2017) Power Cord Replacement: Schritt 14, Bild 1 von 3 EDCO Floor Stripper TS8 .75L (2017) Power Cord Replacement: Schritt 14, Bild 2 von 3 EDCO Floor Stripper TS8 .75L (2017) Power Cord Replacement: Schritt 14, Bild 3 von 3
    • Separate the green ground wires from each other and move them away from the switch housing.

  15. EDCO Floor Stripper TS8 .75L (2017) Power Cord Replacement, Disconnect the power cord from the switch: Schritt 15, Bild 1 von 1
    • Use a flathead screwdriver to loosen the two screws on the right side of the switch assembly securing the black and white wires from the power cord.

    • During reassembly, ensure each wire is installed in its correct location on the switch.

  16. EDCO Floor Stripper TS8 .75L (2017) Power Cord Replacement: Schritt 16, Bild 1 von 3 EDCO Floor Stripper TS8 .75L (2017) Power Cord Replacement: Schritt 16, Bild 2 von 3 EDCO Floor Stripper TS8 .75L (2017) Power Cord Replacement: Schritt 16, Bild 3 von 3
    • Remove the black wire from the switch.

  17. EDCO Floor Stripper TS8 .75L (2017) Power Cord Replacement: Schritt 17, Bild 1 von 3 EDCO Floor Stripper TS8 .75L (2017) Power Cord Replacement: Schritt 17, Bild 2 von 3 EDCO Floor Stripper TS8 .75L (2017) Power Cord Replacement: Schritt 17, Bild 3 von 3
    • Remove the white wire from the switch.

  18. EDCO Floor Stripper TS8 .75L (2017) Power Cord Replacement: Schritt 18, Bild 1 von 3 EDCO Floor Stripper TS8 .75L (2017) Power Cord Replacement: Schritt 18, Bild 2 von 3 EDCO Floor Stripper TS8 .75L (2017) Power Cord Replacement: Schritt 18, Bild 3 von 3
    • Use a 1-1/16 inch wrench or an adjustable wrench to loosen the power cord's strain relief fitting from the switch housing.

    • Once the fitting is loose enough to turn by hand, twist the power cord and fitting counterclockwise until it is fully unthreaded from the switch housing.

  19. EDCO Floor Stripper TS8 .75L (2017) Power Cord Replacement, Remove the power cord: Schritt 19, Bild 1 von 3 EDCO Floor Stripper TS8 .75L (2017) Power Cord Replacement, Remove the power cord: Schritt 19, Bild 2 von 3 EDCO Floor Stripper TS8 .75L (2017) Power Cord Replacement, Remove the power cord: Schritt 19, Bild 3 von 3
    • Remove the power cord from the on/off switch.

  20. EDCO Floor Stripper TS8 .75L (2017) Power Cord Replacement, Transfer the strain relief fitting to the new cord: Schritt 20, Bild 1 von 2 EDCO Floor Stripper TS8 .75L (2017) Power Cord Replacement, Transfer the strain relief fitting to the new cord: Schritt 20, Bild 2 von 2
    • If the replacement power cord comes with a strain relief fitting pre-installed, skip the remaining steps and begin reassembly

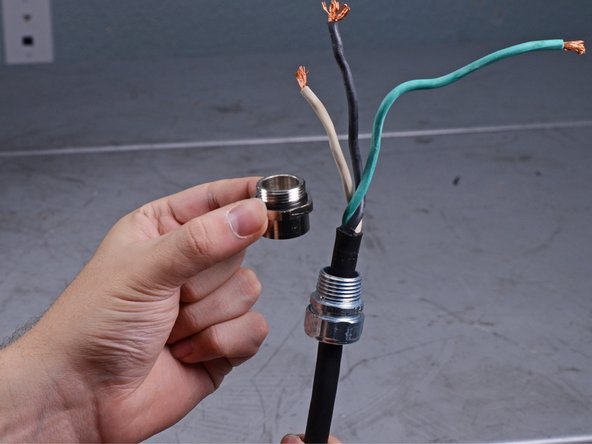
    • Use two adjustable wrenches to unscrew the strain relief fitting by turning the locknut counterclockwise relative to the fitting.

    • 1-1/16 inch lock nut

    • 15/16 inch strain relief fitting

    • Reassembly tip: note the length from the end of the power cord to the strain relief fitting. Match this length as close as possible when reinstalling the fitting.

  21. EDCO Floor Stripper TS8 .75L (2017) Power Cord Replacement: Schritt 21, Bild 1 von 3 EDCO Floor Stripper TS8 .75L (2017) Power Cord Replacement: Schritt 21, Bild 2 von 3 EDCO Floor Stripper TS8 .75L (2017) Power Cord Replacement: Schritt 21, Bild 3 von 3
    • Remove the lock nut from the power cord.

  22. EDCO Floor Stripper TS8 .75L (2017) Power Cord Replacement: Schritt 22, Bild 1 von 3 EDCO Floor Stripper TS8 .75L (2017) Power Cord Replacement: Schritt 22, Bild 2 von 3 EDCO Floor Stripper TS8 .75L (2017) Power Cord Replacement: Schritt 22, Bild 3 von 3
    • Insert a flathead screwdriver into the fitting and push the blue grommet out to remove it from the housing.

  23. EDCO Floor Stripper TS8 .75L (2017) Power Cord Replacement: Schritt 23, Bild 1 von 3 EDCO Floor Stripper TS8 .75L (2017) Power Cord Replacement: Schritt 23, Bild 2 von 3 EDCO Floor Stripper TS8 .75L (2017) Power Cord Replacement: Schritt 23, Bild 3 von 3
    • Remove the fitting from the power cord.

  24. EDCO Floor Stripper TS8 .75L (2017) Power Cord Replacement: Schritt 24, Bild 1 von 3 EDCO Floor Stripper TS8 .75L (2017) Power Cord Replacement: Schritt 24, Bild 2 von 3 EDCO Floor Stripper TS8 .75L (2017) Power Cord Replacement: Schritt 24, Bild 3 von 3
    • Remove the grommet from the power cord.

  25. EDCO Floor Stripper TS8 .75L (2017) Power Cord Replacement: Schritt 25, Bild 1 von 3 EDCO Floor Stripper TS8 .75L (2017) Power Cord Replacement: Schritt 25, Bild 2 von 3 EDCO Floor Stripper TS8 .75L (2017) Power Cord Replacement: Schritt 25, Bild 3 von 3
    • Remove the remaining nut and washer from the power cable.

    • These may have slid down the power cable during the previous steps.

  26. EDCO Floor Stripper TS8 .75L (2017) Power Cord Replacement: Schritt 26, Bild 1 von 1
    • Only the power cord remains.

Abschluss

To reassemble your device, follow these instructions in reverse order.

2 weitere Nutzer:innen haben diese Anleitung absolviert.

Robert Boyd

Mitglied seit: 02/01/21

26.386 Reputation

94 Anleitungen geschrieben

0 Kommentare

Kommentar hinzufügen

Seitenaufrufe:

Letzte 24 Stunden: 0

Letzte 7 Tage: 3

Letzte 30 Tage: 16

Insgesamt: 421