Diese Version enthält möglicherweise inkorrekte Änderungen. Wechsle zur letzten geprüften Version.
Was du brauchst
-
Dieser Schritt ist noch nicht übersetzt. Hilf mit, ihn zu übersetzen!
-
Remove the back panel by inserting your fingers into the indentations next to the tabs. Press the tabs inward towards each other while pulling the back panel toward you.
-
-
Dieser Schritt ist noch nicht übersetzt. Hilf mit, ihn zu übersetzen!
-
Using the T10 Torx Security Bit Screwdriver, unscrew the screws on the upper left and right corners of the inner panel to remove the inner back panel.
-
-
Dieser Schritt ist noch nicht übersetzt. Hilf mit, ihn zu übersetzen!
-
Press down on the two plastic hinges to remove the upper portion of printer.
-
-
Dieser Schritt ist noch nicht übersetzt. Hilf mit, ihn zu übersetzen!
-
Grasp the plastic plug on the end of the speaker wire, then gently pull the plug away from the printer until the wire is removed.
-
-
-
Dieser Schritt ist noch nicht übersetzt. Hilf mit, ihn zu übersetzen!
-
Rotate the printer so the paper tray is facing towards you.
-
Gently lift the scanner tray up and away from the printer.
-
Press the gray plastic tabs inward to release the tabs from the printer.
-
-
Dieser Schritt ist noch nicht übersetzt. Hilf mit, ihn zu übersetzen!
-
Returning to the back of the printer, remove the scanner from the back hinges.
-
-
Dieser Schritt ist noch nicht übersetzt. Hilf mit, ihn zu übersetzen!
-
Gently grasp and unplug the two white ribbon cables from the printer body.
-
-
Dieser Schritt ist noch nicht übersetzt. Hilf mit, ihn zu übersetzen!
-
Unplug the white plastic multi-wire connector (with orange, black, red, and brown wires) from it's port.
-
-
Dieser Schritt ist noch nicht übersetzt. Hilf mit, ihn zu übersetzen!
-
Detach the scanner tray from the printer by lifting the scanner tray off the printer body.
-
-
Dieser Schritt ist noch nicht übersetzt. Hilf mit, ihn zu übersetzen!
-
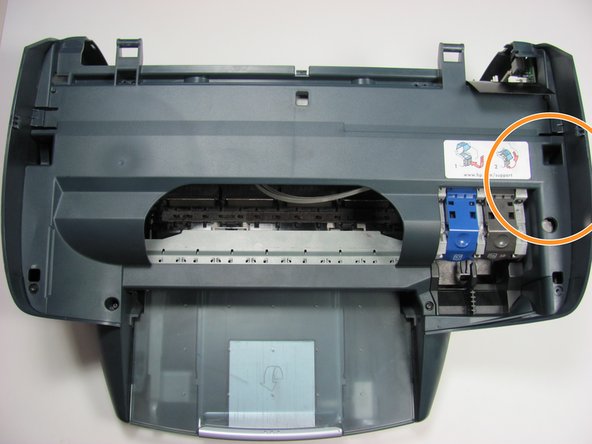
Locate the panel labeled with a HP support link sticker.
-
Release the tab by the support link sticker.
-
Remove the black screw below the tab.
-
-
Dieser Schritt ist noch nicht übersetzt. Hilf mit, ihn zu übersetzen!
-
Remove the two black screws closest to the printer tray.
-
-
Dieser Schritt ist noch nicht übersetzt. Hilf mit, ihn zu übersetzen!
-
Unhook the encoder strip from its small silver hooks and remove it from the printer.
-
To replace, feed the new encoder strip through the silver hooks.
-


Rückgängig: Ich habe diese Anleitung nicht absolviert.
4 weitere Nutzer:innen haben diese Anleitung absolviert.
Team

Cal Poly, Team 12-31, Maness Spring 2011 Mitglied von Cal Poly, Team 12-31, Maness Spring 2011
CPSU-MANESS-S11S12G31
5 Mitglieder
9 Anleitungen geschrieben