Zum Hauptinhalt wechseln

Epiphone Les Paul Special Input Jack Replacement

Was du brauchst

  1. Epiphone Les Paul Special Input Jack Replacement, Input Jack: Schritt 1, Bild 1 von 1
    • Using a Phillips #1 screwdriver, remove the four 7 mm screws holding the input jack cover.

  2. Epiphone Les Paul Special Input Jack Replacement: Schritt 2, Bild 1 von 1
    • With a 12 mm wrench, remove the nut holding the input jack in place.

  3. Epiphone Les Paul Special Input Jack Replacement: Schritt 3, Bild 1 von 2 Epiphone Les Paul Special Input Jack Replacement: Schritt 3, Bild 2 von 2
    • Lift off the tone control knob.

  4. Epiphone Les Paul Special Input Jack Replacement: Schritt 4, Bild 1 von 1
    • Using an 11 mm wrench, remove the nut of the tone control.

  5. Epiphone Les Paul Special Input Jack Replacement: Schritt 5, Bild 1 von 1
    • With a Phillips #1 screwdriver, remove the three 7 mm screws holding on the back plate.

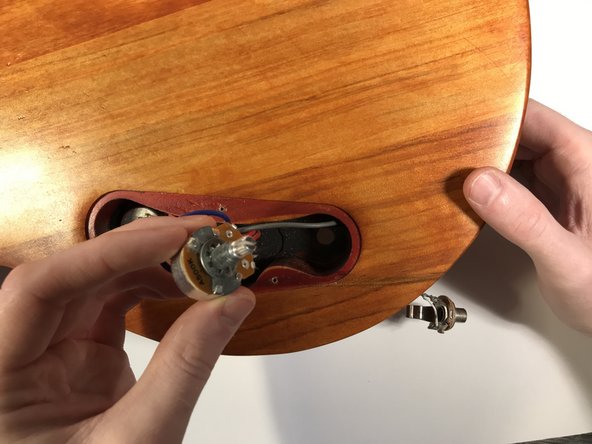
  6. Epiphone Les Paul Special Input Jack Replacement: Schritt 6, Bild 1 von 2 Epiphone Les Paul Special Input Jack Replacement: Schritt 6, Bild 2 von 2
    • Pull out the tone control.

  7. Epiphone Les Paul Special Input Jack Replacement: Schritt 7, Bild 1 von 2 Epiphone Les Paul Special Input Jack Replacement: Schritt 7, Bild 2 von 2
    • Push the input jack through the body and pull it out.

  8. Epiphone Les Paul Special Input Jack Replacement: Schritt 8, Bild 1 von 1
    • The soldering iron is very hot. Avoid contact with skin, as well as the body of the instrument. When not in use, place it on a soldering iron stand.

    • Desolder the wires from the input jack.

  9. Epiphone Les Paul Special Input Jack Replacement: Schritt 9, Bild 1 von 1
    • The soldering iron is very hot. Avoid contact with skin, as well as the body of the instrument. When not in use, place it on a soldering iron stand.

    • Solder the wires to the input jack.

    • Repeat steps 7-1 in reverse order to put it all back together.

Abschluss

To get everything back into its original place, follow steps 1-7 in reverse order.

2 weitere Nutzer:innen haben diese Anleitung absolviert.

Team

0 Kommentare

Kommentar hinzufügen

Seitenaufrufe:

Letzte 24 Stunden: 2

Letzte 7 Tage: 16

Letzte 30 Tage: 81

Insgesamt: 4,098