Zum Hauptinhalt wechseln

Etekcity Lasergrip 1080 Screen Replacement

Was du brauchst

  1. Etekcity Lasergrip 1080 Screen Replacement, Battery: Schritt 1, Bild 1 von 1
    • Pull the battery cover away from the handle by gripping near the thumb groove.

  2. Etekcity Lasergrip 1080 Screen Replacement: Schritt 2, Bild 1 von 1
    • Gently pull the battery out of the handle.

    • Excessive force could damage wires.

  3. Etekcity Lasergrip 1080 Screen Replacement: Schritt 3, Bild 1 von 2 Etekcity Lasergrip 1080 Screen Replacement: Schritt 3, Bild 2 von 2
    • Disconnect the battery by pulling the connector away from it.

    • Positive first

    • Negative second

    • When replacing the battery, this order is reversed.

  4. Etekcity Lasergrip 1080 Screen Replacement, Buttons: Schritt 4, Bild 1 von 2 Etekcity Lasergrip 1080 Screen Replacement, Buttons: Schritt 4, Bild 2 von 2
    • Remove the battery cover from the device by pulling it straight out.

  5. Etekcity Lasergrip 1080 Screen Replacement: Schritt 5, Bild 1 von 2 Etekcity Lasergrip 1080 Screen Replacement: Schritt 5, Bild 2 von 2
    • Using the plastic opening tool remove the front and rear yellow covers.

    • When removing the back cover, be careful not to lose the buttons as they are not connected.

  6. Etekcity Lasergrip 1080 Screen Replacement: Schritt 6, Bild 1 von 1
    • Remove the two 3.1 mm Phillips #0 screws.

  7. Etekcity Lasergrip 1080 Screen Replacement: Schritt 7, Bild 1 von 2 Etekcity Lasergrip 1080 Screen Replacement: Schritt 7, Bild 2 von 2
    • Pull the two halves apart.

    • Be careful not to lose any components on the inside.

  8. Etekcity Lasergrip 1080 Screen Replacement: Schritt 8, Bild 1 von 1
    • Realign the buttons with the button terminals.

    • Red terminal to red button.

    • Orange terminal to orange button.

    • Yellow terminal to yellow button.

  9. Etekcity Lasergrip 1080 Screen Replacement, Etekcity Lasergrip 1080 Trigger Replacement: Schritt 9, Bild 1 von 2 Etekcity Lasergrip 1080 Screen Replacement, Etekcity Lasergrip 1080 Trigger Replacement: Schritt 9, Bild 2 von 2
    • Carefully pull the trigger out.

    • The trigger is spring loaded, so be careful that you do not lose the spring as you pull the trigger out.

    • To put the trigger back in, align the peg with the hole in the handle and align the shaft with the button terminal.

  10. Etekcity Lasergrip 1080 Screen Replacement, Screen: Schritt 10, Bild 1 von 1
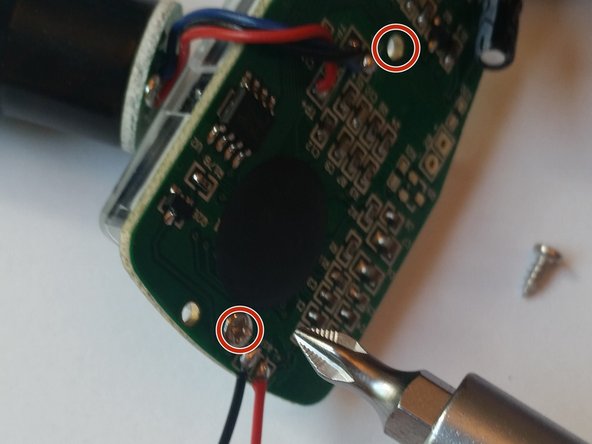
    • Carefully pull the motherboard out of its slot in the body of the device.

  11. Etekcity Lasergrip 1080 Screen Replacement: Schritt 11, Bild 1 von 2 Etekcity Lasergrip 1080 Screen Replacement: Schritt 11, Bild 2 von 2
    • Unscrew the two 3.4 mm screws on the motherboard.

  12. Etekcity Lasergrip 1080 Screen Replacement: Schritt 12, Bild 1 von 1
    • Take off the cover and separate the parts.

    • All of these parts are fragile and mishandling them may cause damage.

Abschluss

To reassemble your device, follow these instructions in reverse order.

Team

USF Tampa, Team 5-1, Blackwell Fall 2015 Mitglied von USF Tampa, Team 5-1, Blackwell Fall 2015

USFT-BLACKWELL-F15S5G1

3 Mitglieder

9 Anleitungen geschrieben

0 Kommentare

Kommentar hinzufügen

Seitenaufrufe:

Letzte 24 Stunden: 0

Letzte 7 Tage: 1

Letzte 30 Tage: 5

Insgesamt: 900