Zum Hauptinhalt wechseln

Fingerprint Sensor Disconnect

Grundständige Anleitung
Dies ist eine grundständige Anleitung, die nur als Teil einer anderen Anleitung verwendet werden sollte.

Was du brauchst

  1. Fingerprint Sensor Disconnect, Loosen the rear glass adhesive: Schritt 1, Bild 1 von 1
    • Apply a heated iOpener to the rear glass to loosen the adhesive underneath. Apply the iOpener for at least two minutes.

  2. Fingerprint Sensor Disconnect, Insert an opening pick: Schritt 2, Bild 1 von 3 Fingerprint Sensor Disconnect, Insert an opening pick: Schritt 2, Bild 2 von 3 Fingerprint Sensor Disconnect, Insert an opening pick: Schritt 2, Bild 3 von 3
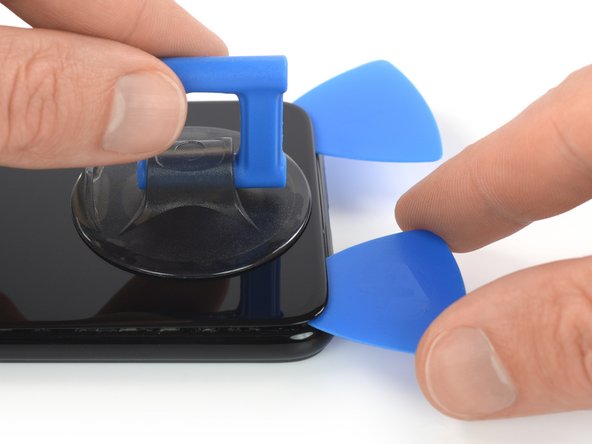
    • Secure a suction handle to the bottom edge of the rear glass, as close to the edge as possible.

    • If your rear glass is badly cracked, covering it with a layer of clear packing tape may allow the suction cup to adhere. Alternatively, very strong tape may be used instead of the suction cup. If all else fails, you can superglue the suction cup to the rear glass.

    • Lift the rear glass with the suction handle to create a small gap between the glass and the frame.

    • In case you have trouble creating a gap, apply more heat to further soften the adhesive. Follow the iOpener instructions to avoid overheating.

    • Insert an opening pick into the gap.

    • Slide the opening pick to the bottom right corner to slice the adhesive.

  3. Fingerprint Sensor Disconnect, Slice the bottom edge adhesive: Schritt 3, Bild 1 von 2 Fingerprint Sensor Disconnect, Slice the bottom edge adhesive: Schritt 3, Bild 2 von 2
    • Insert a second opening pick and slide it to the bottom left corner to slice the adhesive.

    • Leave the opening picks in place to prevent the adhesive from resealing.

  4. Fingerprint Sensor Disconnect, Slice the lefthand-side adhesive: Schritt 4, Bild 1 von 3 Fingerprint Sensor Disconnect, Slice the lefthand-side adhesive: Schritt 4, Bild 2 von 3 Fingerprint Sensor Disconnect, Slice the lefthand-side adhesive: Schritt 4, Bild 3 von 3
    • If the adhesive becomes hard to cut, it has most likely cooled down. Use your iOpener to reheat it.

    • Insert a third opening pick at the bottom left corner.

    • Slide the opening pick along the left edge of the phone to slice the rear glass adhesive.

    • Leave the opening pick in its place at the top left corner to prevent the adhesive from resealing.

  5. Fingerprint Sensor Disconnect, Slice the top edge adhesive: Schritt 5, Bild 1 von 2 Fingerprint Sensor Disconnect, Slice the top edge adhesive: Schritt 5, Bild 2 von 2
    • Insert a fourth opening pick under the top left corner of the rear glass.

    • Slide the opening pick along the top edge of the phone to slice the rear glass adhesive.

    • Leave the opening pick in the top right corner to prevent the adhesive from resealing.

  6. Fingerprint Sensor Disconnect, Slice the righthand-side adhesive: Schritt 6, Bild 1 von 2 Fingerprint Sensor Disconnect, Slice the righthand-side adhesive: Schritt 6, Bild 2 von 2
    • Insert a fifth opening pick at the top right corner of the phone.

    • Slide the opening pick along the right edge to slice the remaining adhesive.

    • Don't try to remove the rear glass all the way yet. The fingerprint sensor is still connected to the motherboard.

  7. Fingerprint Sensor Disconnect, Open up the phone assembly: Schritt 7, Bild 1 von 3 Fingerprint Sensor Disconnect, Open up the phone assembly: Schritt 7, Bild 2 von 3 Fingerprint Sensor Disconnect, Open up the phone assembly: Schritt 7, Bild 3 von 3
    • Carefully fold the rear glass to the left side of the phone assembly like you'd open the front cover of a book.

    • Avoid tensioning the fingerprint flex cable during this process.

  8. Fingerprint Sensor Disconnect, Peel the protective foil off: Schritt 8, Bild 1 von 2 Fingerprint Sensor Disconnect, Peel the protective foil off: Schritt 8, Bild 2 von 2
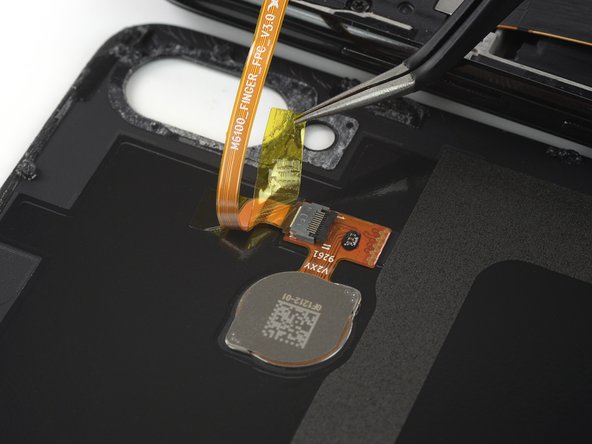
    • Use a pair of tweezers to carefully peel the yellow protective foil off the ZIF connector.

  9. Fingerprint Sensor Disconnect, Open the ZIF connector: Schritt 9, Bild 1 von 2 Fingerprint Sensor Disconnect, Open the ZIF connector: Schritt 9, Bild 2 von 2
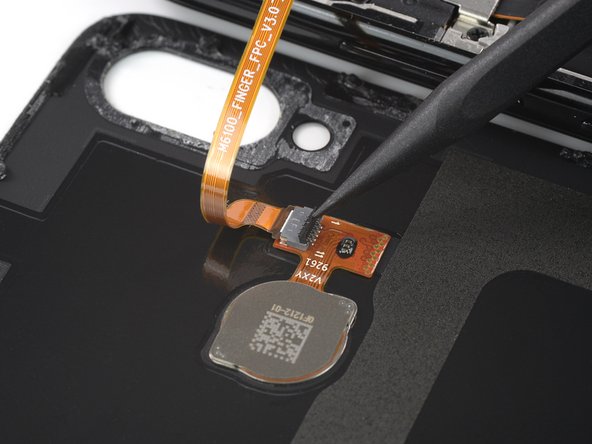
    • Use the pointed end of a spudger to open the ZIF connector by bringing its black flap in an upright position.

  10. Fingerprint Sensor Disconnect, Disconnect the fingerprint flex cable: Schritt 10, Bild 1 von 2 Fingerprint Sensor Disconnect, Disconnect the fingerprint flex cable: Schritt 10, Bild 2 von 2
    • Disconnect the fingerprint flex cable by pulling it straight out off the ZIF connector using a pair of tweezers.

Abschluss

To reassemble your device, follow these instructions in reverse order.

Dominik Schnabelrauch

Mitglied seit: 11/23/16

202.546 Reputation

682 Anleitungen geschrieben

Team

iFixit Mitglied von iFixit

Staff

135 Mitglieder

16.718 Anleitungen geschrieben

0 Kommentare

Kommentar hinzufügen

Seitenaufrufe:

Letzte 24 Stunden: 0

Letzte 7 Tage: 0

Letzte 30 Tage: 1

Insgesamt: 53