Einleitung
Benutze diese Anleitung, um den alten Akku in deiner Fitbit Ionic zu ersetzen.
Entlade deinen Akku aus Sicherheitsgründen auf unter 25 %, bevor du dein Gerät auseinanderbaust. Falls der Akku während der Reparatur versehentlich beschädigt wird, ist so das Risiko geringer, dass er sich entzündet oder explodiert.
Falls dein Akku aufgebläht ist, musst du entsprechende Vorsichtsmaßnahmen treffen.
Du benötigst Ersatzklebestreifen für den Zusammenbau, um die Komponenten wieder zu befestigen.
Was du brauchst
-
-
Bevor du anfängst, trenne deine Fitbit Ionic vom Ladegerät und schalte sie aus.
-
-
-
Erhitze einen iOpener und lege ihn mindestens zwei Minuten lang auf das Display, um den Kleber darunter aufzuweichen.
Hair dryer on low took about 25 minutes directly blasting on the device, then used the ifixit metal spudger blade with rubber handle in the velcro kit pack
Thanks for sharing your experience!
-
-
-
Setze eine flache Klinge in den schmalen Spalt zwischen Uhrengehäuse und Display ein.
-
Schneide den Kleber an der oberen Seite der Fitbit Ionic durch.
-
-
-
Heble die Oberkante des Displays mit einer flachen Klinge hoch, sodass ein kleiner Spalt entsteht.
-
-
-
Setze jeweils ein Plektrum unter die obere rechte und die obere linke Ecke.
-
Lasse die Plektren stecken, damit sich der Kleber nicht wieder verbinden kann.
-
Entferne die Klinge.
-
-
-
Setze ein drittes Plektrum unter die obere rechte Ecke und schiebe es an der rechten Kante des Displays entlang.
-
Lasse das Plektrum in der unteren rechten Ecke stecken, damit sich der Kleber nicht wieder verbinden kann.
-
-
-
Setze ein viertes Plektrum unter die obere linke Ecke und schiebe es an der linken Kante des Displays entlang.
-
Lasse das Plektrum in der unteren linken Ecke stecken, damit sich der Kleber nicht wieder verbinden kann.
-
-
-
Benutze das flache Ende eines Spudgers, um die leicht verklebte NFC-Antenne abzulösen und hochzuhebeln.
-
Klappe die NFC-Antenne vorsichtig zur Oberkante der Uhr hin.
Il semble qu'il y ait confusion : <vers bord “superieur" > et non "inférieur” .
Plusieurs cas relevés
Bonjour Bernard ! Merci pour vos différentes remarques ! Vous êtes un lecteur attentif et éclairé. Nous avons adapté le texte d’origine et/ou les traductions en français. iFixit étant un wiki modifiable par tous, n’hésitez pas à modifier vous-même la prochaine fois que vous remarquez quelque chose.
-
-
-
-
Klappe die Displayeinheit vorsichtig zur oberen Seite der Uhr hin.
Plutôt que “replier" il vaudrait mieux dire “basculer vers le haut" puis ajouter <en soulevant délicatement la nappe de connection de l'écran qui reste connectée (qui est maintenant libérée) >
-
-
-
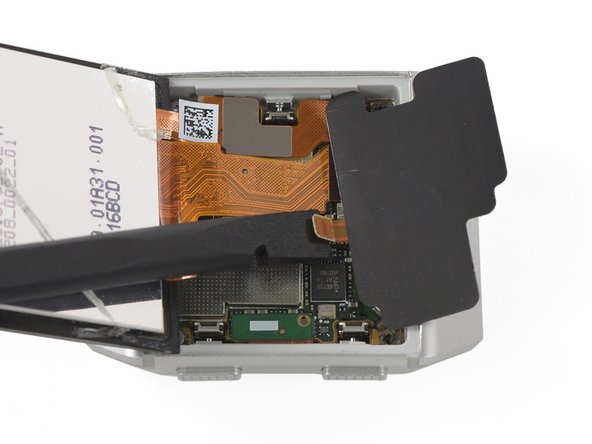
Entferne die Metallabschirmung über dem Akku-Flachbandkabel mithilfe einer Pinzette.
The pointy tweezers in the ifixit kit are easier to work with the shield than the ones pictured here.
-
-
-
Klappe die Displayeinheit in ihre ursprüngliche Position zurück.
-
-
-
Entferne die beiden Torx T2 Schrauben (3,65 mm Länge) an der Oberkante der Uhr.
-
-
-
Entferne die Metallabdeckung mit einer Pinzette.
Theres a lip on the right side that goes under the frame, and another lip that goes under the nfc antenna where you need to slightly turn the nfc antenna a bit to get the left side of the shield away.
-
-
-
Benutze einen Spudger, um die NFC-Antenne hochzuhebeln und abzutrennen.
-
Entferne die NFC-Antenne.
-
-
-
Benutze einen Spudger, um die beiden Displaykabel vom Motherboard hochzuhebeln und abzutrennen.
-
-
-
Entferne die Displayeinheit.
The comment “turn on your Fitbit…” is out of sequence at best - battery is out, etc. However the “Remove the display assembly” is correct.
When reassembling and prior to gluing the screen, turn the device on with all components attached. Verify screen function, button function, nfc function, and HR monitor function.
-
-
-
Entferne die Torx T2 Schraube (3,65 mm Länge).
-
-
-
Trenne den Herzfrequenzmesser vom Motherboard ab, indem du ihn mit einem Spudger hochhebelst.
-
-
-
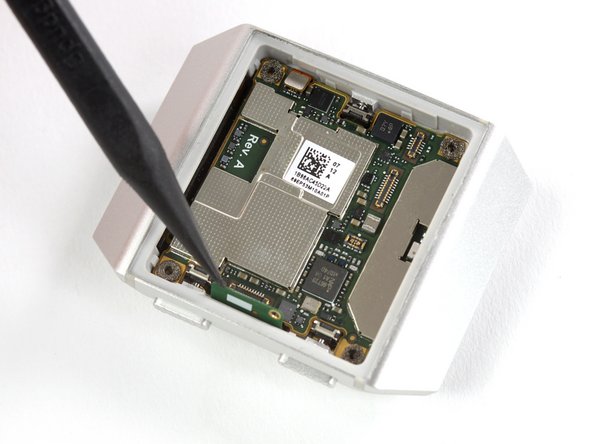
Setze eine Spudger in den Spalt zwischen Uhrengehäuse und Oberkante des Motherboards ein.
-
Heble das Motherboard mithilfe des Spudgers hoch.
-
Entferne das Motherboard.
-
-
-
Setze das flache Ende eines Spudgers an der Oberkante der Fitbit Ionic zwischen das Uhrengehäuse und den Akku ein.
-
Heble den Akku mit dem Spudger hoch.
-


Um dein Gerät wieder zusammenzubauen, folge den Schritten dieser Anleitung in umgekehrter Reihenfolge.
Schalte, wenn möglich, dein Gerät ein und teste deine Reparatur, bevor du neuen Kleber anbringst und es wieder versiegelst.
Für eine optimale Leistung solltest du deinen neu eingebauten Akku kalibrieren: Lade dein Gerät auf 100 % auf und lasse es zwei weitere Stunden am Ladegerät. Benutze nun dein Gerät, bis der Akku leer ist und es sich von selbst ausschaltet. Lade es dann ohne Unterbrechung wieder auf 100 % auf.
Entsorge deinen Elektromüll sachgerecht.
Hat die Reparatur nicht ganz geklappt? In unserem Forum findest du Hilfe bei der Fehlersuche.
Rückgängig: Ich habe diese Anleitung nicht absolviert.
7 weitere Nutzer:innen haben diese Anleitung absolviert.
Besonderer Dank geht an diese Übersetzer:innen:
100%


Diese Übersetzer:innen helfen uns, die Welt zu reparieren! Wie kann ich mithelfen?
Hier starten ›


14 Kommentare
This guide is very detailed and pretty accurate. Thank you for posting it!
Does anyone know how crucial the ‘Calibration’ procedure noted at the end article is?
I replaced my battery and it drains so quickly - during the course of a few hours.
But I didn’t try leaving it on the charger for 2 hours after 100% is reached. Trying that now.
The battery drains so quickly - just like the old battery that I am replacing.
It charges up to 100% but then loses about 1% every 5 minutes. Could there be a short circuit somewhere?
This was all sealed up by factory until I needed a new battery.
Hi @monte87 unfortunately I’m overwhelmed with this problem. Maybe you can contact the troubleshooting website of Fitbit directly. I hope someone there can tell you more about your problem.
ONE SOLUTION -
I examined my Ionic case under high magnification and discovered that the bottom has a clear plastic lens covering the sensors. Over time, this lens layer has worn thin and actually cracked enough to allow water or sweat to infiltrate the bottom of the pebble.
This must have caused a short or damaged the sensors because every new battery I tried drained quickly.
I have put all of my parts (Screen, battery, Main board, shield, etc.) into a new case complete with sensor array and now I am seeing excellent battery life!
Thanks for helping resurrect my Ionic!
Amazing guide! I was able to replace my ionic’s battery and it’s working again, thanks!
The symptoms my ionic had: the watch worked only when it was plugged into the charging cable. As soon as I remove the charging cable it shut down. Ionic did show that it’s charging when it was connected to the charger but it failed to charge even after I left it charging for more then a day. I tried soft/hard factory resets, replacing charger, replacing battery and nothing helped. So I decide to buy a battery and replace it myself and it finally resurrected my watch :)
Because fitibit didn’t have the battery available, I ordered HSABAT IONIC 500mah from ali. I’ll try to leave a comment after I use it for some time. At least my ionic is holding a charge right now :)
A couple of tips:
- You DO need a technician's razor with a flat! I’ve tried multiple plastic tools and even a knife - I couldn’t detach the screen. Partially, because the gap is so narrow. It’s very easy with a flat blade!
- (DO IT AT YOUR OWN RISK) I didn’t have an iOpener so I put my watch in a ziplock, put it in a cup, poured hot water (~100C) and left it for ~3 minutes. It was very easy to detach the screen with the technician's razor with a flat, and it simply popped out! my screen is still working and there no cracks :)
Andrii -
Thank you for your feedback and sharing your experience! I'm glad your repair went well.
Is there anybody who would provide the service to post out to them fix and resend back , I have a spare watch in excellent condition with a good screen and good battery I would like to swap them over to my original Fitbit Ionic looking for somebody who could do this for me ,07703190950. ozzy64@btopenworld.com