Diese Version enthält möglicherweise inkorrekte Änderungen. Wechsle zur letzten geprüften Version.
Was du brauchst
-
Dieser Schritt ist noch nicht übersetzt. Hilf mit, ihn zu übersetzen!
-
Locate the four straps on each corner of the cushion.
-
Untie each of the straps and remove the cushion from the chair.
-
-
Dieser Schritt ist noch nicht übersetzt. Hilf mit, ihn zu übersetzen!
-
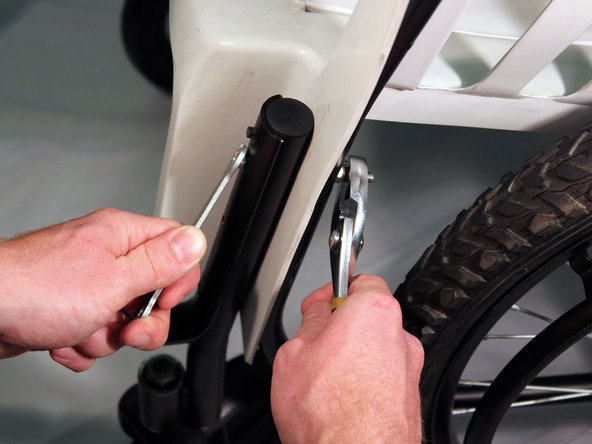
Turn the chair around and locate the two base plates that hold the axle to the back of the chair.
-
Hold the nut with the pliers. In the other hand, use the 10mm wrench to remove the screw.
-
-
Dieser Schritt ist noch nicht übersetzt. Hilf mit, ihn zu übersetzen!
-
Remove both of the screws from each of the axle plates to free the chair from the axle.
-
-
-
Dieser Schritt ist noch nicht übersetzt. Hilf mit, ihn zu übersetzen!
-
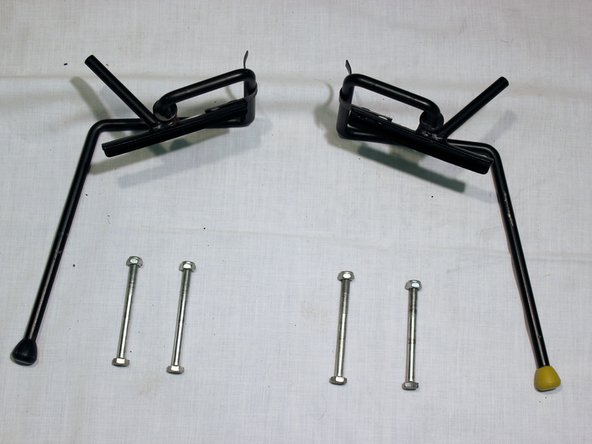
Locate both of the brakes. They are each located on the front of the chair between the rear tire and the frame.
-
There are two screws connecting each of the brakes to the frame.
-
Remove both of the screws from the frame using the 10mm wrench and pair of pliers.
-
-
Dieser Schritt ist noch nicht übersetzt. Hilf mit, ihn zu übersetzen!
-
Remove the brakes from the frame.
-
Repeat with the brake on the other side of the wheelchair.
-
-
Dieser Schritt ist noch nicht übersetzt. Hilf mit, ihn zu übersetzen!
-
Locate the screws that hold the back frame, chair, castor wheel, and front frame together.
-
Remove both of these screws using the 10mm wrench and a pair of pliers.
-
-
Dieser Schritt ist noch nicht übersetzt. Hilf mit, ihn zu übersetzen!
-
Remove the front frame and each of the castor wheels from the wheelchair.
-
-
Dieser Schritt ist noch nicht übersetzt. Hilf mit, ihn zu übersetzen!
-
Remove the lawn chair from the back frame by lifting it up.
-


Rückgängig: Ich habe diese Anleitung nicht absolviert.
3 weitere Nutzer:innen haben diese Anleitung absolviert.
Team

Cal Poly, Team 14-7, Maness Spring 2013 Mitglied von Cal Poly, Team 14-7, Maness Spring 2013
CPSU-MANESS-S13S14G7
5 Mitglieder
7 Anleitungen geschrieben