Diese Version enthält möglicherweise inkorrekte Änderungen. Wechsle zur letzten geprüften Version.
Was du brauchst
-
Dieser Schritt ist noch nicht übersetzt. Hilf mit, ihn zu übersetzen!
-
Use the Phillips #00 screwdriver to remove the 7 screws on the sides of the camera:
-
Four 3.95mm Phillips screws located on the bottom of the camera
-
Two 3.95mm Phillips screws located on the right side of the camera
-
One 3.95mm Phillips screw located on the left side of the camera
-
-
Dieser Schritt ist noch nicht übersetzt. Hilf mit, ihn zu übersetzen!
-
Slide open the battery compartment cover with your thumb.
-
-
Dieser Schritt ist noch nicht übersetzt. Hilf mit, ihn zu übersetzen!
-
Wedge the edge of the spudger between the front and back case, near the corner of the flash.
-
Carefully run the spudger along the right edge of the camera, creating an opening.
-
Insert the spudger into the left side of the camera, above the screwhole. Then carefully run it along this edge.
-
-
Dieser Schritt ist noch nicht übersetzt. Hilf mit, ihn zu übersetzen!
-
Slowly lift the back cover straight up, lightly jiggling it if necessary.
-
Remove the battery compartment cover.
-
-
Dieser Schritt ist noch nicht übersetzt. Hilf mit, ihn zu übersetzen!
-
Gently insert the spudger under the clip holding the orange ribbon. The clip should lift up and the ribbon will slide out.
-
This step will free the back cover from the rest of the camera.
-
-
-
Dieser Schritt ist noch nicht übersetzt. Hilf mit, ihn zu übersetzen!
-
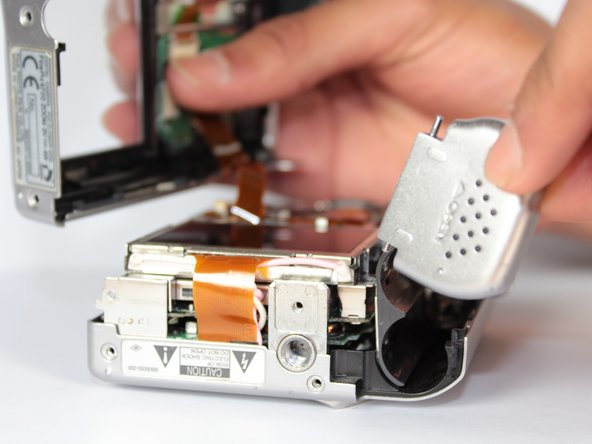
Use the tweezers to grab the speaker (located on left side of the camera) and pull straight up.
-
-
Dieser Schritt ist noch nicht übersetzt. Hilf mit, ihn zu übersetzen!
-
Use the tweezers to pull gently on the small orange ribbon, located in upper left hand corner near the flash, to remove the square insert.
-
-
Dieser Schritt ist noch nicht übersetzt. Hilf mit, ihn zu übersetzen!
-
Use your fingers to slowly pull the flash straight up.
-
-
Dieser Schritt ist noch nicht übersetzt. Hilf mit, ihn zu übersetzen!
-
Slightly separate the front cover from the motherboard unit (which consists of the motherboard, speaker, screen, and battery compartment).
-
Rotate the bottom portion of the motherboard unit (the screen and battery compartment) over the lens unit.
-
-
Dieser Schritt ist noch nicht übersetzt. Hilf mit, ihn zu übersetzen!
-
Use your fingers to remove the tripod mount.
-
-
Dieser Schritt ist noch nicht übersetzt. Hilf mit, ihn zu übersetzen!
-
Gently stick the spudger under the ribbon clips and lift them up.
-
Use the tweezers to pull both ribbons out of the ribbon clips.
-
-
Dieser Schritt ist noch nicht übersetzt. Hilf mit, ihn zu übersetzen!
-
Locate the wire running from the speaker unit to the motherboard.
-
This is where the power plug for the speaker is located.
-
-
Dieser Schritt ist noch nicht übersetzt. Hilf mit, ihn zu übersetzen!
-
Use the tweezers to grab the speaker wires close to the motherboard.
-
Pull speaker wire straight out.
-


Team

Cal Poly, Team 14-8, Forte Spring 2012 Mitglied von Cal Poly, Team 14-8, Forte Spring 2012
CPSU-FORTE-S12S14G8
5 Mitglieder
17 Anleitungen geschrieben