Einleitung
This guides is meant to be used with the intention to replace the lens.
Warning: The lens is very fragile; any scrape or fingerprint could result in a unusable lens. Take great caution in the replacement of the lens.
Was du brauchst
-
-
Flip the camera so that the bottom is facing upwards.
-
With the Phillips #00 screwdriver, remove all four screws.
-
-
-
Flip the camera so that it is now on the right side.
-
With the Phillips #00 screwdriver, remove all four screws.
-
-
-
Flip the camera so that it is now on the left side.
-
Move or remove the flap hiding the camera ports.
-
With the Phillips #00 screwdriver, remove all screws.
-
-
-
Flip the camera so that it is now on the top side.
-
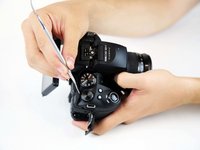
With a spudger, pry off the highlighted metal piece of the camera.
-
-
-
Pull the LCD screen up and out of the way.
-
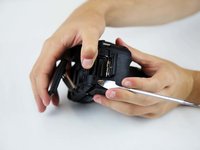
With the Phillips #00 screwdriver, remove the screws.
-
-
-
-
Slowly and carefully pull the frame away to have a better view of the inside.
-
-
-
Peel back (or off) the black tape to expose more of the inside of the camera.
-
Flip the white switch of the highlighted chamber up, and that should unlock the ribbon cable from its compartment.
-
-
-
With the Phillips #00 screwdriver, remove all five screws.
-
Remove the metal casing.
-
-
-
Once the motherboard is taken out, with a screwdriver, unscrew all highlighted screws.
-
Take the lens off once it is unscrewed.
-


To reassemble your device, follow these instructions in reverse order.
To reassemble your device, follow these instructions in reverse order.
Rückgängig: Ich habe diese Anleitung nicht absolviert.
3 weitere Personen haben diese Anleitung absolviert.
Team

Baylor, Team S1-G2, Williams Fall 2018 Mitglied von Baylor, Team S1-G2, Williams Fall 2018
BU-WILLIAMS-F18S1G2
4 Mitglieder
12 Anleitungen geschrieben