Zum Hauptinhalt wechseln

Fujitsu Lifebook Stylistic Q584 Camera Replacement

Was du brauchst

  1. Fujitsu Lifebook Stylistic Q584 Camera Replacement, Back Case: Schritt 1, Bild 1 von 1
    • Remove the white sticker covering the screws (if applicable).

    • Use the PH1 screwdriver to remove the four 2 mm screws from the the backside of the device.

  2. Fujitsu Lifebook Stylistic Q584 Camera Replacement: Schritt 2, Bild 1 von 1
    • Insert the plastic opening tool along the seam of the back case.

    • Gently slide the plastic opening tool along the entire seam popping the clips free.

  3. Fujitsu Lifebook Stylistic Q584 Camera Replacement: Schritt 3, Bild 1 von 1
    • Carefully lift the back case and remove the smartcard ribbon from the motherboard.

  4. Fujitsu Lifebook Stylistic Q584 Camera Replacement, Inner Back Shield: Schritt 4, Bild 1 von 1
    • Remove the ten 3mm screws with a PH00 screwdriver from the shield.

  5. Fujitsu Lifebook Stylistic Q584 Camera Replacement: Schritt 5, Bild 1 von 1
    • Remove the grey docking station port cover.

  6. Fujitsu Lifebook Stylistic Q584 Camera Replacement: Schritt 6, Bild 1 von 1
    • Gently slide the plastic opening tool along the entire seam popping the clips free.

  7. Fujitsu Lifebook Stylistic Q584 Camera Replacement: Schritt 7, Bild 1 von 1
    • Lift the shield away from the device and remove the fingerprint scanner's ribbon from the motherboard.

  8. Fujitsu Lifebook Stylistic Q584 Camera Replacement, Camera: Schritt 8, Bild 1 von 2 Fujitsu Lifebook Stylistic Q584 Camera Replacement, Camera: Schritt 8, Bild 2 von 2
    • Pull up the cord that connects the battery to the motherboard

  9. Fujitsu Lifebook Stylistic Q584 Camera Replacement: Schritt 9, Bild 1 von 2 Fujitsu Lifebook Stylistic Q584 Camera Replacement: Schritt 9, Bild 2 von 2
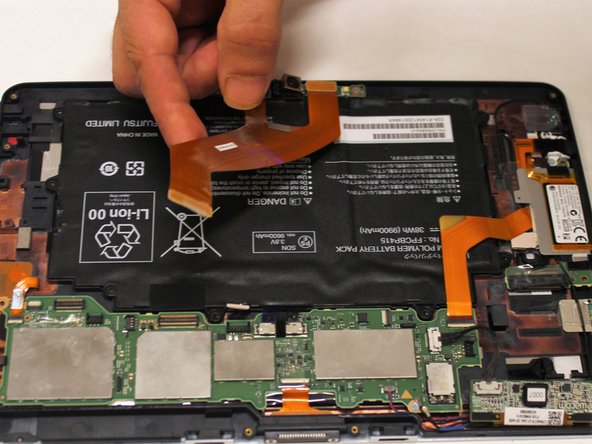
    • Pull the ribbon straight up from the back of the camera board

  10. Fujitsu Lifebook Stylistic Q584 Camera Replacement: Schritt 10, Bild 1 von 1
    • Remove the single 2mm screw using a PH000 screwdriver from the camera board.

Abschluss

To reassemble your device, follow these instructions in reverse order.

Connor Stanton

Mitglied seit: 09/21/17

613 Reputation

6 Anleitungen geschrieben

Team

Washington State, Team S1-G3, Phelps-Hillen Fall 2017 Mitglied von Washington State, Team S1-G3, Phelps-Hillen Fall 2017

WSU-PHELPS-HILLEN-F17S1G3

5 Mitglieder

10 Anleitungen geschrieben

0 Kommentare

Kommentar hinzufügen

Seitenaufrufe:

Letzte 24 Stunden: 0

Letzte 7 Tage: 2

Letzte 30 Tage: 3

Insgesamt: 272