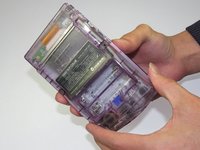
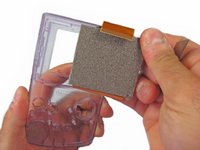
Zum Hauptinhalt wechseln

Game Boy Color LCD Display Austausch

Was du brauchst

  1. Game Boy Color LCD Display Austausch, Batterie: Schritt 1, Bild 1 von 2 Game Boy Color LCD Display Austausch, Batterie: Schritt 1, Bild 2 von 2
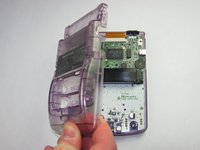
    • Das Batteriefach befindet sich auf der Rückseite des Game Boy Color.

    • Drücke die Rasten nach oben. Kippe den Batteriefachdeckel nach oben und hebe ihn weg.

  2. Game Boy Color LCD Display Austausch: Schritt 2, Bild 1 von 1
    • Entferne die Batterien aus dem Fach.

  3. Game Boy Color LCD Display Austausch, Rückseite: Schritt 3, Bild 1 von 1
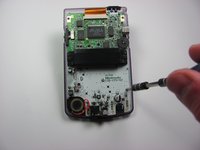
    • Schraube die sechs TriWing Y1 Schrauben auf der Rückseite wie im Bild gezeigt heraus. Die unteren beiden Schrauben befinden sich im Batteriefach.

  4. Game Boy Color LCD Display Austausch: Schritt 4, Bild 1 von 2 Game Boy Color LCD Display Austausch: Schritt 4, Bild 2 von 2
    • Hebe das rückseitigen Gehäuseteil vorsichtig vom restlichen Gerät ab.

  5. Game Boy Color LCD Display Austausch, LCD Flachbandkabel: Schritt 5, Bild 1 von 1
    • Ziehe die Laschen an jeder Seite mit einem Spudger hoch.

  6. Game Boy Color LCD Display Austausch: Schritt 6, Bild 1 von 1
    • Entferne das Kabel vorsichtig aus dem Sockel.

  7. Game Boy Color LCD Display Austausch, Hauptplatine: Schritt 7, Bild 1 von 2 Game Boy Color LCD Display Austausch, Hauptplatine: Schritt 7, Bild 2 von 2
    • Drehe die drei Kreuzschlitz #1 Schrauben heraus.

  8. Game Boy Color LCD Display Austausch: Schritt 8, Bild 1 von 1
    • Hebe die Hauptplatine vorsichtig aus dem vorderen Gehäuseteil heraus.

  9. Game Boy Color LCD Display Austausch, LCD Display: Schritt 9, Bild 1 von 2 Game Boy Color LCD Display Austausch, LCD Display: Schritt 9, Bild 2 von 2
    • Hebe das LCD Display vorsichtig aus dem vorderen Gehäuseteil.

    • Es hilft, wenn du das Gehäuse ein bisschen verwindest.

Abschluss

Um dein Gerät wieder zusammen zu setzen folge den Schritten in umgekehrter Reihenfolge.

38 weitere Nutzer:innen haben diese Anleitung absolviert.

Besonderer Dank geht an diese Übersetzer:innen:

en de

100%

VauWeh hilft uns, die Welt in Ordnung zu bringen! Wie kann ich mithelfen?
Hier starten ›

Team

Cal Poly, Team 19-47, Regan Winter 2013 Mitglied von Cal Poly, Team 19-47, Regan Winter 2013

CPSU-REGAN-W13S19G47

4 Mitglieder

56 Anleitungen geschrieben

7 Kommentare

I broke my screen doing this. Be really gentle!

Andrew - Antwort

Broke my screen just like the last commenter. These instructions are retarded. DON’T pry the screen from the back. Take the front cover off and PUSH it from the front. The circuity for the display is encased in the thin piece of glass all around the LCD. Prying WILL break it!

VoopTech - Antwort

Horrible instructions, TBH.

Michelle Fernandez - Antwort

Broke the plastic around the screen and doesn't turn on anymore -_- . Guess now I can put a backlit in but not how I wanted it to go

Daniel Guerrero - Antwort

Same thing happened to me, but its not really an issue. The way I see it, this is an article for replacing the screen, so it doesnt much matter if the one you’re taking out is broken.

DJ Gunter -

Kommentar hinzufügen

Seitenaufrufe:

Letzte 24 Stunden: 19

Letzte 7 Tage: 107

Letzte 30 Tage: 533

Insgesamt: 51,740