Zum Hauptinhalt wechseln
Gemeinsam reparieren - Jetzt registrieren

GameStop GS3 GameCube Controller Buttons Replacement

Was du brauchst

  1. GameStop GS3 GameCube Controller Buttons Replacement, Back Panel: Schritt 1, Bild 1 von 3 GameStop GS3 GameCube Controller Buttons Replacement, Back Panel: Schritt 1, Bild 2 von 3 GameStop GS3 GameCube Controller Buttons Replacement, Back Panel: Schritt 1, Bild 3 von 3
    • First, remove the 6 screws in the back panel and pull the back panel off.

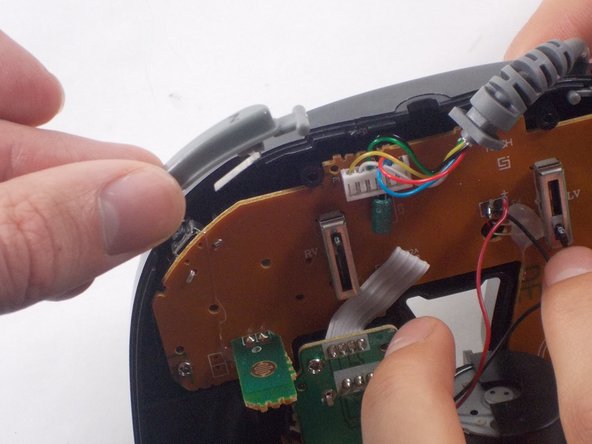
    • Separate the halves of the controller. However, be careful when separating due to the little wires that could get mixed up.

    Frag FixBot

    Kommentar hinzufügen

  2. GameStop GS3 GameCube Controller Buttons Replacement: Schritt 2, Bild 1 von 3 GameStop GS3 GameCube Controller Buttons Replacement: Schritt 2, Bild 2 von 3 GameStop GS3 GameCube Controller Buttons Replacement: Schritt 2, Bild 3 von 3
    • Next, remove the rumble motor by unscrewing the 2 screws connecting it.

    Frag FixBot

    Kommentar hinzufügen

  3. GameStop GS3 GameCube Controller Buttons Replacement: Schritt 3, Bild 1 von 3 GameStop GS3 GameCube Controller Buttons Replacement: Schritt 3, Bild 2 von 3 GameStop GS3 GameCube Controller Buttons Replacement: Schritt 3, Bild 3 von 3
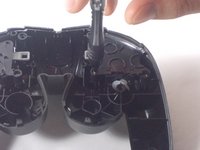
    • Finally remove the screws holding in the right and left triggers. It's easiest to hold the trigger together as shown in the third picture. Remove both the left and right trigger, and then you have successfully removed your back panel.

    Frag FixBot

    Kommentar hinzufügen

  4. GameStop GS3 GameCube Controller Buttons Replacement, Buttons: Schritt 4, Bild 1 von 1
    • Hold the controller as shown in the picture so that you can remove the circuit board.

    • The locations of screws to be removed in future steps are shown in red.

    Frag FixBot

    Kommentar hinzufügen

  5. GameStop GS3 GameCube Controller Buttons Replacement: Schritt 5, Bild 1 von 2 GameStop GS3 GameCube Controller Buttons Replacement: Schritt 5, Bild 2 von 2
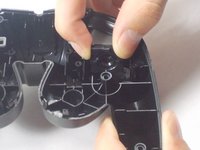
    • Now that the back panel has been removed it should be easy to snap off the "Z" and "TURBO" buttons as shown in the images.

    Frag FixBot

    Kommentar hinzufügen

  6. GameStop GS3 GameCube Controller Buttons Replacement: Schritt 6, Bild 1 von 1
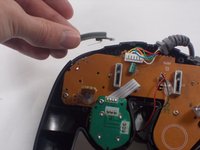
    • Remove the two screws on the motherboard so that you can remove the motherboard from the front cover.

    Frag FixBot

    Kommentar hinzufügen

  7. GameStop GS3 GameCube Controller Buttons Replacement: Schritt 7, Bild 1 von 1
    • Now your controller front panel should look similar to this.

    • Remove the rubber backings on the buttons shown in red.

    • Snap them back in when you go to put the controller back together.

    Frag FixBot

    Kommentar hinzufügen

  8. GameStop GS3 GameCube Controller Buttons Replacement: Schritt 8, Bild 1 von 1
    • Remove the buttons and you should have what you see here.

    Frag FixBot

    Kommentar hinzufügen

Abschluss

To reassemble your device, follow these instructions in reverse order.

Rückgängig: Ich habe diese Anleitung nicht absolviert.

Team

UMass Dartmouth, Team 3-5, Isaacson Fall 2016 Mitglied von UMass Dartmouth, Team 3-5, Isaacson Fall 2016

UMASSD-ISAACSON-F16S3G5

3 Mitglieder

10 Anleitungen geschrieben

0 Kommentare zur Anleitung

Kommentar hinzufügen

Seitenaufrufe:

Letzte 24 Stunden: 0

Letzte 7 Tage: 6

Letzte 30 Tage: 46

Insgesamt: 1,365