Zum Hauptinhalt wechseln

Garmin Dash Cam 20 Screen Replacement

Was du brauchst

  1. Garmin Dash Cam 20 Screen Replacement, Internal Assembly: Schritt 1, Bild 1 von 2 Garmin Dash Cam 20 Screen Replacement, Internal Assembly: Schritt 1, Bild 2 von 2
    • Be sure to turn off the Dash Cam by pressing the power button.

  2. Garmin Dash Cam 20 Screen Replacement: Schritt 2, Bild 1 von 2 Garmin Dash Cam 20 Screen Replacement: Schritt 2, Bild 2 von 2
    • Rotate the Dash Cam to where the socket faces you.

    • Remove the 9 mm screw using the Torx T6 screwdriver.

  3. Garmin Dash Cam 20 Screen Replacement: Schritt 3, Bild 1 von 2 Garmin Dash Cam 20 Screen Replacement: Schritt 3, Bild 2 von 2
    • Remove the Dash Cam socket piece.

  4. Garmin Dash Cam 20 Screen Replacement: Schritt 4, Bild 1 von 2 Garmin Dash Cam 20 Screen Replacement: Schritt 4, Bild 2 von 2
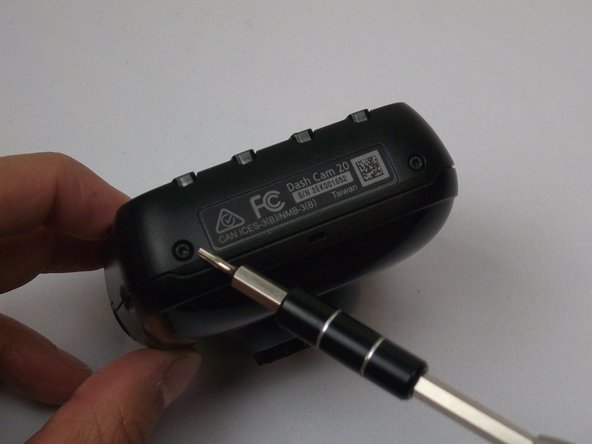
    • Rotate the Dash Cam to where the product information faces you.

    • Remove the two 5 mm screws using the Torx T5 screwdriver.

  5. Garmin Dash Cam 20 Screen Replacement: Schritt 5, Bild 1 von 3 Garmin Dash Cam 20 Screen Replacement: Schritt 5, Bild 2 von 3 Garmin Dash Cam 20 Screen Replacement: Schritt 5, Bild 3 von 3
    • Remove top case from the bottom case.

    • The compact nature of the casing requires use of the metal spudger for needed leverage.

  6. Garmin Dash Cam 20 Screen Replacement: Schritt 6, Bild 1 von 3 Garmin Dash Cam 20 Screen Replacement: Schritt 6, Bild 2 von 3 Garmin Dash Cam 20 Screen Replacement: Schritt 6, Bild 3 von 3
    • Remove the two 5mm screws using the Torx T5 screwdriver

    • By removing the screws, the metal battery frame will now become free from the rest of the device.

  7. Garmin Dash Cam 20 Screen Replacement, Screen: Schritt 7, Bild 1 von 3 Garmin Dash Cam 20 Screen Replacement, Screen: Schritt 7, Bild 2 von 3 Garmin Dash Cam 20 Screen Replacement, Screen: Schritt 7, Bild 3 von 3
    • Use the Phillips screwdriver to remove the four 5mm screws.

  8. Garmin Dash Cam 20 Screen Replacement: Schritt 8, Bild 1 von 2 Garmin Dash Cam 20 Screen Replacement: Schritt 8, Bild 2 von 2
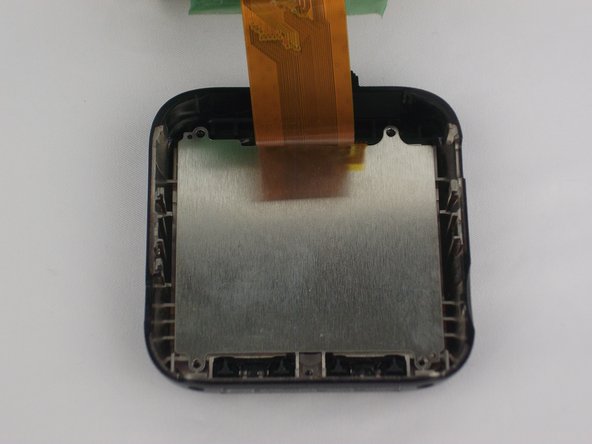
    • Use the metal spudger to remove metal plate from device. This will reveal the screen.

  9. Garmin Dash Cam 20 Screen Replacement: Schritt 9, Bild 1 von 3 Garmin Dash Cam 20 Screen Replacement: Schritt 9, Bild 2 von 3 Garmin Dash Cam 20 Screen Replacement: Schritt 9, Bild 3 von 3
    • Use the metal spudger to remove screen from device.

  10. Garmin Dash Cam 20 Screen Replacement: Schritt 10, Bild 1 von 1
    • The screen is now detached.

Abschluss

To reassemble your device, follow these instructions in reverse order.

Ein:e weitere:r Nutzer:in hat diese Anleitung absolviert.

Team

USF Tampa, Team 2-1, Cagle Fall 2016 Mitglied von USF Tampa, Team 2-1, Cagle Fall 2016

USFT-CAGLE-F16S2G1

4 Mitglieder

5 Anleitungen geschrieben

0 Kommentare

Kommentar hinzufügen

Seitenaufrufe:

Letzte 24 Stunden: 0

Letzte 7 Tage: 5

Letzte 30 Tage: 10

Insgesamt: 466