Einleitung
Welcome to this replacement guide for the screen of the Garmin Drive 52 and Traffic. The Garmin Drive 52 and Traffic is a GPS navigator that helps you find your way on the road. However, accidents happen and the screen of your device may get damaged or cracked. In such cases, replacing the screen can be a cost-effective solution to get your device back up and running. This guide will walk you through the steps required to replace the screen of your Garmin Drive 52 and Traffic. Please note that this procedure can be a bit tricky and requires some technical expertise.
Before beginning this repair turn off the device.
Was du brauchst
-
-
Pop the suction cup off of the device.
-
Unscrew the four T5 Torx screws on the back.
-
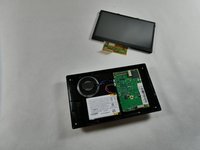
Carefully pry apart the front and back with a Jimmy.
-
-
-
-
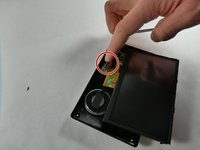
Flip up the ZIF connector's lock bar, remove the ribbon cable, and pull the screen out.
-


To reassemble your device, follow these instructions in reverse order.
Rückgängig: Ich habe diese Anleitung nicht absolviert.
Eine weitere Person hat diese Anleitung absolviert.

Team

UMass Dartmouth, Team 1-2, Petersen Fall 2022 Mitglied von UMass Dartmouth, Team 1-2, Petersen Fall 2022
UMASSD-PETERSEN-F22S1G2
6 Mitglieder
4 Anleitungen geschrieben