Diese Version enthält möglicherweise inkorrekte Änderungen. Wechsle zur letzten geprüften Version.
Was du brauchst
-
Dieser Schritt ist noch nicht übersetzt. Hilf mit, ihn zu übersetzen!
-
Use a Torx T9 screwdriver to remove these four .8mm screws and seperate the housing.
-
-
Dieser Schritt ist noch nicht übersetzt. Hilf mit, ihn zu übersetzen!
-
Use a spudger tool to disengage the power ribbon from the main board. Once the ribbon is disconnected you can separate the bottom piece of the housing that holds the battery.
-
-
Dieser Schritt ist noch nicht übersetzt. Hilf mit, ihn zu übersetzen!
-
Use the spudger tool again and wedge it in between the battery and the housing, pry until the battery starts to separate from the adhesive holding it in place. Once you have the battery disconnected you are ready to replace it.
-
-
-
Dieser Schritt ist noch nicht übersetzt. Hilf mit, ihn zu übersetzen!
-
Use a spudger to pry open the power ribbon from the main board.
-
-
Dieser Schritt ist noch nicht übersetzt. Hilf mit, ihn zu übersetzen!
-
Use your Torx T9 screwdriver to remove the one .8mm screw that holds the main board to the watch housing.
-
-
Dieser Schritt ist noch nicht übersetzt. Hilf mit, ihn zu übersetzen!
-
Use the spudger to pry the motherboard out of the housing.
-
-
Dieser Schritt ist noch nicht übersetzt. Hilf mit, ihn zu übersetzen!
-
Once removed simply separate the digitizer from the main board.
-
-
Dieser Schritt ist noch nicht übersetzt. Hilf mit, ihn zu übersetzen!
-
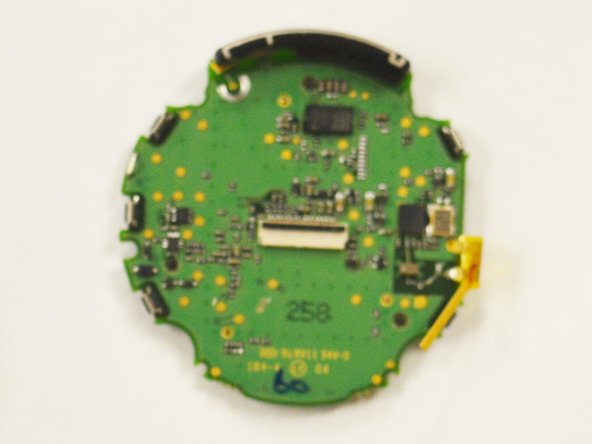
Lastly use your spudger tool to pry the data ribbon open from the motherboard. Once the ribbon is removed the board will be free and you can replace the board.
-


Rückgängig: Ich habe diese Anleitung nicht absolviert.
5 weitere Nutzer:innen haben diese Anleitung absolviert.
Team

IUPUI, Team 54-4, Wilson Spring 2016 Mitglied von IUPUI, Team 54-4, Wilson Spring 2016
IUPUI-WILSON-S16S54G4
3 Mitglieder
6 Anleitungen geschrieben
2 Kommentare
Ottima, le prime guide che trovo per Garmin Fenix 2. Io metterei una foto con le specifiche della batteria. Saluti.
Hi there, any idea where I can buy motherboard replacement for my Fenix 1?