Zum Hauptinhalt wechseln

Gateway MS2285 Hard Drive Replacement

Was du brauchst

  1. Gateway MS2285 Hard Drive Replacement, Turn Laptop Over: Schritt 1, Bild 1 von 1
    • Turn the laptop over so that the underside is facing towards you.

  2. Gateway MS2285 Hard Drive Replacement, Unlock The Battery: Schritt 2, Bild 1 von 2 Gateway MS2285 Hard Drive Replacement, Unlock The Battery: Schritt 2, Bild 2 von 2
    • Slide the short slider one towards the unlocked lock symbol.

  3. Gateway MS2285 Hard Drive Replacement, Release The Battery: Schritt 3, Bild 1 von 2 Gateway MS2285 Hard Drive Replacement, Release The Battery: Schritt 3, Bild 2 von 2
    • Slide the long slider towards the unlocked lock icon.

    • This slider is spring loaded and may require a little force.

    • If done correctly, a click will be heard and the battery will be slightly raised.

  4. Gateway MS2285 Hard Drive Replacement, Remove The Battery: Schritt 4, Bild 1 von 2 Gateway MS2285 Hard Drive Replacement, Remove The Battery: Schritt 4, Bild 2 von 2
    • Grasp the battery's raised end and lift upwards.

  5. Gateway MS2285 Hard Drive Replacement, Unscrew Backplate: Schritt 5, Bild 1 von 2 Gateway MS2285 Hard Drive Replacement, Unscrew Backplate: Schritt 5, Bild 2 von 2
    • Use the Phillips head screwdriver to remove the five screws holding the back plate.

    • The screws are counter-clockwise threaded.

  6. Gateway MS2285 Hard Drive Replacement, Remove Back Plate: Schritt 6, Bild 1 von 3 Gateway MS2285 Hard Drive Replacement, Remove Back Plate: Schritt 6, Bild 2 von 3 Gateway MS2285 Hard Drive Replacement, Remove Back Plate: Schritt 6, Bild 3 von 3
    • Place fingers under back plate via the indentation and lift upwards to remove.

  7. Gateway MS2285 Hard Drive Replacement, Unscrew Hard Drive Cover: Schritt 7, Bild 1 von 2 Gateway MS2285 Hard Drive Replacement, Unscrew Hard Drive Cover: Schritt 7, Bild 2 von 2
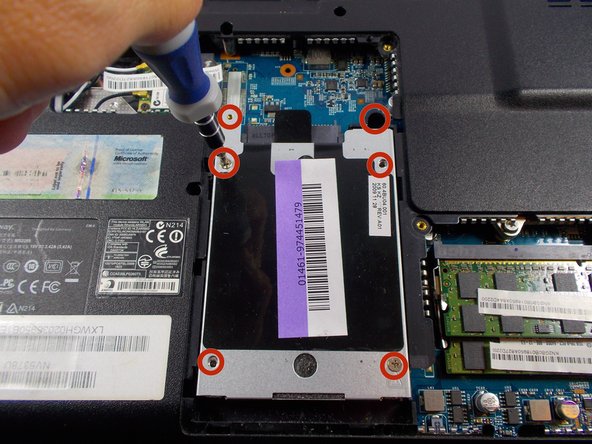
    • Unscrew the six screws holding the hard drive cover in place

  8. Gateway MS2285 Hard Drive Replacement, Unlock Hard Drive Cover and Hard Drive: Schritt 8, Bild 1 von 2 Gateway MS2285 Hard Drive Replacement, Unlock Hard Drive Cover and Hard Drive: Schritt 8, Bild 2 von 2
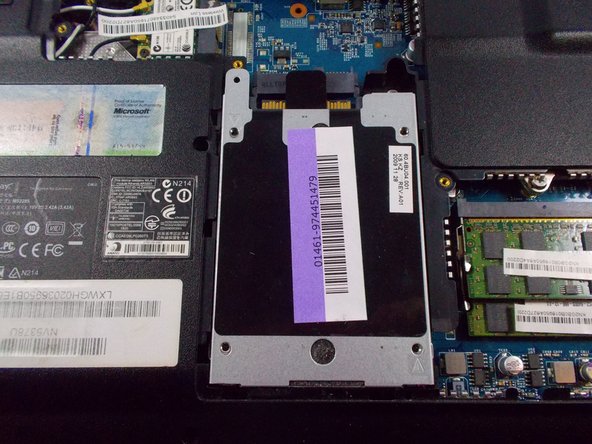
    • Grip onto the cover and slide it away from the connector to release the cover and hard drive.

  9. Gateway MS2285 Hard Drive Replacement, Remove Hard Drive Cover: Schritt 9, Bild 1 von 3 Gateway MS2285 Hard Drive Replacement, Remove Hard Drive Cover: Schritt 9, Bild 2 von 3 Gateway MS2285 Hard Drive Replacement, Remove Hard Drive Cover: Schritt 9, Bild 3 von 3
    • Grip onto the black plastic tab to lift the end enough to get your fingers under.

    • Once it is high enough, place another finger or fingers under the cover and lift straight off.

  10. Gateway MS2285 Hard Drive Replacement, Remove Hard Drive: Schritt 10, Bild 1 von 2 Gateway MS2285 Hard Drive Replacement, Remove Hard Drive: Schritt 10, Bild 2 von 2
    • Use hand to grab hard drive and remove.

    • Do not touch the gold connectors.

Abschluss

To reassemble your device, follow these instructions in reverse order.

Ein:e weitere:r Nutzer:in hat diese Anleitung absolviert.

Chris mello

Mitglied seit: 10/22/14

331 Reputation

3 Anleitungen geschrieben

Team

UMass Dartmouth, Team 1-7, Shastany Fall 2014 Mitglied von UMass Dartmouth, Team 1-7, Shastany Fall 2014

UMASSD-SHASTANY-F14S1G7

3 Mitglieder

6 Anleitungen geschrieben

0 Kommentare

Kommentar hinzufügen

Seitenaufrufe:

Letzte 24 Stunden: 1

Letzte 7 Tage: 9

Letzte 30 Tage: 18

Insgesamt: 3,699