Zum Hauptinhalt wechseln

Gateway SA1 Cooling Fan Replacement

Was du brauchst

  1. Gateway SA1 Cooling Fan Replacement, Battery: Schritt 1, Bild 1 von 1
    • Move the latch to the right of the battery to unlock.

  2. Gateway SA1 Cooling Fan Replacement: Schritt 2, Bild 1 von 1
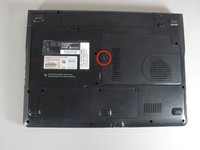
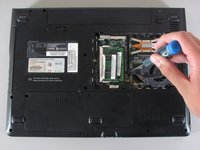
    • Slide the latch on the left directly below the battery to unlock and pull out the battery as shown.

    • The latch must be held in position to remove the battery.

  3. Gateway SA1 Cooling Fan Replacement, Cooling Fan: Schritt 3, Bild 1 von 2 Gateway SA1 Cooling Fan Replacement, Cooling Fan: Schritt 3, Bild 2 von 2
    • Unscrew the indicated Philips screw.

    • Screw cannot be completely removed from cover.

  4. Gateway SA1 Cooling Fan Replacement: Schritt 4, Bild 1 von 1
    • Use the spudger to pry open the cover.

    • There will be three tabs on each side except for the side with the screw.

  5. Gateway SA1 Cooling Fan Replacement: Schritt 5, Bild 1 von 2 Gateway SA1 Cooling Fan Replacement: Schritt 5, Bild 2 von 2
    • Unscrew the six indicated Philips screws.

    • These screws cannot be completely removed from the cooling fan component.

  6. Gateway SA1 Cooling Fan Replacement: Schritt 6, Bild 1 von 1
    • Unplug the shown cable attaching the cooling fan to the computer.

  7. Gateway SA1 Cooling Fan Replacement: Schritt 7, Bild 1 von 1
    • You are now able to remove the cooling fan.

Abschluss

To reassemble your device, follow these instructions in reverse order.

6 weitere Nutzer:innen haben diese Anleitung absolviert.

Team

Cal Poly, Team 24-20, Regan Spring 2010 Mitglied von Cal Poly, Team 24-20, Regan Spring 2010

CPSU-REGAN-S10S24G20

4 Mitglieder

14 Anleitungen geschrieben

0 Kommentare

Kommentar hinzufügen

Seitenaufrufe:

Letzte 24 Stunden: 0

Letzte 7 Tage: 2

Letzte 30 Tage: 3

Insgesamt: 13,430