Zum Hauptinhalt wechseln

Google Pixel 2 Battery Replacement

Archivierte Anleitung
Diese Anleitung wurde ausschließlich für historische Zwecke erhalten. Verwende die aktualisierte Version dieser Anleitung, um deine Reparatur durchzuführen.

Was du brauchst

  1. Google Pixel 2 Battery Replacement, Opening Procedure: Schritt 1, Bild 1 von 2 Google Pixel 2 Battery Replacement, Opening Procedure: Schritt 1, Bild 2 von 2
    • If your display glass is cracked, keep further breakage contained and prevent bodily harm during your repair by taping the glass. This also makes a smooth surface allowing the suction cup to bond.

    • Apply a suction cup as close to the volume button edge of the phone as you can while avoiding the curved edge.

    • The suction cup will not make a good seal on the curved portion of the glass.

  2. Google Pixel 2 Battery Replacement: Schritt 2, Bild 1 von 3 Google Pixel 2 Battery Replacement: Schritt 2, Bild 2 von 3 Google Pixel 2 Battery Replacement: Schritt 2, Bild 3 von 3
    • Pull up on the suction cup with firm, constant pressure and insert an opening pick between the front panel and rear case.

    • Do not insert the pick deeper than 1.5 mm, or you risk damaging the OLED panel.

    • This requires a significant amount of force and patience. If you have trouble, rock the suction cup and screen to weaken the adhesive, or apply heat with an iOpener, heat gun, or hair dryer.

    • The display panel is fragile. If you plan to re-use your display, take care to insert your tool only as far as necessary to separate the adhesive. Inserting the tool any further can damage the OLED panel under the glass.

  3. Google Pixel 2 Battery Replacement: Schritt 3, Bild 1 von 2 Google Pixel 2 Battery Replacement: Schritt 3, Bild 2 von 2
    • In the following steps, extra caution is required in certain areas to avoid damage to the phone:

    • Do not insert the pick more than 9 mm into the bottom edge of the phone. If the pick contacts the folded portion of the OLED panel it can damage the display.

    • Only make very shallow cuts in the upper left corner, prying deeply can damage the front-facing camera.

    • Inserting an opening tool deeper than 1.5 mm into the sides of the device, or 9 mm into the top and bottom can permanently damage the display.

  4. Google Pixel 2 Battery Replacement: Schritt 4, Bild 1 von 2 Google Pixel 2 Battery Replacement: Schritt 4, Bild 2 von 2
    • In the following steps, use the flat of the opening pick, rather than a corner, to cut here. This will help prevent inserting the pick too deeply.

    • Slide the opening pick up the right side of the phone to separate the display adhesive.

    • Take extra care with the side bezels, which are only 1.5 mm deep.

  5. Google Pixel 2 Battery Replacement: Schritt 5, Bild 1 von 3 Google Pixel 2 Battery Replacement: Schritt 5, Bild 2 von 3 Google Pixel 2 Battery Replacement: Schritt 5, Bild 3 von 3
    • Slide the opening pick around the upper-right corner and along the top edge of the phone.

    • There's a mesh covering the earpiece speaker on the top edge of the screen. If you don’t have a replacement mesh, take care not to damage or lose this component.

  6. Google Pixel 2 Battery Replacement: Schritt 6, Bild 1 von 3 Google Pixel 2 Battery Replacement: Schritt 6, Bild 2 von 3 Google Pixel 2 Battery Replacement: Schritt 6, Bild 3 von 3
    • Slide the pick around the upper-left corner of the phone and down the left edge of the phone.

  7. Google Pixel 2 Battery Replacement: Schritt 7, Bild 1 von 3 Google Pixel 2 Battery Replacement: Schritt 7, Bild 2 von 3 Google Pixel 2 Battery Replacement: Schritt 7, Bild 3 von 3
    • Slide the pick around the bottom-left corner and along the bottom of the phone. Keep pick at a slight angle away from the screen to avoid damage to the OLED corners.

    • Take extra care not to insert the opening pick more than 9 mm to avoid damaging the OLED panel.

  8. Google Pixel 2 Battery Replacement: Schritt 8, Bild 1 von 2 Google Pixel 2 Battery Replacement: Schritt 8, Bild 2 von 2
    • Reinsert the pick at the top edge of the phone and gently pry up the display.

    • If the display doesn't readily lift, do some extra prying to separate the last of the adhesive. The adhesive near the upper speaker is thicker than other places.

    • Don't try to fully separate the display yet, as a fragile ribbon cable still connects it to the phone's motherboard.

  9. Google Pixel 2 Battery Replacement: Schritt 9, Bild 1 von 2 Google Pixel 2 Battery Replacement: Schritt 9, Bild 2 von 2
    In diesem Schritt verwendetes Werkzeug:
    Magnetic Project Mat
    $19.95
    Kaufen
    • Carefully lay the display down on top of the rear case as shown, making sure not to crease or tear the display ribbon cable.

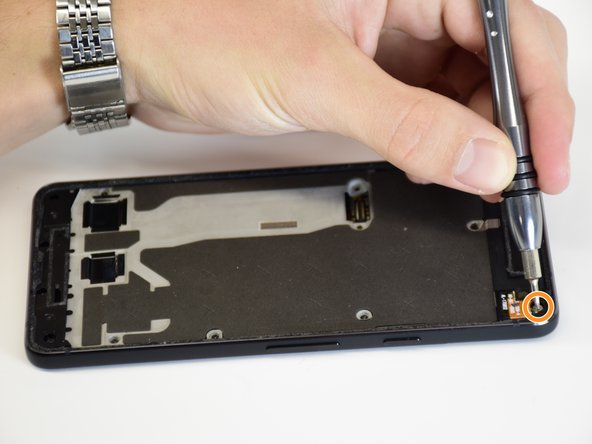
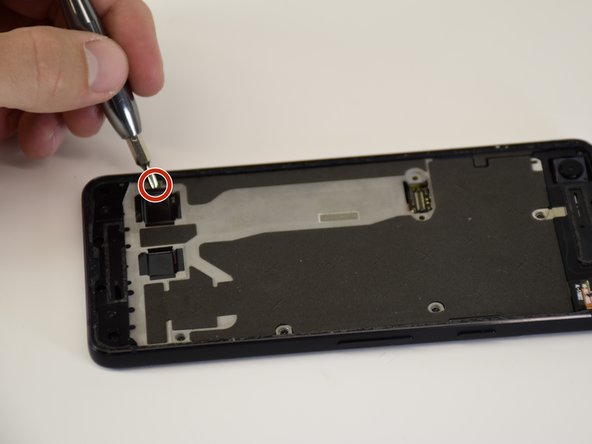
    • Remove the two 4.0 mm T5 Torx screws securing the display cable bracket.

    • Throughout this repair, keep track of each screw and make sure it goes back exactly where it came from.

  10. Google Pixel 2 Battery Replacement: Schritt 10, Bild 1 von 1
    • Remove the display cable bracket.

  11. Google Pixel 2 Battery Replacement: Schritt 11, Bild 1 von 2 Google Pixel 2 Battery Replacement: Schritt 11, Bild 2 von 2
    • Use the point of a spudger to lift the display cable connector up and out of its socket on the motherboard.

    • Avoid touching the motherboard with the tip of your spudger. The components surrounding the socket are fragile.

    • To re-attach press connectors like this one, carefully align and press down on one side until it clicks into place, then repeat on the other side. Do not press down on the middle. If the connector is misaligned, the pins can bend, causing permanent damage.

    • If any part of your screen doesn't respond to touch after your repair re-seat this connector, making sure it clicks fully into place and that there's no dust or other obstruction in the socket.

    • During reassembly, pause here and replace the adhesive around the edges of the display.

  12. Google Pixel 2 Battery Replacement, Battery: Schritt 12, Bild 1 von 3 Google Pixel 2 Battery Replacement, Battery: Schritt 12, Bild 2 von 3 Google Pixel 2 Battery Replacement, Battery: Schritt 12, Bild 3 von 3
    • Remove the 11 J000 3.5-mm screws.

    • Remove the single T5 4.0-mm screw.

  13. Google Pixel 2 Battery Replacement: Schritt 13, Bild 1 von 1
    • Pull the black protective sheet off by using the plastic opening tool.

    • It is normal to hear popping noises as the sheet is detached from the phone body.

  14. Google Pixel 2 Battery Replacement: Schritt 14, Bild 1 von 3 Google Pixel 2 Battery Replacement: Schritt 14, Bild 2 von 3 Google Pixel 2 Battery Replacement: Schritt 14, Bild 3 von 3
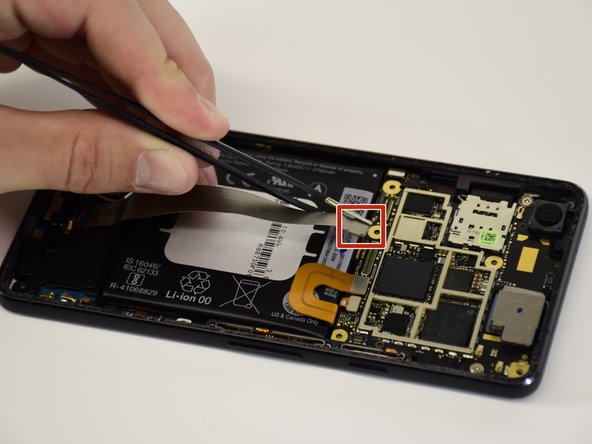
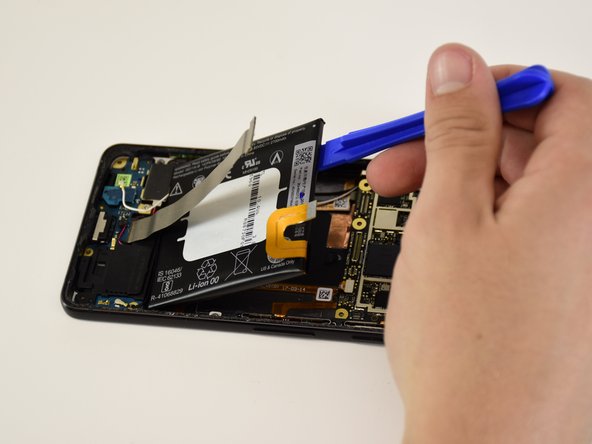
    • Remove the silver ribbon connector that stretches over the battery by grabbing it with the tweezers and lifting up.

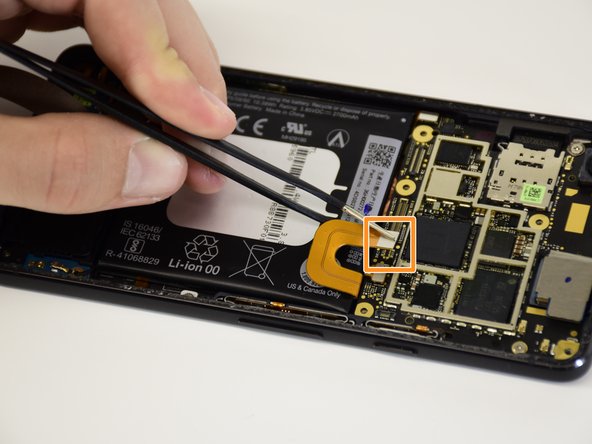
    • Remove the gold ribbon connector by grabbing it with the tweezers and lifting up.

  15. Google Pixel 2 Battery Replacement: Schritt 15, Bild 1 von 3 Google Pixel 2 Battery Replacement: Schritt 15, Bild 2 von 3 Google Pixel 2 Battery Replacement: Schritt 15, Bild 3 von 3
    • Lift up the battery using the plastic opening tool.

    • The battery is glued to the bottom, removing it will not damage the device.

    • Remove the battery using your hand.

    • Do not reuse the battery after it has been removed, as doing so is a potential safety hazard. Replace it with a new battery.

    • To install a new battery:

    • Remove any remaining adhesive from the phone, and clean the glued areas with isopropyl alcohol and a lint-free cloth.

    • Secure the new battery with pre-cut adhesive or double-sided adhesive tape. In order to position it correctly, apply the new adhesive into the phone, not directly onto the battery.

    • Press the battery firmly into place for 5-10 seconds.

Abschluss

To reassemble your device, follow these instructions in reverse order.

Nick Lyon

Mitglied seit: 01/24/18

1.137 Reputation

2 Anleitungen geschrieben

Team

Cal Poly, Team S18-G5, Livingston Winter 2018 Mitglied von Cal Poly, Team S18-G5, Livingston Winter 2018

CPSU-LIVINGSTON-W18S18G5

4 Mitglieder

11 Anleitungen geschrieben

0 Kommentare

Kommentar hinzufügen

Seitenaufrufe:

Letzte 24 Stunden: 0

Letzte 7 Tage: 0

Letzte 30 Tage: 1

Insgesamt: 67