Einleitung
This repair guide was authored by the iFixit staff and hasn’t been endorsed by Google. Learn more about our repair guides here.
Follow this guide to remove and replace the motherboard on the Google Pixel 5.
For your safety, discharge your battery below 25% before disassembling your phone. This reduces the risk of a dangerous thermal event if the battery is accidentally damaged during the repair.
Warning: Do not reuse the battery if it has been deformed or damaged, as doing so is a potential safety hazard. Replace it with a new battery.
Was du brauchst
-
-
Insert a SIM eject tool, bit, or straightened paper clip into the SIM card tray hole.
-
Press firmly to eject the SIM card tray.
-
Remove the SIM card tray.
-
-
-
Heat an iOpener and apply it to the bottom edge of the screen for one minute.
It would be helpful to know for how long ally the heated pad
Agreed, my friend from the past.
If you click on the "iOpener" link, it tells you to heat it up for 30 seconds, and if you're using a microwave with a carousel, make sure it moves freely.
-
-
-
Screen seam: This seam separates the screen from the rest of the phone. Do not pry at this seam.
-
Bezel seam: This is where the plastic bezel designed to protect the screen meets the frame. It's held in place by plastic clips. This is where you should pry.
Please remove the image of the pick in the bottom of the phone in Step 2. This led me to place a pick there BEFORE step 5 which damaged my digitizer. Now I have to replace the entire screen as a result.
Alternatively, add the image from step 5 with the suction cup in place, or just draw an arrow digitally to the seam you're referring to in step 2. Or call "Step 2" "Important Note" instead of a step.
Wow, I'm glad I read this first. I too assumed this step was about inserting the pick, but wasn't sure because it wasn't clearly written that way.
Agreed with the "important note" idea, along with combining this with step 5 where the context is actually relevant.
-
-
-
Pull the blue handle towards the hinge to disengage opening mode.
-
Position the suction cups near the bottom edge of the screen—one on the front, and one on the back.
-
Push down on the cups to apply suction to the desired area.
-
-
-
Push the blue handle away from the hinge to engage opening mode.
-
Turn the handle clockwise until you see the cups start to stretch.
-
Wait one minute to give the adhesive a chance to release and present an opening gap.
-
Insert an opening pick under the screen and its bezel frame when the Anti-Clamp creates a large enough gap.
-
Skip the next step.
-
-
-
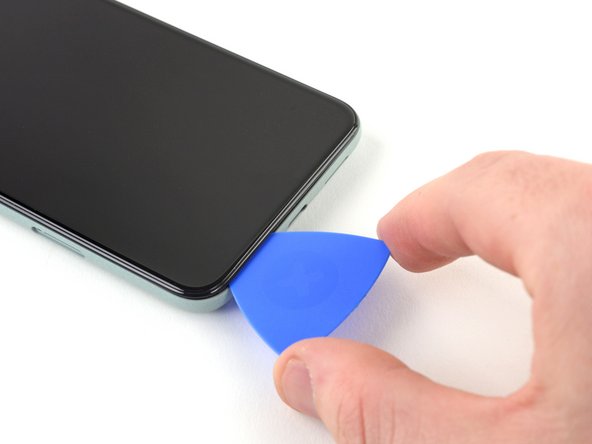
Apply a suction cup to the screen, as close to the heated edge as possible.
-
Pull up on the suction cup with strong, steady force to create a gap.
-
Insert the opening pick into the gap.
"Insert the opening pick into the gap." NOT the gap under the glass, the second gap... If not you will probably break your screen, at least I did. Especially important if your pixel 5 shipped with the screen gap :(
-
-
-
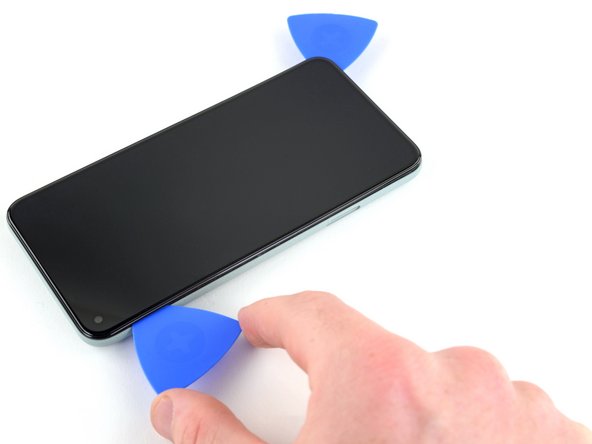
Slide the opening pick back and forth along the bottom of the screen to slice the adhesive.
-
Leave the pick inserted in the bottom right corner to prevent the adhesive from re-sealing.
-
-
-
Apply a heated iOpener to the left edge of the screen for one minute.
-
-
-
Insert another opening pick into the bottom left corner of the screen.
-
Slide the opening pick around the left corner.
-
Continue to slide the pick up towards the front camera to slice the adhesive on the left edge of the screen.
-
Leave the pick inserted to prevent the adhesive from re-sealing.
I suggest placing an orientation sticker on the screen so you don't lose track of where that delicate ribbon cable is. I gently bent one, immediately after doing a successful one, resulting in a costly screen replacement. It's important to know that it's incredibly delicate.
-
-
-
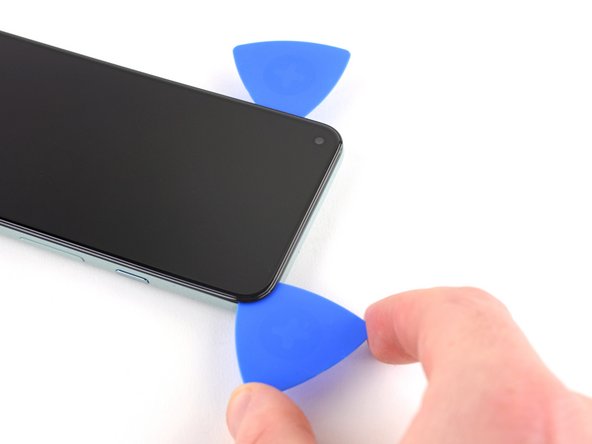
Insert another opening pick into the top left corner of the screen.
-
Slide the pick around the front camera and across the top edge of the phone.
-
Slide the pick to the top right corner of the phone and leave the pick inserted.
-
-
-
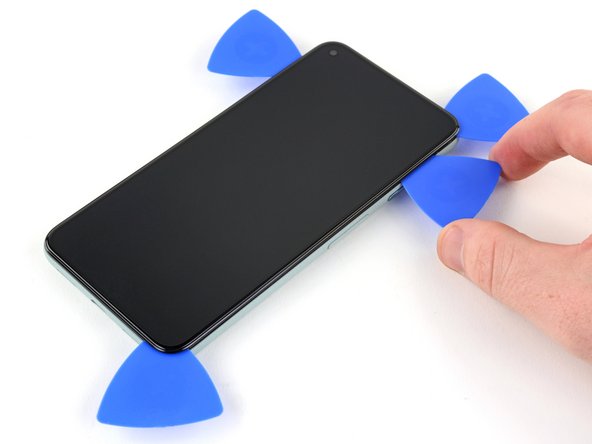
Insert an opening pick into the bottom right corner of the screen.
-
Slide the pick up to the top right corner to slice the last edge of adhesive.
-
-
-
Use the opening pick from the top left corner to lift up the left edge of the screen a few millimeters. This will keep the clips from snapping back down into the case.
-
Lift up on the right side of the screen and open up the phone like a book.
-
-
-
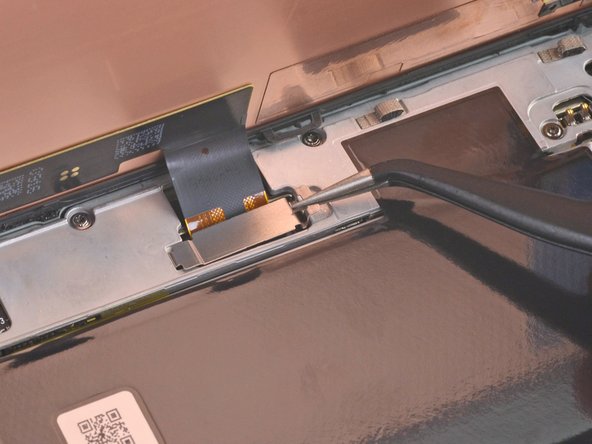
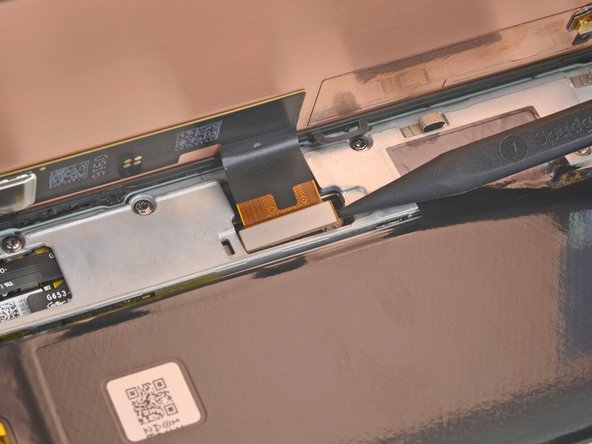
Use tweezers to grip the screen connector cover securing the screen flex cable.
-
Push the clip in towards the connector to unlatch it.
I found it easier to use the spudger here rather than the tweezers (which have sharp ends that could damage something if you happen to slip).
some 5a models will have a screw instead of clip , here's a photo https://imgur.com/a/9dZG5pQ
-
-
-
-
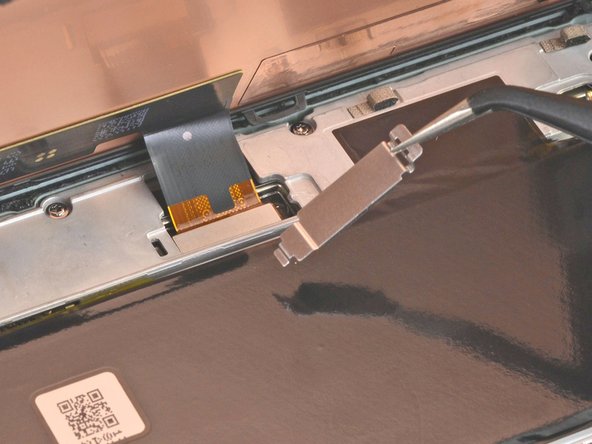
Use the tip of the spudger to pry up and disconnect the screen flex cable.
The curved ends of the blue iFixit Opening Tool helped me reseat the connector when installing the new screen.
So hard to get this thing reseated to test the screen, even before putting the adheasive round the phone edge to finish the job. What made it particularly hard was that the flex cable on mine seemed very short compared to video's i've seen online.
-
-
-
Remove the screen.
Where from we can buy the screen. Thanks
the screen does not fit
-
-
-
Use tweezers to lift up the graphite tape until you are able to grip it with your fingers.
-
Peel off the graphite tape.
On reassembly, I missed the graphite tape installation. Will this be an issue?
-
-
-
Use tweezers to peel off the graphite pad covering the charging plate cover.
-
-
-
Use a T3 Torx driver to remove the two 4.6 mm-long screws securing the charging plate cover to the midframe.
-
-
-
Use a T3 Torx driver to remove the eight 4.6 mm-long screws securing the midframe.
-
-
-
Use tweezers to lift up the right side of the midframe.
-
Remove the midframe.
Removing the midframe may cause a metal-foam spacer above the light sensor to pop out. After placing in the midframe on re-assembly, you can use the tweezers to squeeze the spacer back in between the midframe and the metal divider near the top of the phone.
There is a picture of this spacer at https://www.ifixit.com/Guide/Google+Pixe.... To replace it, first replace the midframe. Then, before screwing the midframe back down, use the tweezers to pinch the space together, compressing the foam in the middle, and slide it into place.
-
-
-
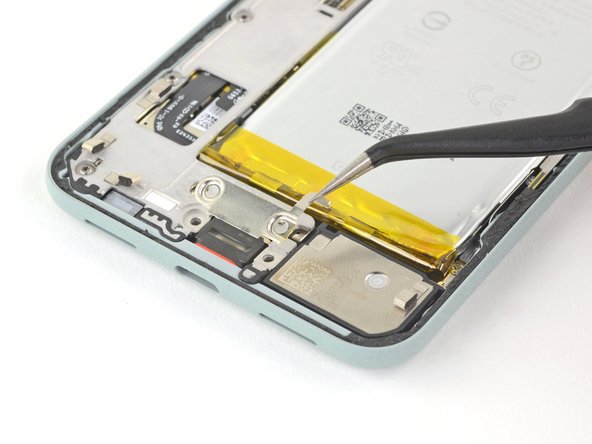
Use the pointed end of the spudger to pry the battery connector straight up and disconnect it from the motherboard.
-
-
-
Use a T3 Torx driver to remove the 4.1 mm shouldered screw.
-
-
-
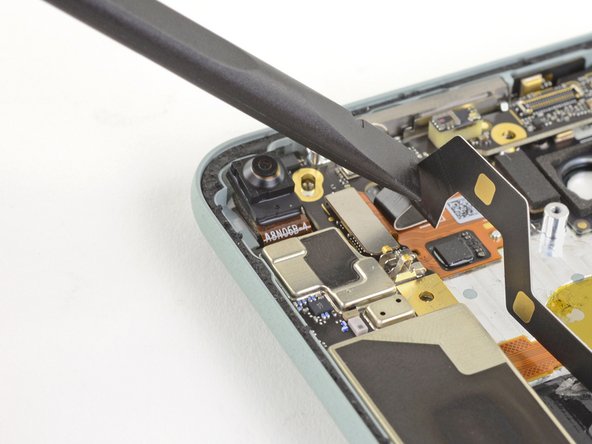
Use the spudger to disconnect the two rear camera press connectors from the motherboard.
-
-
-
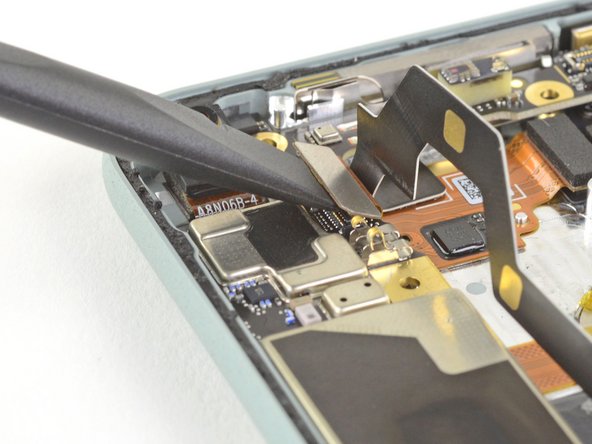
Use tweezers to lift up on the rear camera assembly to remove it from its housing.
-
-
-
Use blunt nose tweezers to grip the black adhesive pull tab located on the top right edge of the battery. Lift the pull tab with the tweezers until you are able to grip it with your fingers.
-
Pull on the pull tab with a slow, steady force at a shallow angle to prevent the pull tab from snapping in the middle.
-
If the pull tab breaks prematurely, use tweezers to retrieve the remaining length of adhesive and continue pulling.
I found what helped the best, was after grabbing the tab wrapping it around the tip of the spudger, and rolling slowly away, holding it as close as possible to where the tab was. Before I did that since you're pulling so much at once it easily snapped in half. Luckily I could grab a tiny bit of the strip. After wrapping it around the spudger, it no longer broke. The whole strip came off in one piece. Both pieces are complete horizontal pieces and are along the entire width of the battery, from the side you're pulling to the other side of the battery. There's quite a bit there especially since it stretches during this process. You'll feel it suddenly basically give away. ******
It is very much like the adhesive strips you use to hang items on the wall. When you're removing the hook, you pull at a low angle on that tab and it stretches until it comes off clean. Pull too high and you peel paint. A similar process here, keep it low and roll it slowly on the spudger. It will come away cleanly.
Pull very slowly. Once there is enough out to grip with fingers use your fingers . The tweezers concentrated the load in a small contact area with hard edges. more likely to start a tear. Easier to control pull as well. As the tab comes out keep regripping closer to the battery. That takes the load off the part of tab that has already been stretched thin and weakened.
-
-
-
Use the same process to remove the pull tab located at the bottom left edge of the battery.
-
-
-
If any of the adhesive strips broke off underneath the battery and could not be retrieved, apply a few drops of high concentration (over 90%) isopropyl alcohol into the opening of the affected tab.
This is a frustrating step since I bought the kit thinking I had everything I needed. I don't keep 90% isopropyl alcohol on hand (71% is effective as a disinfectant, where as 90% is not).
For those who also do not have 90% on hand, I was able to just gently lift the battery out without the alcohol and the graphite under the battery remained in perfect condition and did not tear at all.
-
-
-
Tilt the phone so that the alcohol flows towards the remaining adhesive.
-
Wait one minute for the adhesive to soften, then proceed to the next step.
If you're like me, I ended up having a random piece fall out of the phone that I had no idea where it went. After searching I gave up and left it out. However, after looking at the second photo in this step, the one with it tilted fully towards the camera, I found it. Between the index and thumb in the photo, directly in the center of the phone is a thick gray bar. Just to the right of it is a loose piece that might fall out for you. It looks like two thin pieces of metal that sandwich some insulation. You will also notice two tiny tabs bent at an angle on each end only on one side. If that piece does fall out, that's where it goes. Just match the tab angles with this photo and location. I, unfortunately, don't have that piece anymore and am not willing to break through that display adhesive to put it back anyways.
-
-
-
Insert an opening pick into the gap long the left side of the battery.
-
Use the opening pick to slice the remaining adhesive at the top and bottom of the battery.
-
If you cannot pry the battery up, add a few more drops of isopropyl alcohol to the adhesive. A plastic card can also be helpful during this process.
This was, by far, the hardest step for me. Pay very much attention to that link "strategically located". It tells you exactly where the toughest adhesive is. I had to use a lot of isopropyl alcohol, a lot of waiting for the adhesive to dissolve, and the thin spudger on only the top and bottom of the battery to pry it out. I did not use the pick.
I don't think it's worth applying adhesive when putting the battery back in.
Absolutely agree. More isopropyl alcohol, a lot of waiting is the key.
Watch how far you push in. The thin cable for the finger print sensor is at the back I snapped it pushing into the glue.
Try to not use alcohol. Or at least use just a tiny bit without tilting the phone too much. While it worked for me, it leaked into my primary camera lens. Wide camera is okay fortunately, so I can still take photos for important things, and I hope in the next few days alcohol will evaporate. I also tried to put the iOpener on the camera to increase the pressure and move the alcohol to the edges. It kinda worked but photos are still a no go, too blurred
Just to update who may read this, alcohol fully evaporated after 1 day. I've been very lucky 😅!
-
-
-
Remove your old battery.
Step 28 battery replacement guide. This is the battery replacement guide - for bad batteries. So why does it say "Do not reuse the battery if it has been deformed or damaged, as doing so is a potential safety hazard. Replace it with a new battery." This must have been copied from a different guide, that does not involve battery replacement.
-
-
-
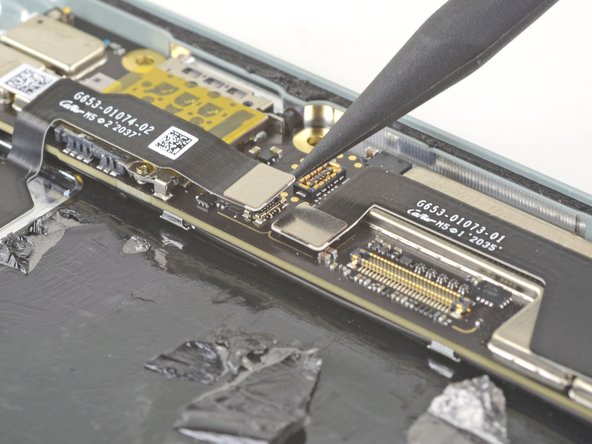
Use the pointed end of a spudger to disconnect the two press connectors by lifting them straight up from the motherboard.
-
-
-
Use a T3 Torx driver to remove the two 2.9 mm screws securing the motherboard to the rear case.
-
-
-
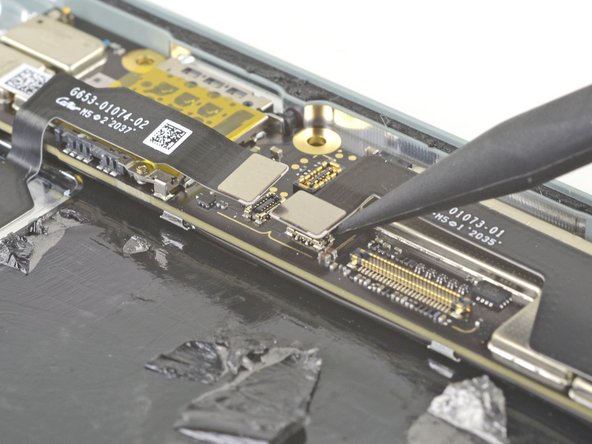
Use a spudger to gently fold the flex cable covering the rear case press connector out of the way.
-
-
-
Use the spudger to disconnect the rear case press connector.
-
-
-
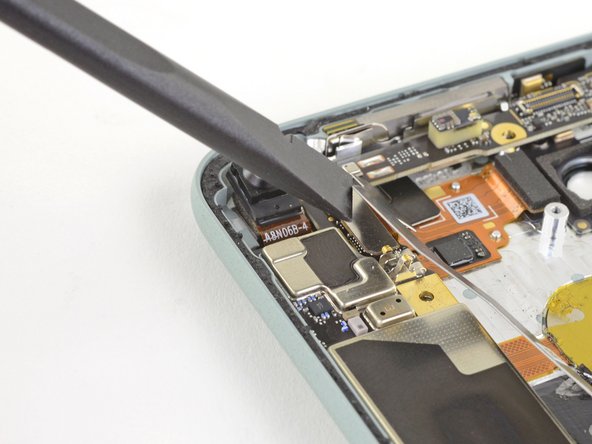
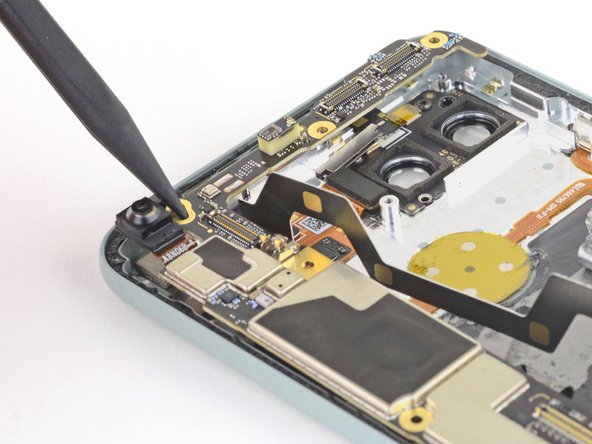
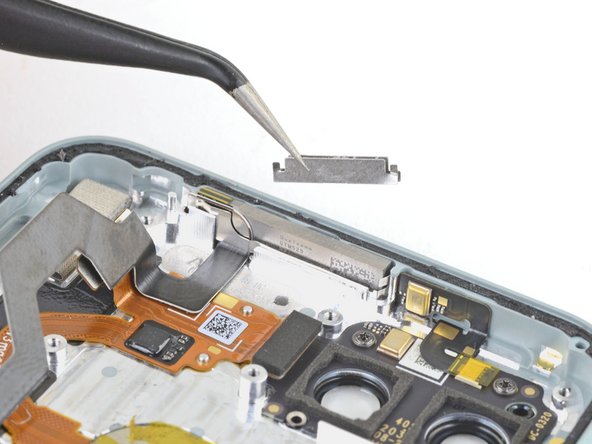
Insert the pointed end of the spudger into the screw holes near the front facing camera.
-
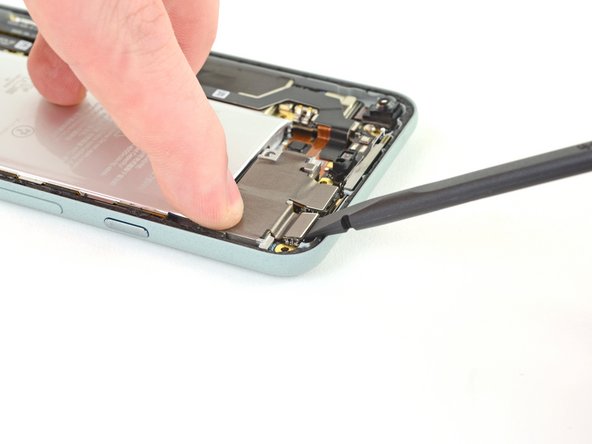
Push the motherboard down towards the bottom of the phone, then lift up to free the top of the motherboard from the rear case.
-
-
-
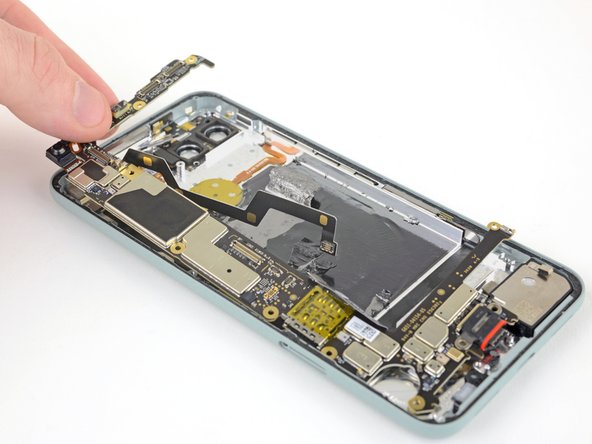
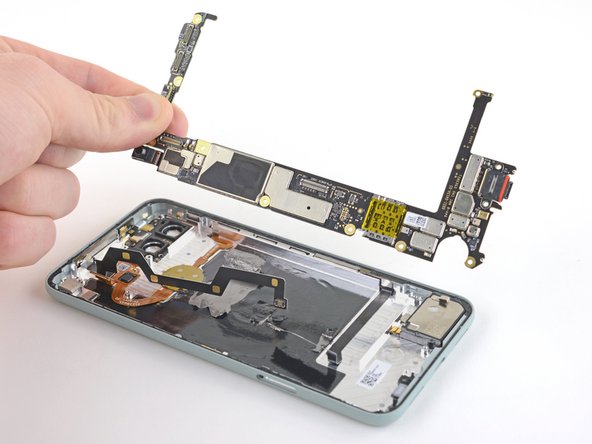
Use your fingers to pull the motherboard up towards the top of the rear case to free the charging port.
-
Remove the motherboard.
-


Compare your new replacement part to the original part—you may need to transfer remaining components or remove adhesive backings from the new part before installing.
To reassemble your device, follow the above steps in reverse order.
Take your e-waste to an R2 or e-Stewards certified recycler.
Repair didn’t go as planned? Try some basic troubleshooting, or ask our Answers community for help.
Rückgängig: Ich habe diese Anleitung nicht absolviert.
3 weitere Nutzer:innen haben diese Anleitung absolviert.

3 Kommentare
Good day. Please tell me, what is the size of the vibration motor for the pixel 5? I can't find the type of vibro motor anywhere.
Mr. Boyd, where exactly is the proximity sensor inside the Pixel 5 phone?
Any idea on model number for power IC in pixel 5? The technician is saying its Qualcomm PM8996 or PMI 8996 001 Power Management IC. Can somebody please help with my dead pixel 5 please!