Einleitung
Diese Anleitung wurde von iFixit-Mitarbeiter:innen verfasst und ist keine offizielle Reparaturanleitung von Google. Hier erfährst du mehr über unsere Qualitätsstandards.
Bringe nach erfolgter Reparatur einen vorgestanzten Klebestreifen am Display des Google Pixel oder Pixel XL an.
Manche Ersatzdisplayklebestreifen werden nicht mit Ohrhörer-Lautsprechergitter geliefert. Wenn das bei dir der Fall ist, dann musst du vor dem Einbau das Gitter vom alten auf das neue Display übertragen. Du kannst hier auch einen neuen kaufen.
Bevor du anfängst, musst du die Displayeinheit deines Pixels schon ausgebaut und zur Seite gelegt haben. Genaue Anleitungen für jedes Modell findest du unter folgenden Links:
Was du brauchst
-
-
Löse alle Überreste des Displayklebers vom Gehäuse deines Smartphones ab.
-
Schabe mit der Spudgerspitze alle Kleberreste ab und beseitige gründlich alle Spuren.
-
Du erzielst die besten Ergebnisse, wenn du die Klebeflächen mit Ispropylalkohol (mindestens 90%ig) reinigst und für die Montage vorbereitest.
-
-
-
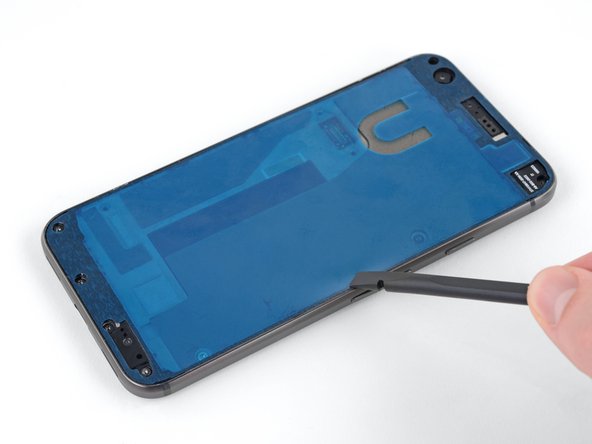
Die Ersatzklebestreifen dürfen nur an den Kanten es Rahmens befestigt werden, es kann aber sein, dass das Innere des Klebestreifens gefüllt ist.
-
Um das überflüssige Innere des Klebestreifens zu entfernen, musst du die weiße Schicht (Papier) und die schwarze Klebeschicht vom U-förmigen Ausschnitt her beginnend vorsichtig ablösen.
-
-
-
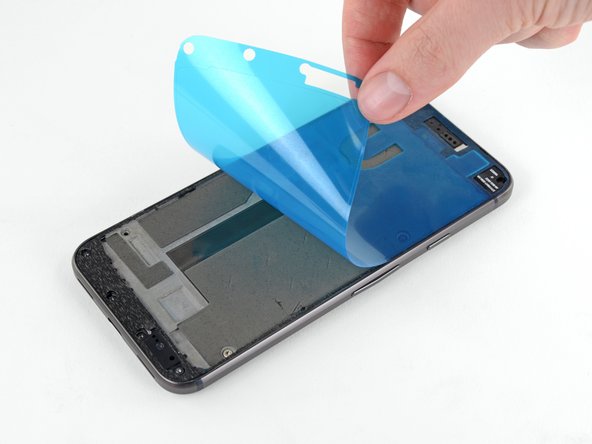
Ziehe die verbliebene Schutzschicht aus Papier ab und entsorge sie. Dadurch liegt die Klebefläche darunter frei.
What the pics above don’t really point out is that - at least for the example I received - If you start out at one top corner and are extremely careful, you can peel the backing off in essentially one piece going down along the long edge, along the bottom and back up the other long edge to the other top corner. I messed that part up but once I was done it was clear that’s how it was supposed to work. That said, mine had an extra piece of backing up top that was separate from the rest which had to be pulled off after.
Also, I managed to stretch out one of the long edges and had to snip it with scissors to get the pieces to fit properly. So, be careful about that but if it happens it’s really no big deal to fix.
There is a little square on the adhesive covering that should be removed before you remove the rest. Otherwise, you will have just that little chunk of covering left, and won’t be able to touch much of the adhesive pad while trying to get it off. I managed it, but doing it the other way around would have saved frustration and removed any risk of stretching out the glue.
Can we all agree that thinner phones is not worth this crap?
-
-
-
-
Halte die Klebefolie mit der Klebeschicht nach unten und richte sie sorgfältig an der Unterkante des Smartphones aus.
-
Wenn er genau ausgerichtet ist, dann lege den restlichen Bogen auf das Smartphone ab.
This was honestly easier than I thought it would be. The only complication is that the right side of the plastic was just a hair too wide, so the glue lined up perfectly on the left side, but wouldn’t fit in perfect on the right. I simple pushed everything down as best as I could, removed the cover, and then used the tweezers to make sure the right side of the adhesive was in the groove.
The problem could have been on the left side if I inserted the glue holder different, so it would work either way.
-
-
-
Drücke den Kleber fest.
I held the spudger facing the inside, rather than over the edge towards the outside as pictured here, and my sides missed the spot in a few places. (I’m gonna try pushing them in place with the spudger after I peel, but I thought I would share that this direction I pushed might be why they missed their mark.)
The plastic adhesive sheet was SLIGHTLY too big to fit perfectly into the grooves. One side went in fine, but I had to use the tweezers to fit the other side of glue into the track properly (pushing down before pulling the sheet off would likely have mashed up the adhesive).
-
-
-
Ziehe die Plastikschutzschicht ab und entsorge sie. Dadurch wird der Displaykleber freigelegt.
Once I peeled the backing off I had to take a few minutes with the spudger to tamp down a few places where the adhesive wasn’t flat. No biggie.
-
-
-
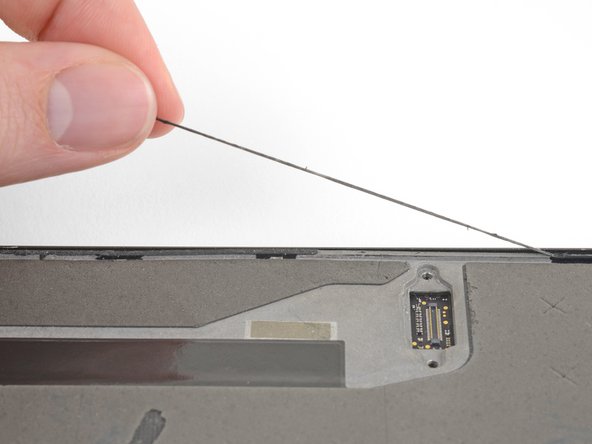
Schließe den Displaykabelstecker wieder an.
-
Schraube den Steckerhalter fest.
-
Schalte dein Smartphone ein und prüfe, ob deine Reparatur erfolgreich war.
I tested the the display BEFORE attaching the adhesive in the previous step because if something wasn’t right I didn’t want to have wasted the adhesive. Just a quick power on/off, unplug the display and then apply the adhesive.
How do you know if phone is on without display?
Connect the display without re-adhering it to do the testing! Then when you’re sure it’s working you can disconnect it and apply the new adhesive.
-
-
-
Wenn du sicher bist, dass das Display gut funktioniert, dann richte es sorgfältig mit dem Rahmen aus und drücke es fest
The new display was slightly raised along both long edges so I heated it up with a hair dryer and VERY GENTLY used my thumbs to press down along the edges until I could feel the display begin to flatten out and sit properly. Didn’t take long for this to happen (10min?). Once I got to this point I heated it up one last time, layed a microfiber cloth over the display and set a heavy (not crazy) stack of books on top and let it sit for 30min (as recommended above). When complete the display was nice and flat but after a while it started to bow up again, so I re-heated it, applied books and waited another 30min. Ended up having to do this three (3) times before it stayed flat. After several hours it’s still flat.
-


Entsorge deinen Elektromüll fachgerecht.
Die Reparatur hat nicht den gewünschten Erfolg gebracht? Unsere Community kann dir weiterhelfen.
Entsorge deinen Elektromüll fachgerecht.
Die Reparatur hat nicht den gewünschten Erfolg gebracht? Unsere Community kann dir weiterhelfen.
Rückgängig: Ich habe diese Anleitung nicht absolviert.
48 weitere Nutzer:innen haben diese Anleitung absolviert.
Besonderer Dank geht an diese Übersetzer:innen:
100%


Diese Übersetzer:innen helfen uns, die Welt zu reparieren! Wie kann ich mithelfen?
Hier starten ›

2 Kommentare
What is the included tesa tape for?
The Tesa tape is to adhere the battery to the frame. You don't want anything moving around inside your phone--that can stress, damage, or disconnect ribbon connectors.
Isopropyl Alcohol will damage the foam padding if you aren’t careful - the pad will dissolve away.
Jackson Schleich - Antwort
That’s a good point, Jackson! I added a warning to the step.
Taylor Dixon -
What if i remove the foam padding? Is it okay to install the display back without the foam?
PalmY Phokham - Antwort
That’s okay! The foam padding just acts as a support for the display, so your new display might be a little more vulnerable to a crack in the future. If you’re really worried about it, you can look for a replacement midframe part with the foam still attached.
Taylor Dixon -
Removing the adhesive took FOREVER for me. What ended up working best for me was to use a dry thumb and friction rubbing back and forth to get the gummy adhesive to kind of ball up and come off. Oh, and to really get the bits of adhesive along the edges I ended up removing the midframe to more easily get at it. Finally, I used rubbing alcohol and Q-Tips to get any remaining bits and pieces.
Steven Crider - Antwort
+1 on removing the midframe to clean it… it’s a hassle to remove if you’re only replacing the screen, but it keeps you from accidentally melting the foam padding with IPA.
Mr. Porter -
A lot of the adhesive was stuck to my screen rather than the chassis. In the process of scraping it off, I removed some of the white paint which served as the background near the speaker area. This is kind of unsightly and noticeable when reinstalled. You might want to caution folks to use a rubber utensil rather then the metal one I used, as the background on the display side can be scraped off and leave a gap in the paint.
Eric Kreps - Antwort
I used a spudger for the most part, combined with some heat from a hairdryer from time to time, and lots of isopropyl alcohol (at least on the screen half… as mentioned by others, be careful about going too crazy with IPA on the midframe, as the pad will melt.) At one point, I got a little cocky and tried using my tweezers (dipped in IPA), and it worked great for about 30 seconds before I left a small scratch… which is visible from the outside.
—
Only use non-abrasive, non-metallic tools for cleaning.
Mr. Porter - Antwort