Diese Übersetzung enthält möglicherweise noch nicht die neuesten Änderungen der Original-Anleitung. Hilf mit, die Übersetzung zu aktualisieren oder sieh dir die Original-Anleitung an.
Einleitung
Wenn dein Google Pixel XL ganz allgemein schlecht funktioniert, und du die Ursache nicht feststellen kannst, dann hilft vielleicht der Austausch der Hauptplatine.
Das nicht verstärkte Display des Pixel XL ist zerbrechlich und mit zähem Klebstoff am Rahmen befestigt, dadurch sind Reparaturen schwierig. Es kann leicht passieren, dass das Display bricht, besonders wenn es schon Mikrorisse hat. Wende ausreichend Wärme an und sei beim Hebeln besonders vorsichtig.
Was du brauchst
-
-
Setze ein SIM Auswurfwerkzeug, einen SIM Auswurfbit oder eine aufgebogene Büroklammer in das kleine Loch oben in der linken Seitenkante des Smartphones ein.
-
Drücke darauf, dann springe der Einschub heraus.
-
-
-
Erwärme einen iOpener und lege ihn zwei Minuten lang auf die linke Displaykante.
-
Achte auf die Klebezonen, bevor du anfängst zu hebeln:
-
Dünne Klebestreifen am Displayglas
-
Dicke Klebestreifen
From my experince, it’s better to use a heat gun (if iFixit sold a good heat gun in volume, they should spruik that). Also, heat ALL sides at the same time BUT concentrate on the top part of the phone where the foam adhesive tape is thickest, second on the bottom where the foam is almost as thick. It also helps to use the 2nd & 3rd images in the series to visualise where the adhesive is.
Ty for the advice I prefer heat gun but my first pixel
-
-
-
Wenn sich der Rand warm anfühlt, dann setze einen Saugheber nahe an der Kante an.
-
Hebe den Saugheber hoch und setze ein Plektrum in den entstandenen Spalt ein.
-
Wenn es schwer geht, einen Spalt zu öffnen, dann erwärme den Rand nochmals und probiere es erneut.
From my experience, I had to use a thin blade (such as the ones included with the deluxe iFixit repair kit) to slide into the small gap, and cut away at the foam adhesive. Once enough of a gap is created, the picks can then be used to push the adhesive aside - but the adhesive is so thick, especially -as Brewmaster396 observed in the comments below - at the top right corner behind the screen, that the knife is required to cut it. I failed here - cracking the back layer of my screen - because I didn’t take time to cut all the adhesive away from that thick part, and kept trying to pull the screen off. It doesn’t take a lot of pressure to crack - so maybe it’s more a thing of cutting and floating the screen up, not pulling and prying.
Mark the picks with lines that show how deep you can go in that part of the screen. This will help keep you from accidentally hitting the fragile screen
Matthew Goodwin - Excellent suggestion.
Jon T made a great suggestion about creating a mark on the picks (see above).
Matthew Goodwin responds with an “Excellent suggestion.”
Here we are 8 months later and no lines on the picks in my new pro-tech tool kit, not sure why this hasn’t been implemented at this point in time.
Bob H.
-
-
-
Schneide mit dem Plektrum an der Oberkante entlang, um den Kleber aufzutrennen.
-
Lasse ein Plektrum in der Kante stecken, damit der Klebstoff sich nicht wieder verbinden kann.
-
-
-
Erwärme einen iOpener und lege ihn zwei Minuten lang auf den rechten Rand des Smartphones.
-
Setze ein Plektrum nahe an der Oberkante des Smartphones ein, dort wo du den Kleber vorher schon aufgetrennt hast.
-
Führe das Plektrum um die rechte Ecke herum.
-
Schneide den Kleber mit dem Plektrum behutsam an der rechten Kante nach unten auf.
-
Wiederhole das Ganze an der linken Kante des Smartphones.
-
-
-
Erwärme zwei Minuten lang den unteren Rand mit dem iOpener.
-
Setze ein Plektrum nahe an der rechten Kante, wo du schon den Kleber gelöst hast.
-
Führe das Plektrum behutsam um die Ecke herum.
-
Trenne mit dem Plektrum den Kleber entlang der Unterkante auf.
-
-
-
Wenn du um das ganze Smartphone herum aufgeschnitten hast, dann hebe die Displayeinheit vorsichtig an den rechten Ecken ein wenig hoch.
-
Schneide mit einem Plektrum durch alle restlichen Verklebungen.
As long as you’ve disengaged the adhesive relatively evenly around all sides, I found mounting the suction cup in the middle (biased a little to the left or right side), helps a lot on this step.
-
-
-
Hebe die Displayeinheit am oberen Ende hoch und klappe sie herum, so dass sie mit der Rückseite nach oben auf dem Rahmen liegt.
-
-
-
Entferne die beiden 4 mm Torx T5 Schrauben, mit denen die Displaykabelhalterung befestigt ist.
-
Entferne die Displaykabelhalterung.
-
-
-
Heble mit der Spudgerspitze das Displaykabel hoch und löse es aus seinem Anschluss heraus.
i have to agree with the comment here about the connector. If you press it in the middle, it will bend. Resulting in either bent pins on the motherboard or the display. In my case it was both !
Be careful prying up the connector and apply force only from the side as shown in the picture cause in the longest side there are capacitors that can be broke doing the lever ( happened to me Repair missing capacitor near display connection port )
-
-
-
-
Entferne die Displayeinheit.
The Parts List does not state you need a replacement display. Is this portion of the Repair Guide copied and pasted from another guide (perhaps the screen replacement guide) or will I need to procure a replacement screen before I attempt to replace the battery?
It is possible to replace the battery without replacing the display, but there is a significant chance you may break the display during removal. It depends on if your display already has micro-fractures, and how stubborn the screen adhesives are. I would personally buy a screen just in case, and return the part if I didn’t need it.
Hello, I recently bought a refurb screen off of eBay to fit. The phone was 100% working before and just needed a new display/battery.
The battery came before the display. I wanted to test the display before doing too much reassembly, so I plugged in the battery, connected the mother/daughter boards with the interconnect cable, and then plugged in the LCD.
When I press the power button there is the usual single buzz from booting, but the display is completely blank.
Is the replacement screen DOA, or are there important traces/connections made by fully assembling the midframe and missing screws before testing the LCD?
If I already have all the ingredients for a fair test of the LCD, then it seems the LCD is bad?
Like I said the phone worked perfectly before… and if the new battery is dead, I would expect no buzz, or at least a battery graphic?
Hi John,
If the phone buzzed, that usually signifies that it has booted up—having no image at that point usually means some kind of display issue. I would suggest disconnecting the display connector, carefully checking for any debris in the socket, and carefully re-connecting it.
I’ve also seen a comment in another Pixel guide that suggests plugging in the display connector before the battery. If that works, please leave a comment!
battery connector is not accessible without removing the display first………. and reassembling, battery has to be connected first, then the plastic piece and then the display
-
-
-
Entferne folgenden Schrauben, mit denen der Mittelrahmen an der Rückseite befestigt ist:
-
Sieben schwarze 4 mm Torx T5 Schrauben
-
Zwei silberfarbene 3 mm Torx T5 Schrauben
-
-
-
Kunstoffrasten, welche in die Kanten des rückwärtigen Gehäuses eingreifen, halten den Mittelrahmen sehr fest.
-
-
-
Finde die Vertiefung in der unteren linken Ecke des Rahmens und setze dort ein Plektrum ein.
-
Schiebe das Plektrum an der Unterkante des Smartphones entlang bis zur unteren rechten Ecke und lasse es dort stecken.
This step was impossible on my phone as a gap could not be formed at the notch to pry the corner up using either pick or playing card . Flathead micro screwdriver was required causing insignificant cosmetic damage at that area.
This step takes a few tries, starting with the pick perpendicular to the phone. Eventually, after gentle prying, it will catch the corner so you can slip the pick underneath. Like everything in this repair, it requires you to be exceedingly delicate and patient.
Take the tip of the tweezers, insert it in the screw hole near where they show to insert the pick and gently pry up. You should be able to move the plate upwards enough to insert the pick
-
-
-
Setze ein weiteres Plektrum unten in die rechte Kante ein.
-
Schiebe das Plektrum in der Naht langsam nach oben, bis sich die ersten Raste löst.
-
Wenn du die Raste gelöst hast, dann lasse das Plektrum stecken, damit der Mittelrahmen nicht wieder anhaften kann.
-
-
-
Setze ein Plektrum in die rechte Kante des Smartphones ein und schiebe es nach oben bis zur obersten rechten Raste.
-
Schiebe das Plektrum langsam an der Raste vorbei, bis sie sich vom Rahmen löst.
-
-
-
Fasse die rechte Kante des Mittelrahmens an den Ecken und klappe die Kante langsam hoch.
-
Wenn sich die linke Kante lose anfühlt, dann hören mit dem Hochklappen auf und hebe den Mittelrahmen nach oben.
-
Entferne den Mittelrahmen.
-
-
-
Heble den Akkustecker mit der Spudgerspitze hoch und trenne ihn ab.
-
Biege das Flachbandkabel zum Akku ein wenig weg, so dass es sich nicht versehentlich mit der Hauptplatine verbinden kann.
-
-
-
Heble den Stecker des Tastenstreifens mit der Spudgerspitze hoch und trenne ihn ab.
-
-
-
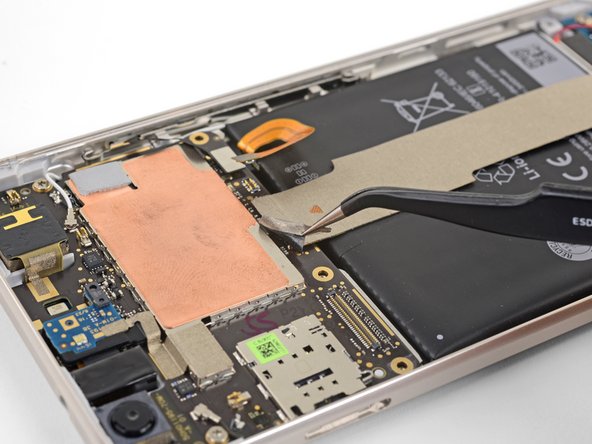
Heble das Verbindungskabel mit der Spudgerspitze hoch und trenne es von der Hauptplatine ab.
-
-
-
Trenne das schwarze Antennenkabel mit der Spudgerspitze nahe am Frontkameramodul von der Hauptplatine ab.
-
Fädle das Antennenkabel aus seiner Halteklammer heraus.
-
-
-
Trenne das weiße Antennenkabel mit der Spudgerspitze nahe am Rückkameramodul von der Hauptplatine ab.
-
Fädle das Antennenkabel aus seiner Halteklammer heraus.
What connector is this? I just broke the connector off the board instead of just disconnecting it. What did I just loose the ability to do?
Update: I pulled the broken connector off the cable, put everything back together, leaving the cable just sandwiched in the right place, and everything seems to be still working completely. Wifi, 4G, Bluetooth.. time will tell what is broken… but it’s not immediately noticeable… I feel really lucky!
David -
Hi jeffersdavid93, did you ever figure out what stopped working with this connector? Thanks!
-
-
-
Entferne die beiden 3 mm Torx T5 Schrauben, mit denen die Hauptplatine am Rahmen befestigt ist.
-
-
-
Heble das Frontkameramodul mit der Spudgerspitze hoch und löse das Modul aus seinem Anschluss heraus.
-
-
-
Setze die Spudgerspitze in die Kopfhörerbuchse hinein und drücke dann nach oben, so dass sich die Buchse aus ihrem Anschluss löst.
-
-
-
Hebe mit dem flachen Ende des Spudgers die Unterkante der Hauptplatine leicht an, so dass sie sich aus ihrer Vertiefung löst.
-
-
-
Finde das Kabel zum Fingerabdrucksensor, welches an der Unterseite der Hauptplatine nahe der Unterkante angebracht ist.
-
Heble mit der Spudgerspitze das Kabel zum Fingerabdrucksensor aus seinem Anschluss heraus.
-
Ziehe das Kabel von der Hauptplatine ab.
-
-
-
Fasse die Hauptplatine an ihren Ecken an und hole sie aus ihrer Vertiefung heraus, wobei du darauf achten musst, dass sich keine Kabel verfangen.
-
Biege das Kabel des Fingerabdrucksensors ein wenig, so dass er nahe am Stecker nach oben gebogen ist.
-
Stelle die Hauptplatine senkrecht so auf, dass der Stecker auf dem Abschluss aufliegt.
-
Richte den Stecker mit dem Finger sorgfältig aus und drücke ihn in seinen Abschluss hinein. Drücke nicht zu fest! Wenn du das richtig machst, wird der Stecker vom Anschluss gut festgehalten.
-


Um dein Gerät wieder zusammenzusetzen, folge den Schritten in umgekehrter Reihenfolge.
Entsorge deinen Elektromüll fachgerecht.
Die Reparatur hat nicht den gewünschten Erfolg gebracht? Unser Antwortenforum kann dir weiterhelfen.
Um dein Gerät wieder zusammenzusetzen, folge den Schritten in umgekehrter Reihenfolge.
Entsorge deinen Elektromüll fachgerecht.
Die Reparatur hat nicht den gewünschten Erfolg gebracht? Unser Antwortenforum kann dir weiterhelfen.
Rückgängig: Ich habe diese Anleitung nicht absolviert.
5 weitere Nutzer:innen haben diese Anleitung absolviert.
Besonderer Dank geht an diese Übersetzer:innen:
87%

Diese Übersetzer:innen helfen uns, die Welt zu reparieren! Wie kann ich mithelfen?
Hier starten ›


3 Kommentare
Thanks for the detailed steps , Question : Where can I buy the replacement motherboard ?
This guide has been updated!