Zum Hauptinhalt wechseln

Guitar Refinish

Was du brauchst

  1. Guitar Refinish, Loosen the tuning pegs: Schritt 1, Bild 1 von 1
    • Turn the tuning pegs counter clock-wise to loosen all of the guitar strings and release the tension.

  2. Guitar Refinish, Remove old guitar strings: Schritt 2, Bild 1 von 1
    • Cutting a string under tension could cause injury. Ensure that all strings are loose before attempting the next step.

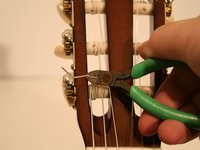
    • Once the strings are loose and have no tension, cut the strings with a handheld wire cutter.

    • Cut the knots near the tuning pegs and bridge as needed. Then, pull the strings to remove them.

  3. Guitar Refinish, Thread strings through the bridge: Schritt 3, Bild 1 von 3 Guitar Refinish, Thread strings through the bridge: Schritt 3, Bild 2 von 3 Guitar Refinish, Thread strings through the bridge: Schritt 3, Bild 3 von 3
    • The first three strings (low E, A, and D), have thick and springy ends; the three thinnest strings (G, B, and high E), do not have thick or springy ends. You may use either set of strings.

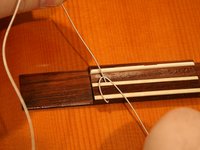
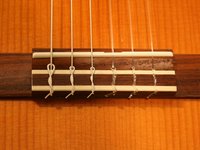
    • Insert the thick end of the string into the top of the bridge and thread it through until about 3 to 4 inches of the string stick out of the bottom.

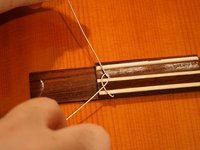
    • Wrap the short end of the string around the long end of the string, creating a loop.

    • Pass the short end of the string through the loop (2 or 3 times for thick strings, 3 or 4 times for thin strings). Make sure the final pass leaves the string underneath the bridge.

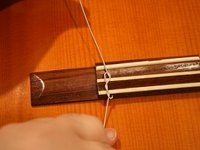
    • Pull both ends of the string until the knot is tight.

  4. Guitar Refinish, Knot the low E, G, and B strings: Schritt 4, Bild 1 von 3 Guitar Refinish, Knot the low E, G, and B strings: Schritt 4, Bild 2 von 3 Guitar Refinish, Knot the low E, G, and B strings: Schritt 4, Bild 3 von 3
    • This knot will be used for only the low E, G, and B strings.

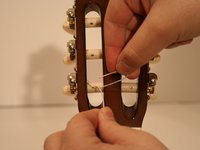
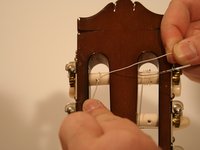
    • Insert the springy end of the string into the hole in the tuning peg.

    • Pull the springy end over the tuning peg and to the left side.

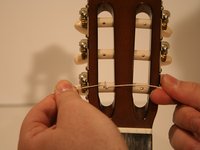
    • Bring the springy end to the right side by passing it under the string, creating a loop.

    • Push the springy end through the loop, and then pull both ends until the knot is tight. You may have to press the knot with your finger tighten it completely.

  5. Guitar Refinish, Knot the A, D, and high E strings: Schritt 5, Bild 1 von 3 Guitar Refinish, Knot the A, D, and high E strings: Schritt 5, Bild 2 von 3 Guitar Refinish, Knot the A, D, and high E strings: Schritt 5, Bild 3 von 3
    • Repeat step 4 (outlined below) for only the strings A, D, and high E .

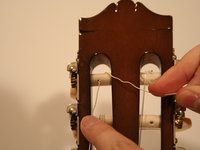
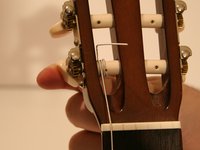
    • Insert the end of the string into the hole in the tuning peg.

    • Pull the end over the tuning peg to the right side.

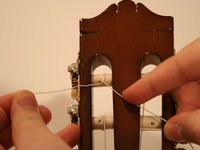
    • Bring the end of the string to the left side by passing it under the string, creating a loop.

    • Push the end through the loop and then pull both ends until the knot is tight. You may have to press and hold the knot with your finger to tighten completely.

  6. Guitar Refinish, Tighten the new strings: Schritt 6, Bild 1 von 3 Guitar Refinish, Tighten the new strings: Schritt 6, Bild 2 von 3 Guitar Refinish, Tighten the new strings: Schritt 6, Bild 3 von 3
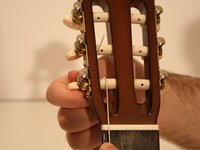
    • Turn the tuning knob in a clock-wise motion to tighten the string until the string makes a clear sound when plucked.

    • As you tighten the string, be sure to hold the string with your free hand until the string stays tight on its own. This will keep the knot from loosening.

    • As the string winds around the tuning peg, make sure that the string passes over the loose end from the knot at least once. This will prevent "slipping" (detuning) during tuning and will help keep the knot tight.

  7. Guitar Refinish, Check your work before tuning: Schritt 7, Bild 1 von 1
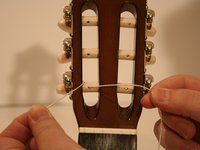
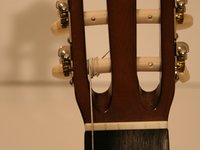
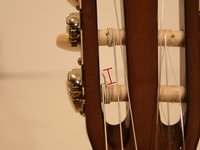
    • Before moving on, compare your work to the image provided. If the head of your guitar does not resemble the guitar in the image, go back to steps 3 and 4.

    • The E strings should be facing outwards (or "away from the body") and the rest of the strings should be facing inwards (or "toward the body").

    • Check that strings are properly set in the notches of the nut of the guitar. The "nut" is the white bar just below the head of the guitar.

    • You are ready to tune your guitar! Classical guitar strings may "slip" or detune. It may take 4 or more rounds of tuning before the new strings stop slipping.

  8. Guitar Refinish, Clip the loose ends: Schritt 8, Bild 1 von 3 Guitar Refinish, Clip the loose ends: Schritt 8, Bild 2 von 3 Guitar Refinish, Clip the loose ends: Schritt 8, Bild 3 von 3
    • Once you have tuned your guitar, remove the loose ends of the strings from the head and bridge of the guitar with your handheld wire cutter.

    • Do not completely remove the loose ends. Cutting the end too close to the tuning peg or the bridge may cause the string to slip out of position later. Leave at least a half inch piece in place.

  9. Guitar Refinish, Guitar Refinish: Schritt 9, Bild 1 von 1
    • Unwind each of the guitar strings by hand or with a string winder.

    • Turn the pegs for the lower strings towards the body of the guitar.

    • Turn the pegs for the higher strings away from the body of the guitar.

    • The strings should have little to no tension after you've finished winding.

  10. Guitar Refinish: Schritt 10, Bild 1 von 1
    • Remove each of the pegs and strings from the bridge.

  11. Guitar Refinish: Schritt 11, Bild 1 von 1
    • Remove the 38 mm phillips ovalhead screws from the neck of the guitar.

  12. Guitar Refinish: Schritt 12, Bild 1 von 1
    • Remove the neck of the guitar.

    • Be cautious when removing the neck; it can be fragile.

  13. Guitar Refinish: Schritt 13, Bild 1 von 1
    • Clean the guitar of dust and oils with a rag.

  14. Guitar Refinish: Schritt 14, Bild 1 von 3 Guitar Refinish: Schritt 14, Bild 2 von 3 Guitar Refinish: Schritt 14, Bild 3 von 3
    • Sand the guitar with a medium-rough grit sanding sponge.

    • Follow the grain of the wood while sanding.

    • This is a hard and time consuming process. Expect to spend at least a few hours on this step.

    • The surface of your guitar should lose any glossy shine after you finish sanding.

    • A sanding sponge will be especially effective on the curved areas of the guitar-- like the back and sides of your instrument.

    • If you are starting from a light color and finishing to a dark color only a rough sanding is necessary.

    • If you are starting from a dark color and finishing to a light color a more complete sanding is necessary.

    • Use eye protection and a mask at all times while sanding.

  15. Guitar Refinish: Schritt 15, Bild 1 von 3 Guitar Refinish: Schritt 15, Bild 2 von 3 Guitar Refinish: Schritt 15, Bild 3 von 3
    • Smooth out dents and scratches with a fine grit sand paper.

    • Go over the damaged area with a light touch, and sand away until the surface feels evened out and flattened.

    • Do not use too much pressure when trying to sand away scratches. Sanding too hard causes the body of the guitar to warp and lowers your guitar's sound quality.

  16. Guitar Refinish: Schritt 16, Bild 1 von 1
    • Apply mineral spirits to the guitar and wipe with a rag.

    • The guitar will then need to dry for about 30 minutes.

  17. Guitar Refinish: Schritt 17, Bild 1 von 2 Guitar Refinish: Schritt 17, Bild 2 von 2
    • Cover the bridge with aluminum foil to protect from the paint.

    • Apply a light, even coat of white primer or a primer similar to the color you want to use to the guitar.

    • The guitar will then need to dry for at least 3 hours.

    • All painting should be done in a well ventilated area.

    • Wear a mask and use eye protection, especially if you are using spray paint.

    • Your workspace should be covered to prevent paint from splattering the surrounding area.

  18. Guitar Refinish: Schritt 18, Bild 1 von 2 Guitar Refinish: Schritt 18, Bild 2 von 2
    • Apply two light and even colored coats of paint to the guitar.

    • The guitar will then need to dry for about 24 hours.

    • Make sure you are painting in a well ventilated area.

    • Wear a mask and eye protection while painting.

  19. Guitar Refinish: Schritt 19, Bild 1 von 2 Guitar Refinish: Schritt 19, Bild 2 von 2
    • Sand the first few coats of paint with a fine grit sandpaper to even out the surface.

    • The guitar will be a chalky texture when the sanding is complete.

    • Wear eye protection and a mask while sanding.

    • Be careful to not scratch through the paint.

  20. Guitar Refinish: Schritt 20, Bild 1 von 1
    • Apply another few light color coats of paint.

    • The guitar will then need to dry for at least 48 hours.

  21. Guitar Refinish: Schritt 21, Bild 1 von 1
    • Apply a thin and even clear colored coat to the guitar.

    • Allow the clear coat to dry for at least 72 hours before moving to the next step.

  22. Guitar Refinish: Schritt 22, Bild 1 von 1
    • Immerse fine grit sandpaper in water for 1 hour.

    • For the best results, prepare different kinds of sandpaper. 600, 800, 1000, 1200 and 2000 grit sandpaper should all be soaked.

  23. Guitar Refinish: Schritt 23, Bild 1 von 2 Guitar Refinish: Schritt 23, Bild 2 von 2
    • Sand the guitar using water-soaked sandpaper.

    • Start with 600 grit sandpaper, follow it with 800 grit, then 1000 grit, then 1200 grit and finally 2000 grit.

    • When you feel less resistance while sanding, it is time to move on to a higher grit sandpaper or finish sanding.

    • Do not press hard while wet sanding. Use a light touch to ensure your guitar is not scratched.

  24. Guitar Refinish: Schritt 24, Bild 1 von 1
    • Apply polish to the guitar using a polishing cloth.

  25. Guitar Refinish: Schritt 25, Bild 1 von 2 Guitar Refinish: Schritt 25, Bild 2 von 2
    • Insert the guitar neck back into the guitar's body.

  26. Guitar Refinish: Schritt 26, Bild 1 von 1
    • Screw the guitar's neck back on using 38 mm phillips ovalhead screws.

  27. Guitar Refinish: Schritt 27, Bild 1 von 3 Guitar Refinish: Schritt 27, Bild 2 von 3 Guitar Refinish: Schritt 27, Bild 3 von 3
    • Insert each of the strings back into the bridge.

  28. Guitar Refinish: Schritt 28, Bild 1 von 1
    • Wind the strings through the pegs.

    • Turn the pegs for the lower strings of the guitar away from guitar's body.

    • Turn the pegs for the higher strings towards the body of the guitar.

    • The strings should have enough tension to stay in place.

Ziellinie

Joe Jolley

Mitglied seit: 02/21/22

301 Reputation

1 Anleitung geschrieben

Team

0 Kommentare

Kommentar hinzufügen

Seitenaufrufe:

Letzte 24 Stunden: 4

Letzte 7 Tage: 24

Letzte 30 Tage: 76

Insgesamt: 1,958