Zum Hauptinhalt wechseln
Gemeinsam reparieren - Jetzt registrieren
HP 15-ac158dx Keyboard Replacement

Was du brauchst

    1. HP 15-ac158dx Keyboard Replacement, Battery: Schritt 1, Bild 1 von 1
      • Remove all external devices from the computer.

      • Remove the charging cord from the computer.

      Frag FixBot

      Kommentar hinzufügen

    2. HP 15-ac158dx Keyboard Replacement: Schritt 2, Bild 1 von 1
      • Turn off the computer by holding the power button.

      Frag FixBot

      Kommentar hinzufügen

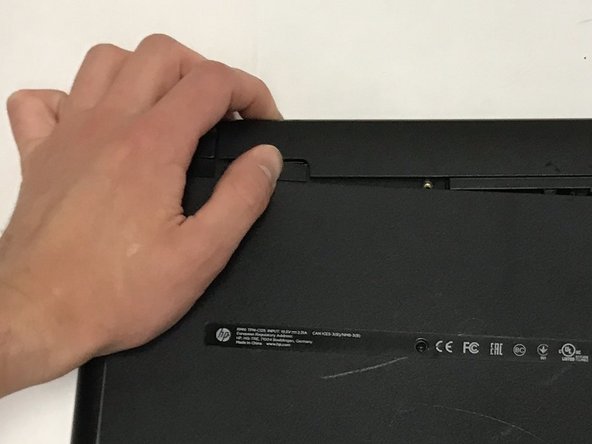
    3. HP 15-ac158dx Keyboard Replacement: Schritt 3, Bild 1 von 2 HP 15-ac158dx Keyboard Replacement: Schritt 3, Bild 2 von 2
      • To remove the battery, slide the left slider on the back to the unlocked position.

      Frag FixBot

      Kommentar hinzufügen

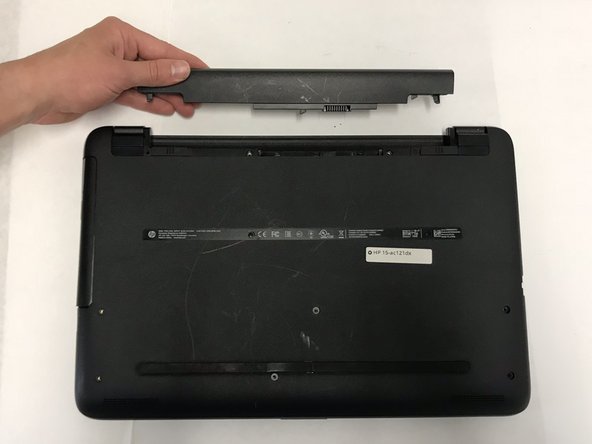
    4. HP 15-ac158dx Keyboard Replacement: Schritt 4, Bild 1 von 2 HP 15-ac158dx Keyboard Replacement: Schritt 4, Bild 2 von 2
      • Push the right slider inwards.

      • Remove the battery out by pulling straight out and to the right.

      Frag FixBot

      Kommentar hinzufügen

    1. HP 15-ac158dx Keyboard Replacement, Back Panel: Schritt 5, Bild 1 von 3 HP 15-ac158dx Keyboard Replacement, Back Panel: Schritt 5, Bild 2 von 3 HP 15-ac158dx Keyboard Replacement, Back Panel: Schritt 5, Bild 3 von 3
      • Locate the CD Compartment panel and gently slide it out.

      Frag FixBot

      Kommentar hinzufügen

    2. HP 15-ac158dx Keyboard Replacement: Schritt 6, Bild 1 von 1
      • Remove the back of the laptop by unscrewing the screws shown.

      • Also remove the other 5 Phillips screws lining the back cover.

      Frag FixBot

      Kommentar hinzufügen

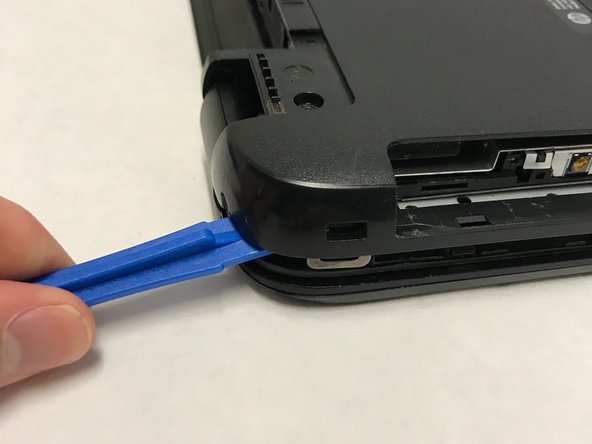
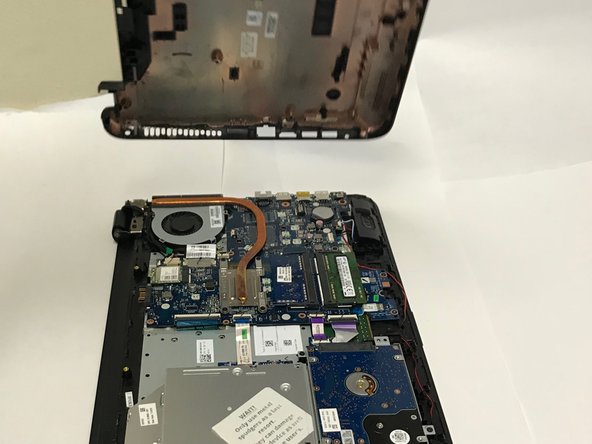
    3. HP 15-ac158dx Keyboard Replacement: Schritt 7, Bild 1 von 3 HP 15-ac158dx Keyboard Replacement: Schritt 7, Bild 2 von 3 HP 15-ac158dx Keyboard Replacement: Schritt 7, Bild 3 von 3
      • Using the prying tool, wedge it underneath the back of the laptop and do the same all around until the back comes off.

      • Dont forget to unscrew 2 screws under 2 plastic tabs (one on each hing). The lid will not come off without them being removed!

      Frag FixBot

      Kommentar hinzufügen

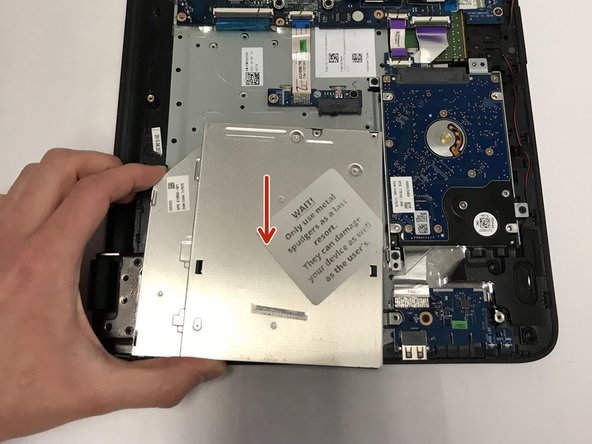
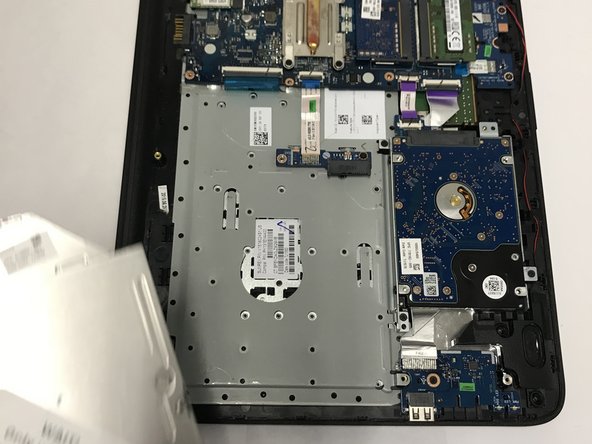
    1. HP 15-ac158dx Keyboard Replacement, CD Compartment: Schritt 8, Bild 1 von 3 HP 15-ac158dx Keyboard Replacement, CD Compartment: Schritt 8, Bild 2 von 3 HP 15-ac158dx Keyboard Replacement, CD Compartment: Schritt 8, Bild 3 von 3
      • Locate the CD Compartment as shown and gently slide it out.

      Frag FixBot

      Kommentar hinzufügen

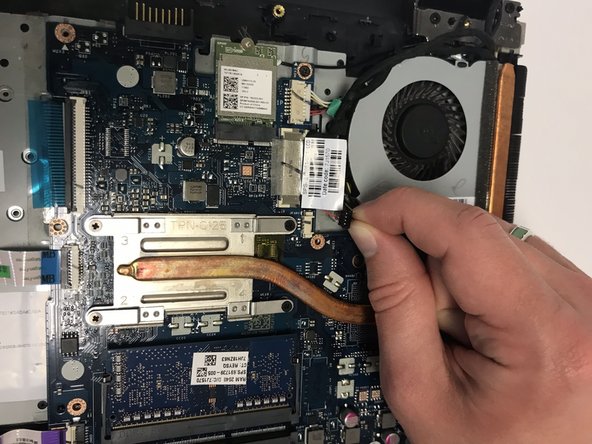
    1. HP 15-ac158dx Keyboard Replacement, Fan: Schritt 9, Bild 1 von 3 HP 15-ac158dx Keyboard Replacement, Fan: Schritt 9, Bild 2 von 3 HP 15-ac158dx Keyboard Replacement, Fan: Schritt 9, Bild 3 von 3
      • Locate the Fan as shown.

      • Pull out the black cable, with four wires attached from its port.

      Frag FixBot

      Kommentar hinzufügen

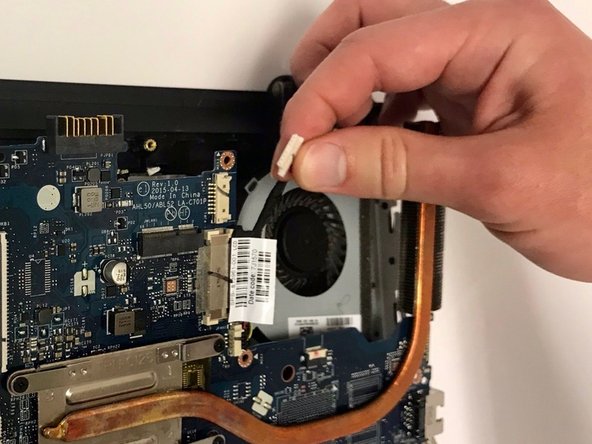
    2. HP 15-ac158dx Keyboard Replacement: Schritt 10, Bild 1 von 2 HP 15-ac158dx Keyboard Replacement: Schritt 10, Bild 2 von 2
      • Pull out the white cable wire from its port.

      • Unscrew the two black Phillips screws holding in the fan.

      Frag FixBot

      Kommentar hinzufügen

    3. HP 15-ac158dx Keyboard Replacement: Schritt 11, Bild 1 von 2 HP 15-ac158dx Keyboard Replacement: Schritt 11, Bild 2 von 2
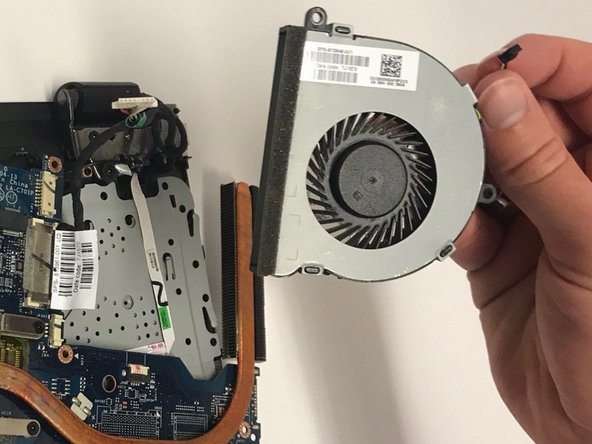
      • Remove fan.

      • Unscrew the two screws holding in the fan.

      Frag FixBot

      Kommentar hinzufügen

    1. HP 15-ac158dx Keyboard Replacement, Motherboard: Schritt 12, Bild 1 von 1
      • Remove the TEN 3mm screws.

      • Remove the ONE 9mm screw.

      Frag FixBot

      Kommentar hinzufügen

    2. HP 15-ac158dx Keyboard Replacement: Schritt 13, Bild 1 von 2 HP 15-ac158dx Keyboard Replacement: Schritt 13, Bild 2 von 2
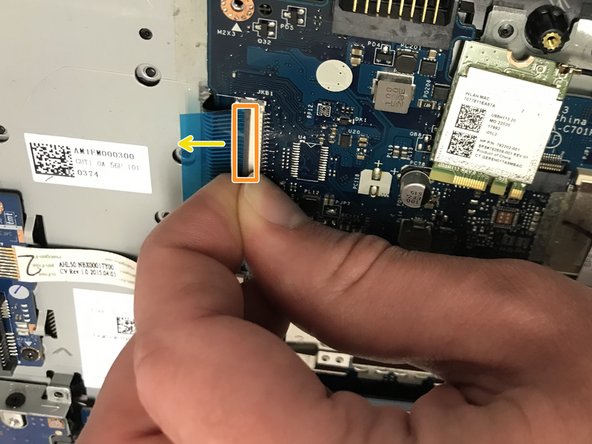
      • Locate the four ribbon clips.

      • Lift the grey part of the ribbon clips.

      • Pull the ribbon cable out and repeat this step for all four ribbon cables.

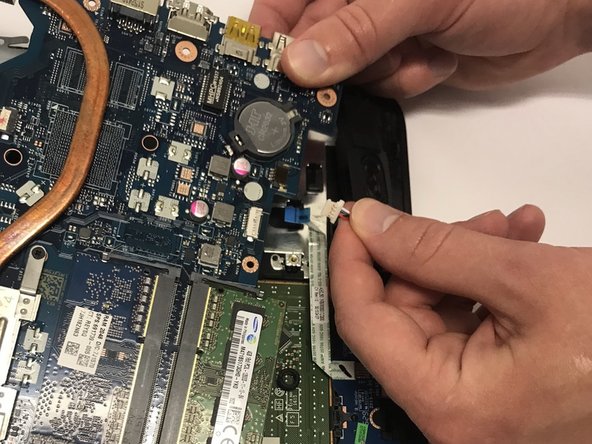
      • Also use a spudger and release the TWO cables attaching the hard drive to the motherboard. Another ribbon cable is located where the fan was sitting.

      Frag FixBot

      Kommentar hinzufügen

    3. HP 15-ac158dx Keyboard Replacement: Schritt 14, Bild 1 von 2 HP 15-ac158dx Keyboard Replacement: Schritt 14, Bild 2 von 2
      • Pull out the white cable (contains red and white cable attached to a black support) with wires from its port.

      Frag FixBot

      Kommentar hinzufügen

    4. HP 15-ac158dx Keyboard Replacement: Schritt 15, Bild 1 von 1
      • Remove the motherboard.

      Frag FixBot

      Kommentar hinzufügen

    1. HP 15-ac158dx Keyboard Replacement, Keyboard: Schritt 16, Bild 1 von 2 HP 15-ac158dx Keyboard Replacement, Keyboard: Schritt 16, Bild 2 von 2
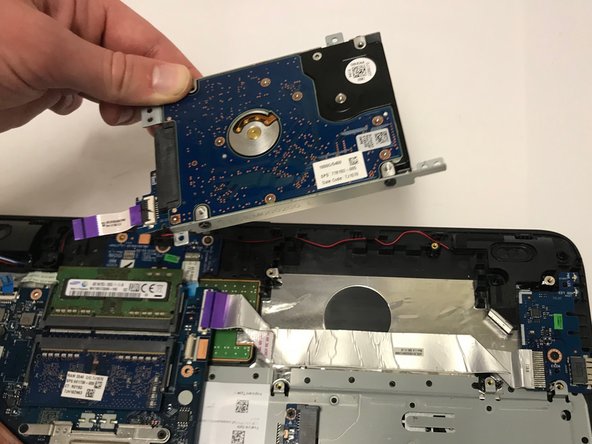
      • Remove the Hard Drive.

      Frag FixBot

      Kommentar hinzufügen

    2. HP 15-ac158dx Keyboard Replacement: Schritt 17, Bild 1 von 2 HP 15-ac158dx Keyboard Replacement: Schritt 17, Bild 2 von 2
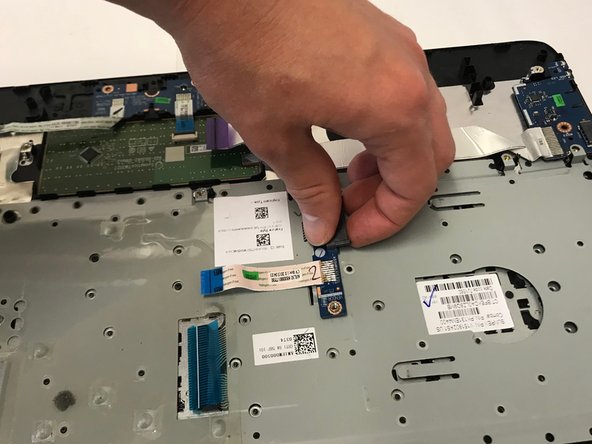
      • Lift up the cable port and place it to the side but do not remove completely from the laptop.

      • Remove the single Phillips screw securing it first.

      Frag FixBot

      Kommentar hinzufügen

    3. HP 15-ac158dx Keyboard Replacement: Schritt 18, Bild 1 von 3 HP 15-ac158dx Keyboard Replacement: Schritt 18, Bild 2 von 3 HP 15-ac158dx Keyboard Replacement: Schritt 18, Bild 3 von 3
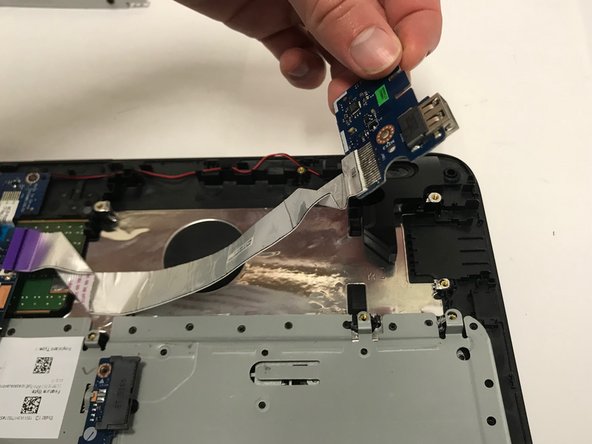
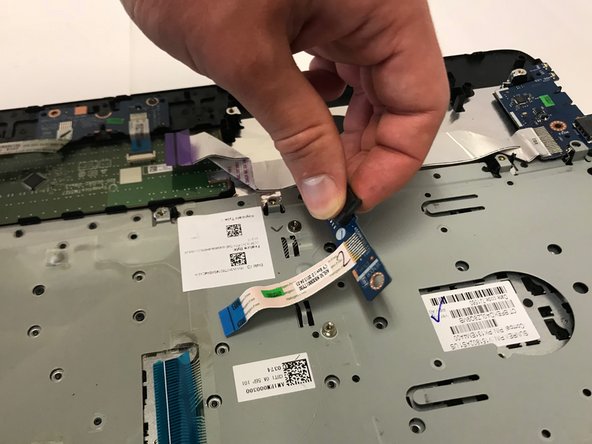
      • Remove the VENDOR component.

      • Unscrew the single Phillips screw holding it to the frame first.

      Frag FixBot

      Kommentar hinzufügen

    4. HP 15-ac158dx Keyboard Replacement: Schritt 19, Bild 1 von 2 HP 15-ac158dx Keyboard Replacement: Schritt 19, Bild 2 von 2
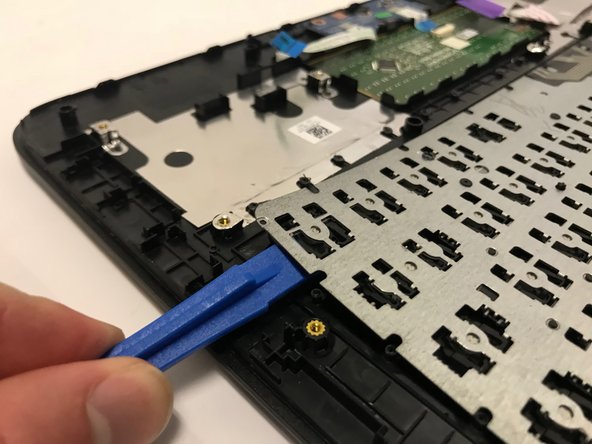
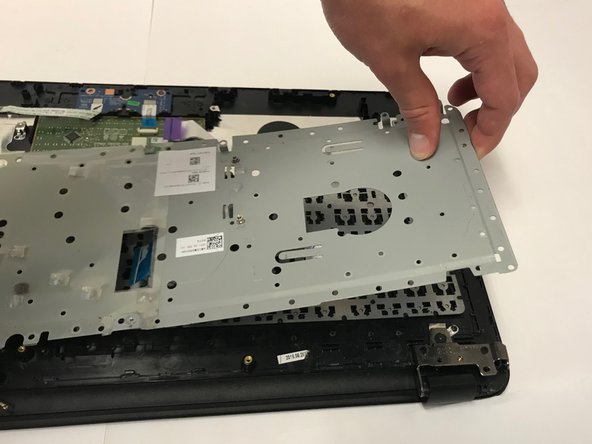
      • Using a plastic prying tools, remove the grey metal plate.

      • It will not come off easy, but do not force it off.

      Frag FixBot

      Kommentar hinzufügen

    5. HP 15-ac158dx Keyboard Replacement: Schritt 20, Bild 1 von 3 HP 15-ac158dx Keyboard Replacement: Schritt 20, Bild 2 von 3 HP 15-ac158dx Keyboard Replacement: Schritt 20, Bild 3 von 3
      • Locate the damaged keyboard and lift up with the prying tool to remove.

      Frag FixBot

      Kommentar hinzufügen

      • To put everything back together and use your laptop with the new keyboard, follow the steps in REVERSE..

      • ENJOY :)

      Frag FixBot

      Kommentar hinzufügen

Abschluss

To reassemble your device, follow these instructions in reverse order.

Rückgängig: Ich habe diese Anleitung nicht absolviert.

7 weitere Personen haben diese Anleitung absolviert.

Team

Baylor, Team S1-G2, Johnson Spring 2018 Mitglied von Baylor, Team S1-G2, Johnson Spring 2018

BU-JOHNSON-S18S1G2

3 Mitglieder

72 Anleitungen geschrieben

3 Kommentare zur Anleitung

Did you have to use soldering iron to melt the plastic rivets when putting back the keyboard?

Cheers.

Lo Yuk Fai - Antwort Teilen

I have done these before and yes, using a soldering iron to melt the plastic rivets is a good method.

Richard Ness - Antwort Teilen

Helpful. Too good!

David Dii Toke - Antwort Teilen

Kommentar hinzufügen

Seitenaufrufe:

Letzte 24 Stunden: 6

Letzte 7 Tage: 34

Letzte 30 Tage: 136

Insgesamt: 8,439