Zum Hauptinhalt wechseln

HP 15-r137wm TouchSmart Cooling Fan Replacement

Was du brauchst

  1. HP 15-r137wm TouchSmart Cooling Fan Replacement, Front Panel Assembly: Schritt 1, Bild 1 von 3 HP 15-r137wm TouchSmart Cooling Fan Replacement, Front Panel Assembly: Schritt 1, Bild 2 von 3 HP 15-r137wm TouchSmart Cooling Fan Replacement, Front Panel Assembly: Schritt 1, Bild 3 von 3
    • Make sure that the device is powered off and unplugged before removing components.

    • Remove all ten (10) 5.5 mm Phillips #0 screws.

    • Remove the two (2) plastic tabs located at the rear of the panel. Locate the two (2) 7.5mm Phillips #0 screws underneath the pads and remove.

  2. HP 15-r137wm TouchSmart Cooling Fan Replacement: Schritt 2, Bild 1 von 1
    In diesem Schritt verwendetes Werkzeug:
    Anti-Static Wrist Strap
    $7.95
    Kaufen
    • Use a wide plastic opening tool to pry off the top casing.

    • Be cautious not to crack the casing near the keyboard as it is quite fragile.

    • Lift the cover off carefully as there are wires still attached to internal components.

    • After panel is removed, use an anti-static wrist strap to ensure the motherboard does not get any external shocks from static discharge.

  3. HP 15-r137wm TouchSmart Cooling Fan Replacement: Schritt 3, Bild 1 von 1
    • The connection for the track pad is still connected.

    • Move the keyboard slightly out of the way to locate the connection.

    • Disconnect the small wire protruding from the motherboard underneath the metal plate.

  4. HP 15-r137wm TouchSmart Cooling Fan Replacement: Schritt 4, Bild 1 von 2 HP 15-r137wm TouchSmart Cooling Fan Replacement: Schritt 4, Bild 2 von 2
    • Locate the connection between the power button and the connecting cable.

    • Do not lift the front panel off to far as the cable is still attached.

    • Remove the cable from the motherboard carefully.

  5. HP 15-r137wm TouchSmart Cooling Fan Replacement, Keyboard: Schritt 5, Bild 1 von 2 HP 15-r137wm TouchSmart Cooling Fan Replacement, Keyboard: Schritt 5, Bild 2 von 2
    • Disconnect the connection between the keyboard the the motherboard.

  6. HP 15-r137wm TouchSmart Cooling Fan Replacement: Schritt 6, Bild 1 von 2 HP 15-r137wm TouchSmart Cooling Fan Replacement: Schritt 6, Bild 2 von 2
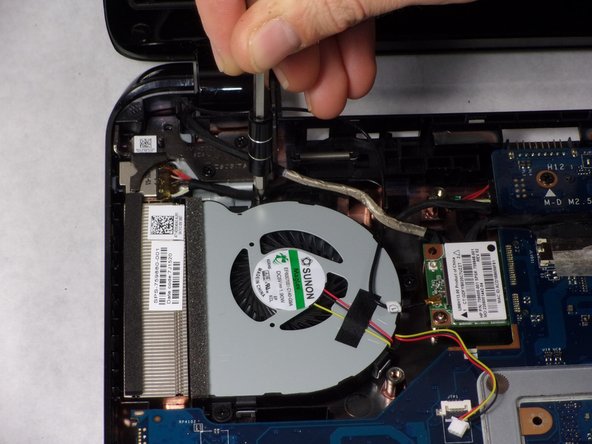
    • Remove the four (4) 2.5mm by 3.5mm Phillips #0 screws from the metal retaining plate.

    • Lift the metal retaining plate off and away from the device.

  7. HP 15-r137wm TouchSmart Cooling Fan Replacement, Cooling Fan: Schritt 7, Bild 1 von 2 HP 15-r137wm TouchSmart Cooling Fan Replacement, Cooling Fan: Schritt 7, Bild 2 von 2
    • Locate the small connection on the motherboard and disconnect it by slowly pulling it away from the motherboard.

    • Slowly disconnect the cable as the wires are very small and fragile

  8. HP 15-r137wm TouchSmart Cooling Fan Replacement: Schritt 8, Bild 1 von 2 HP 15-r137wm TouchSmart Cooling Fan Replacement: Schritt 8, Bild 2 von 2
    • Remove the three (3) 2.5mm by 3.5mm Phillips #0 screws from the fan.

  9. HP 15-r137wm TouchSmart Cooling Fan Replacement: Schritt 9, Bild 1 von 1
    • Remove the cooling fan from the housing carefully.

    • The fan may be connected to the small foam screen. Pull gently to release it.

Abschluss

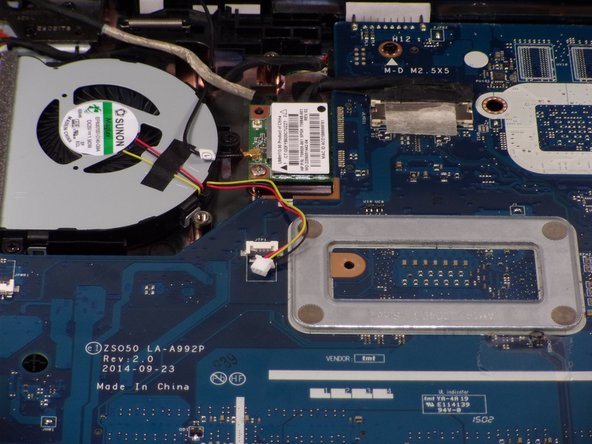
To reassemble your device, follow these instructions in reverse order.

Team

UMass Dartmouth, Team S4-G4, Julie Fall 2017 Mitglied von UMass Dartmouth, Team S4-G4, Julie Fall 2017

UMASSD-JULIE-F17S4G4

3 Mitglieder

7 Anleitungen geschrieben

0 Kommentare

Kommentar hinzufügen

Seitenaufrufe:

Letzte 24 Stunden: 1

Letzte 7 Tage: 3

Letzte 30 Tage: 6

Insgesamt: 378