Zum Hauptinhalt wechseln

HP Chromebook 11 G8 EE Screen Replacement

Was du brauchst

  1. HP Chromebook 11 G8 EE Screen Replacement, Keyboard & Touchpad Assembly: Schritt 1, Bild 1 von 1
    • Use a Phillips #1 screwdriver to remove:

    • Four 7 mm screws.

    • Two 8 mm screws.

  2. HP Chromebook 11 G8 EE Screen Replacement: Schritt 2, Bild 1 von 2 HP Chromebook 11 G8 EE Screen Replacement: Schritt 2, Bild 2 von 2
    • Flip the device over and open the lid.

    • Use a plastic opening tool to pry the keyboard assembly away from the bottom case, prying around the perimeter until it fully separates.

    • Lift the keyboard assembly from the laptop towards you, away from the screen.

  3. HP Chromebook 11 G8 EE Screen Replacement: Schritt 3, Bild 1 von 3 HP Chromebook 11 G8 EE Screen Replacement: Schritt 3, Bild 2 von 3 HP Chromebook 11 G8 EE Screen Replacement: Schritt 3, Bild 3 von 3
    In diesem Schritt verwendetes Werkzeug:
    Tweezers
    $4.99
    Kaufen
    • Lift the keyboard ribbon lock bar and use tweezers to disconnect the keyboard ribbon from the motherboard.

    • Lift the lock bar and use tweezers to remove the touchpad ribbon.

    • Remove the keyboard.

  4. HP Chromebook 11 G8 EE Screen Replacement, Bezel: Schritt 4, Bild 1 von 2 HP Chromebook 11 G8 EE Screen Replacement, Bezel: Schritt 4, Bild 2 von 2
    • Using your hands, pry off the hinge cover by lifting it.

  5. HP Chromebook 11 G8 EE Screen Replacement: Schritt 5, Bild 1 von 3 HP Chromebook 11 G8 EE Screen Replacement: Schritt 5, Bild 2 von 3 HP Chromebook 11 G8 EE Screen Replacement: Schritt 5, Bild 3 von 3
    • Using the opening tool, pry the bezel away from the top case.

    • It requires a bit of force; you aren't going to break it!

  6. HP Chromebook 11 G8 EE Screen Replacement: Schritt 6, Bild 1 von 1
    • Pull the bezel toward you.

    • Peel it away from the screen gently.

  7. HP Chromebook 11 G8 EE Screen Replacement: Schritt 7, Bild 1 von 1
    • Completely remove the bezel.

  8. HP Chromebook 11 G8 EE Screen Replacement, Screen: Schritt 8, Bild 1 von 1
    • Remove the four 3.5 mm screws with a Phillips #1 screwdriver.

  9. HP Chromebook 11 G8 EE Screen Replacement: Schritt 9, Bild 1 von 1
    • Flip the screen toward you.

  10. HP Chromebook 11 G8 EE Screen Replacement: Schritt 10, Bild 1 von 3 HP Chromebook 11 G8 EE Screen Replacement: Schritt 10, Bild 2 von 3 HP Chromebook 11 G8 EE Screen Replacement: Schritt 10, Bild 3 von 3
    In diesem Schritt verwendetes Werkzeug:
    Tweezers
    $4.99
    Kaufen
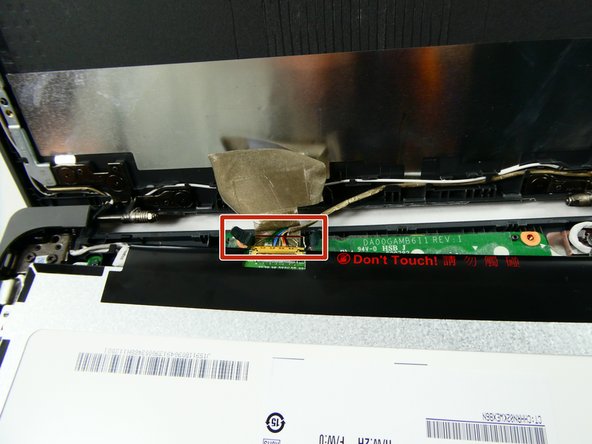
    • Use tweezers to peel away the black tape holding the connector.

  11. HP Chromebook 11 G8 EE Screen Replacement: Schritt 11, Bild 1 von 3 HP Chromebook 11 G8 EE Screen Replacement: Schritt 11, Bild 2 von 3 HP Chromebook 11 G8 EE Screen Replacement: Schritt 11, Bild 3 von 3
    • Use the tweezers to pull away the tan tape.

    • You should see the colored wires of the connector.

  12. HP Chromebook 11 G8 EE Screen Replacement: Schritt 12, Bild 1 von 2 HP Chromebook 11 G8 EE Screen Replacement: Schritt 12, Bild 2 von 2
    • Using the tweezers, lift up the small red latch on the connector.

    • Pull off the connector.

  13. HP Chromebook 11 G8 EE Screen Replacement: Schritt 13, Bild 1 von 1
    • Remove the screen.

Abschluss

To reassemble your device, follow these instructions in reverse order.

Isabella Brown

Mitglied seit: 10/25/22

312 Reputation

2 Anleitungen geschrieben

Team

UMass Dartmouth, Team 4-2, Sinclaire Fall 2022 Mitglied von UMass Dartmouth, Team 4-2, Sinclaire Fall 2022

UMASSD-SINCLAIRE-F22S4G2

5 Mitglieder

13 Anleitungen geschrieben

0 Kommentare

Kommentar hinzufügen

Seitenaufrufe:

Letzte 24 Stunden: 1

Letzte 7 Tage: 20

Letzte 30 Tage: 103

Insgesamt: 746