Einleitung
For this guide, you will be replacing the screen in your HP Chromebook 11A G8 EE laptop. The screen is the display for your entire laptop. It will show you whatever you are working on. The display specs are 11" diagonal, HD (1366 x 768), anti-glare, 220 nits, 45% NTSC [8,9,10]. You may need to replace the screen if it is no longer displaying a picture, or if it is cracked. Before you begin the replacement, be aware of any shattered glass, and make sure your device is turned off since you will be working with wires.
Was du brauchst
-
-
On the bottom of the laptop, remove four 7 mm screw using a Phillips #1 screwdriver.
-
Using the Phillips #1 screwdriver, remove the two remaining 8 mm screws by the hinges.
-
-
-
Flip the laptop over and open up the display.
-
Using the iFixit opening tool, carefully separate the palm rest from the bottom cover by working your way around the perimeter and prying it up.
-
Lift the palm rest of the laptops towards you, away from the screen.
-
-
-
Carefully, lift the keyboard ribbon lock and disconnect the keyboard ribbon from the motherboard.
-
Disconnect the touchpad ribbon from the motherboard, and remove top cover.
-
Remove the keyboard.
-
-
-
-
Once you have pried away the bezel, pull it up towards you.
-
Peel it off gently from the screen.
-
-
In diesem Schritt verwendetes Werkzeug:Tweezers$4.99
-
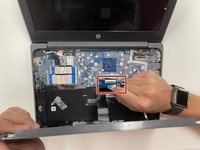
Once the screen is flipped down, use the tweezers to peel away the black tape holding down the connector.
-
-
-
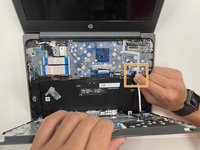
Next, peel away the tan tape, using the tweezers, exposing the screen connector.
-


To reassemble your device, follow these instructions in reverse order.
To reassemble your device, follow these instructions in reverse order.
Rückgängig: Ich habe diese Anleitung nicht absolviert.
8 weitere Personen haben diese Anleitung absolviert.
Team

University of Alabama, Team 2-1, Bedsole Fall 2021 Mitglied von University of Alabama, Team 2-1, Bedsole Fall 2021
UA-BEDSOLE-F21S2G1
4 Mitglieder
7 Anleitungen geschrieben
1 Kommentar zur Anleitung
Does IFixit Sell this screen? I am unable to source parts and this screen for these educational units by HP. I wish iFixit would also list the parts that are needed for the repairs and not just the tools they sell.