Diese Anleitung enthält neuere Änderungen. Wechsel zur neuesten unüberprüften Version.
Einleitung
If it is apparent that there are problems regarding the paper being fed through the printer, replacing the paper roller motor is a possible solution. The paper roller motor controls the paper rollers ability to pull paper into the printer and across the ink cartridges for proper printing.
Was du brauchst
-
-
Open the front access panel by placing your finger in the front slot and pulling gently.
-
-
-
Open the protective lid that is covering the glass. Press gently against the base of the panel to remove the lid from the rest of the printer.
-
-
-
Carefully lift the top panel off of the printer.
-
Do not tear or damage the two cables that connect the top lid to the motherboard.
-
-
-
Remove the two cables by gripping each one close to their connection ports on the motherboard and gently disconnecting them.
-
-
-
-
Detach the white ribbon cable.
-
Remove the two 9mm Torx screws on either side of the white bracket.
-
-
-
Remove the three black 9mm Torx screws and pull the black panel out from under the ink carriage.
-
-
-
Remove the five 9mm Torx screws on the silver panel.
-
Pull out the silver panel.
-
-
-
Turn the printer over.
-
Locate the gap at the bottom corner near the product information sticker.
-
Reach a flat head screwdriver inside the gap and unlatch the silver tab.
-
-
-
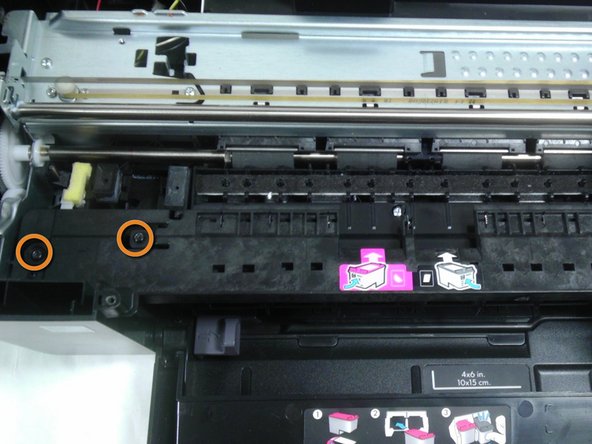
Remove the two 9mm Torx screws in order to detach the roller assembly from the system.
-


To reassemble your device, with the addition of a new motor, follow these instructions in reverse order.
To reassemble your device, with the addition of a new motor, follow these instructions in reverse order.
Rückgängig: Ich habe diese Anleitung nicht absolviert.
7 weitere Nutzer:innen haben diese Anleitung absolviert.
Team

Cal Poly, Team 18-35, Regan Winter 2013 Mitglied von Cal Poly, Team 18-35, Regan Winter 2013
CPSU-REGAN-W13S18G35
5 Mitglieder
15 Anleitungen geschrieben