Zum Hauptinhalt wechseln
Gemeinsam reparieren - Jetzt registrieren

HP Elite x2 G1 1012 WWAN Card Replacement

Was du brauchst

    1. HP Elite x2 G1 1012 WWAN Card Replacement, Display: Schritt 1, Bild 1 von 1
      • Be sure to power off and unplug your device before you begin your repair.

      • With the screen face down, lift up the stand as far as it goes.

      • Make sure not to force it past the resting point.

      Frag FixBot

      Kommentar hinzufügen

    2. HP Elite x2 G1 1012 WWAN Card Replacement: Schritt 2, Bild 1 von 2 HP Elite x2 G1 1012 WWAN Card Replacement: Schritt 2, Bild 2 von 2
      • Use a T5 driver to remove the six screws on the back of the tablet.

      Frag FixBot

      Kommentar hinzufügen

    3. HP Elite x2 G1 1012 WWAN Card Replacement: Schritt 3, Bild 1 von 1
      • After removing the screws, delicately close the stand.

      • Flip the tablet on its back so that the screen is facing up.

      Frag FixBot

      Kommentar hinzufügen

    4. HP Elite x2 G1 1012 WWAN Card Replacement: Schritt 4, Bild 1 von 2 HP Elite x2 G1 1012 WWAN Card Replacement: Schritt 4, Bild 2 von 2
      • Use the suction cup to carefully separate the screen from the device. Pull upwards with a fluid and smooth motion.

      • Do not lift too fast! There will still be wires connecting the screen to the device. Make sure they are not tampered with.

      Frag FixBot

      Kommentar hinzufügen

    5. HP Elite x2 G1 1012 WWAN Card Replacement: Schritt 5, Bild 1 von 3 HP Elite x2 G1 1012 WWAN Card Replacement: Schritt 5, Bild 2 von 3 HP Elite x2 G1 1012 WWAN Card Replacement: Schritt 5, Bild 3 von 3
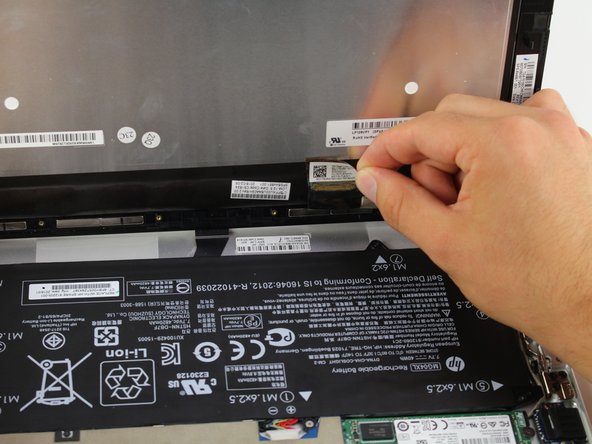
      • Remove the tape on the lower left side of the screen.

      • Underneath the tape, disconnect the LCM cable, the larger wire that was underneath the tape, from the back of the tablet screen.

      Frag FixBot

      Kommentar hinzufügen

    6. HP Elite x2 G1 1012 WWAN Card Replacement: Schritt 6, Bild 1 von 2 HP Elite x2 G1 1012 WWAN Card Replacement: Schritt 6, Bild 2 von 2
      • Disconnect the flex cable from the device using the spudger.

      • Remove the Display Assembly from the device.

      Frag FixBot

      Kommentar hinzufügen

    1. HP Elite x2 G1 1012 WWAN Card Replacement, WWAN Card: Schritt 7, Bild 1 von 2 HP Elite x2 G1 1012 WWAN Card Replacement, WWAN Card: Schritt 7, Bild 2 von 2
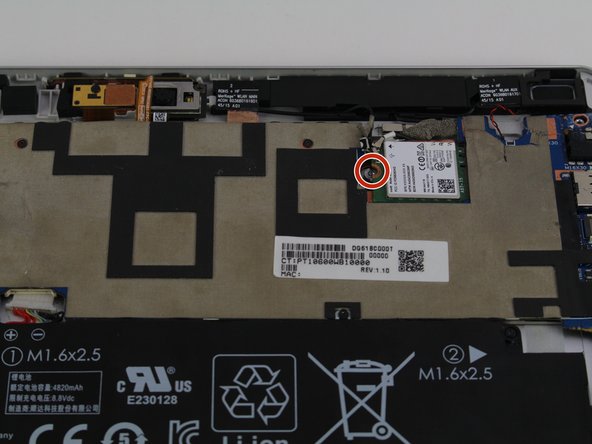
      • Use a Phillips #0 screwdriver to remove the screw from the left hand side of the board.

      Frag FixBot

      Kommentar hinzufügen

    2. HP Elite x2 G1 1012 WWAN Card Replacement: Schritt 8, Bild 1 von 3 HP Elite x2 G1 1012 WWAN Card Replacement: Schritt 8, Bild 2 von 3 HP Elite x2 G1 1012 WWAN Card Replacement: Schritt 8, Bild 3 von 3
      In diesem Schritt verwendetes Werkzeug:
      Tweezers
      $4.99
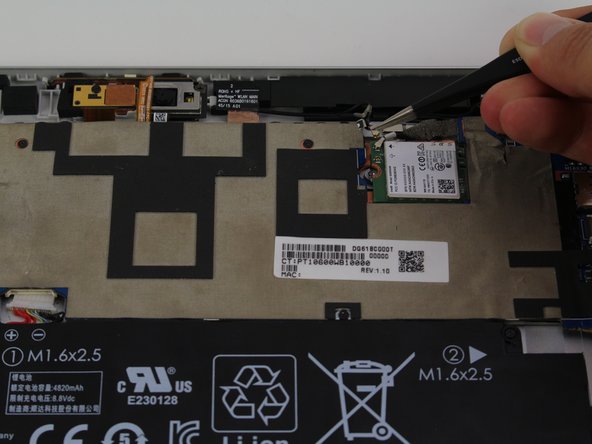
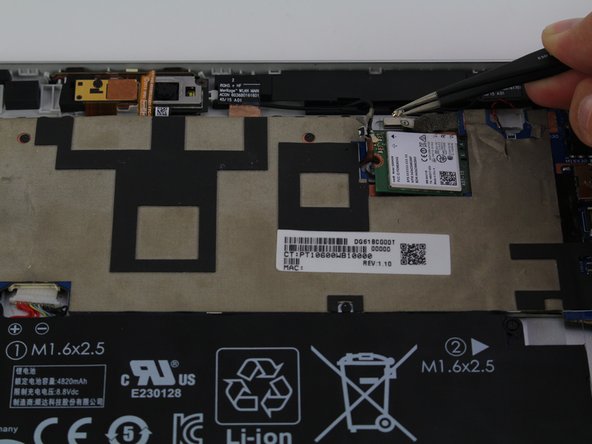
      • Remove the two black wires that are connected to the board with a pair of tweezers.

      Frag FixBot

      Kommentar hinzufügen

    3. HP Elite x2 G1 1012 WWAN Card Replacement: Schritt 9, Bild 1 von 1
      • Use the spudger to lift the board up slightly.

      • Continue to lift and slide the WWAN card until it is completely removed from the device.

      Frag FixBot

      Kommentar hinzufügen

Abschluss

To reassemble your device, follow these instructions in reverse order.

Rückgängig: Ich habe diese Anleitung nicht absolviert.

Team

Cal Poly, Team S24-G7, Maness Spring 2018 Mitglied von Cal Poly, Team S24-G7, Maness Spring 2018

CPSU-MANESS-S18S24G7

4 Mitglieder

6 Anleitungen geschrieben

0 Kommentare zur Anleitung

Kommentar hinzufügen

Seitenaufrufe:

Letzte 24 Stunden: 2

Letzte 7 Tage: 11

Letzte 30 Tage: 45

Insgesamt: 2,015