Diese Version enthält möglicherweise inkorrekte Änderungen. Wechsle zur letzten geprüften Version.
Was du brauchst
-
Dieser Schritt ist noch nicht übersetzt. Hilf mit, ihn zu übersetzen!
-
Place computer with the screen down on a flat surface.
-
Push the two locking latches to the unlocked position.
-
Push the cover toward the top of the computer and lift up.
-
-
Dieser Schritt ist noch nicht übersetzt. Hilf mit, ihn zu übersetzen!
-
Press locking latch on the bottom of the base of the stand.
-
Pull the plastic cover off of the stand.
-
-
-
Dieser Schritt ist noch nicht übersetzt. Hilf mit, ihn zu übersetzen!
-
Use a Torx T15 driver and stick it through the holes on the stand in order to remove the two 12mm screws on the back of the main unit.
-
Tilt stand and lift up to remove it.
-
-
Dieser Schritt ist noch nicht übersetzt. Hilf mit, ihn zu übersetzen!
-
Use a Torx T15 driver to remove the single 10mm screw on the back panel.
-
Pull the back panel toward the bottom of the device to remove it.
-
-
Dieser Schritt ist noch nicht übersetzt. Hilf mit, ihn zu übersetzen!
-
Disconnect these two power connectors on the motherboard, one connector is white and the other is black. You can identify the correct wires by their braided colors: red, yellow, blue, and black.
-
-
Dieser Schritt ist noch nicht übersetzt. Hilf mit, ihn zu übersetzen!
-
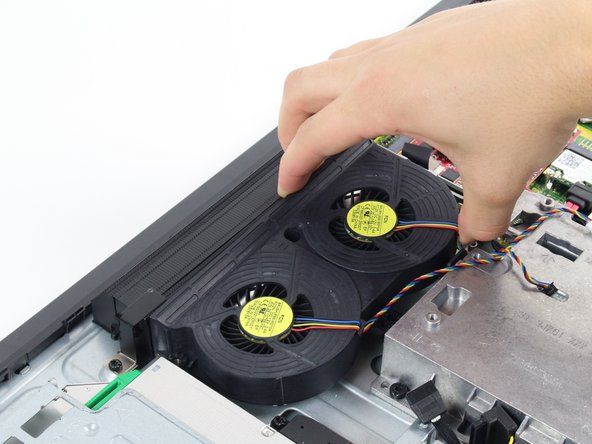
Use a Torx T15 driver to remove the three 6mm screws surrounding the fan assembly.
-
Pull the fan assembly up from the case to remove it.
-


Rückgängig: Ich habe diese Anleitung nicht absolviert.
5 weitere Nutzer:innen haben diese Anleitung absolviert.
Team

Cal Poly, Team 1-24, Maness Fall 2015 Mitglied von Cal Poly, Team 1-24, Maness Fall 2015
CPSU-MANESS-F15S1G24
4 Mitglieder
14 Anleitungen geschrieben