Diese Version enthält möglicherweise inkorrekte Änderungen. Wechsle zur letzten geprüften Version.
Was du brauchst
-
Dieser Schritt ist noch nicht übersetzt. Hilf mit, ihn zu übersetzen!
-
Remove five 4mm Phillips #0 screws securing the lower case to the HP Envy x2 13-j002dx.
-
-
Dieser Schritt ist noch nicht übersetzt. Hilf mit, ihn zu übersetzen!
-
Use a Phillips #00 screwdriver to remove the two 3.5 mm screws from the bottom of the device—one on each side of the keyboard dock.
-
-
Dieser Schritt ist noch nicht übersetzt. Hilf mit, ihn zu übersetzen!
-
Use a pair of tweezers to remove the screw covers on the bottom of the device.
-
Use a Phillips #0 screwdriver to remove the two 4mm screws.
-
-
-
Dieser Schritt ist noch nicht übersetzt. Hilf mit, ihn zu übersetzen!
-
Use an opening pick to remove the plastic cover above the back stand.
-
Pry the cover off.
-
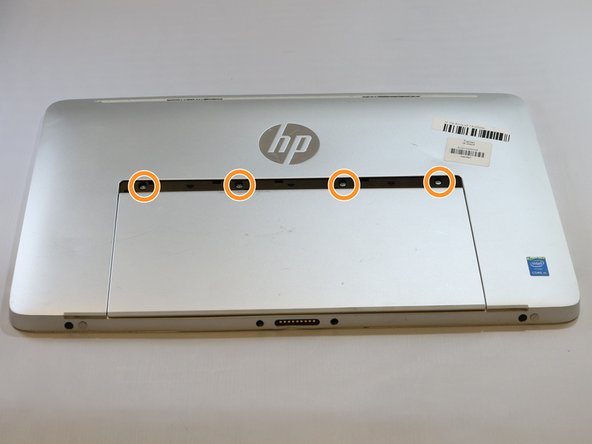
Use a Phillips #0 screwdriver to remove the four 4 mm screws.
-
-
Dieser Schritt ist noch nicht übersetzt. Hilf mit, ihn zu übersetzen!
-
Use an opening pick and a prying tool, and go around the device to remove the back cover from the rest of the assembly.
-
-
Dieser Schritt ist noch nicht übersetzt. Hilf mit, ihn zu übersetzen!
-
Unplug the battery from the motherboard.
-
-
Dieser Schritt ist noch nicht übersetzt. Hilf mit, ihn zu übersetzen!
-
Carefully pull up on the battery connector from the speaker.
-
Use a pair of tweezers and remove the taped down wire for the speaker.
-
Use a Phillips #00 screwdriver to remove the seven 3mm screws around the battery.
-
-
Dieser Schritt ist noch nicht übersetzt. Hilf mit, ihn zu übersetzen!
-
Carefully lift up and remove the battery.
-
Rückgängig: Ich habe diese Anleitung nicht absolviert.
5 weitere Nutzer:innen haben diese Anleitung absolviert.
Ein Kommentar
For step 2, when I was taking the screws out, they were held in by the magnets that were on either side of them making it difficult to remove. I ended up having to use another magnet to get them out.


