Einleitung
Use this guide to remove the back panel of your HP Envy x360 15m-bp111dx. The back panel protects the hardware of your laptop. In order to remove and replace various parts of the HP Envy x360 15m-bp111dx, you will need to remove the back panel first.
Be sure that your laptop is powered off, it's disconnected from the power adapter and that the components have cooled down before beginning the removal process.
Was du brauchst
-
-
Remove the rubber feet to access the screws.
-
Using a Phillips #0 screwdriver, remove the four 7 mm screws.
-
Using a T5 Torx screwdriver, remove the three 5 mm screws.
-
-
-
-
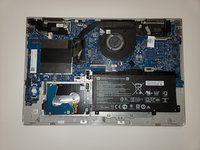
Insert opening picks or an opening tool inside the edge of the chassis to separate the back panel from the rest of the computer.
-
Remove the back case.
-


To reassemble your device, follow these instructions in reverse order.
To reassemble your device, follow these instructions in reverse order.
Rückgängig: Ich habe diese Anleitung nicht absolviert.
2 weitere Personen haben diese Anleitung absolviert.

Team

Clemson, Team 2-2, Hunter Spring 2022 Mitglied von Clemson, Team 2-2, Hunter Spring 2022
CLEM-HUNTER-S22S2G2
5 Mitglieder
6 Anleitungen geschrieben