Zum Hauptinhalt wechseln

HP G60T-600 CTO Power Button Frame Replacement

Was du brauchst

  1. HP G60T-600 CTO Power Button Frame Replacement, Battery: Schritt 1, Bild 1 von 1
    • Failure to remove the battery before performing any replacement guide may result in electric shock.

    • Close your device, then turn it over.

  2. HP G60T-600 CTO Power Button Frame Replacement: Schritt 2, Bild 1 von 2 HP G60T-600 CTO Power Button Frame Replacement: Schritt 2, Bild 2 von 2
    • Place your index finger on the ridged tab.

  3. HP G60T-600 CTO Power Button Frame Replacement: Schritt 3, Bild 1 von 1
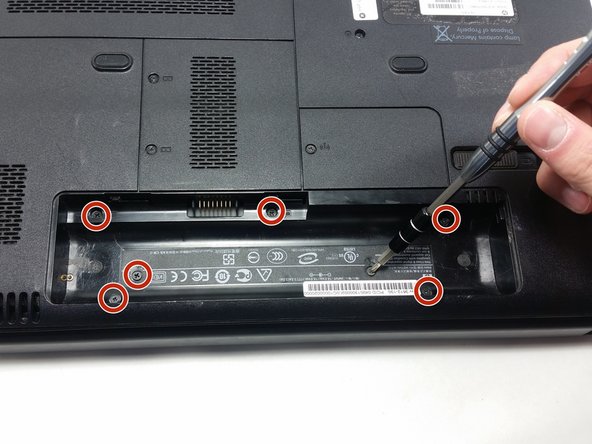
    • Apply moderate pressure to the tab and slide it to the right.

    • While the tab is on the right, you should be able to gently slide your battery out of your device.

  4. HP G60T-600 CTO Power Button Frame Replacement, Keyboard: Schritt 4, Bild 1 von 2 HP G60T-600 CTO Power Button Frame Replacement, Keyboard: Schritt 4, Bild 2 von 2
    • Unscrew the following 5mm screws with a #0 Phillips screwdriver.

  5. HP G60T-600 CTO Power Button Frame Replacement: Schritt 5, Bild 1 von 1
    • Turn your laptop over and open it up.

    • Grip your laptop firmly from both sides and use your thumbs to slide the keyboard towards the screen.

  6. HP G60T-600 CTO Power Button Frame Replacement: Schritt 6, Bild 1 von 1
    • Pull up on the top of your keyboard with medium force. It should start to pop out.

    • A plastic opening tool may facilitate this task.

    • Run your hands underneath the edges of the keyboard until it is free from the device.

    • Do not pull hard to take the keyboard out. There is a small connection that needs to be undone.

  7. HP G60T-600 CTO Power Button Frame Replacement: Schritt 7, Bild 1 von 2 HP G60T-600 CTO Power Button Frame Replacement: Schritt 7, Bild 2 von 2
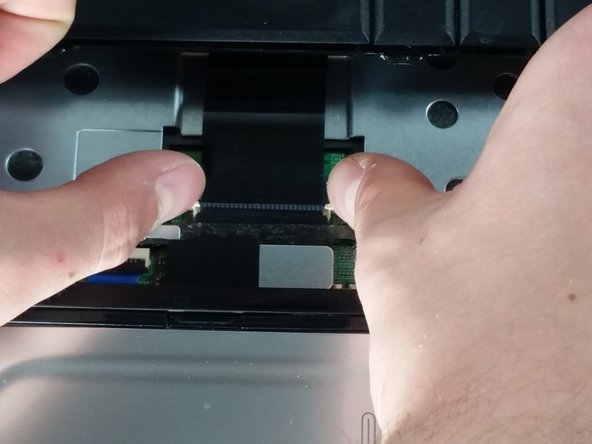
    • Place your thumbs on the two small, white tabs.

    • Push these tabs forward to release the connection and free the keyboard from the device.

  8. HP G60T-600 CTO Power Button Frame Replacement, Power Button Frame: Schritt 8, Bild 1 von 1
    • Similarly to how you remove the keyboard, gently pry a small section of the power button frame up.

  9. HP G60T-600 CTO Power Button Frame Replacement: Schritt 9, Bild 1 von 2 HP G60T-600 CTO Power Button Frame Replacement: Schritt 9, Bild 2 von 2
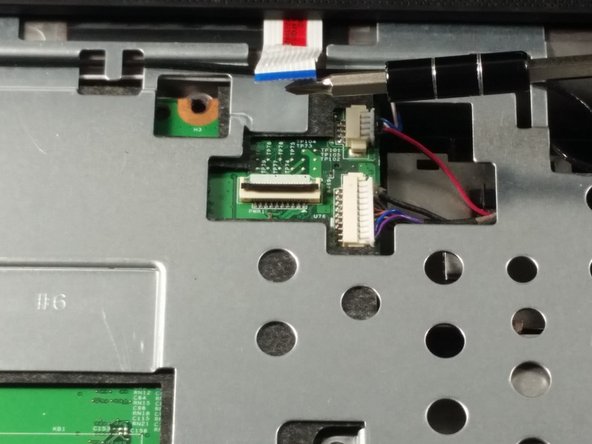
    • Gently pull the white tab upwards.

    • With similar force, pull the connection out.

    • You are now free to pull the power button frame off of your device.

  10. HP G60T-600 CTO Power Button Frame Replacement: Schritt 10, Bild 1 von 1
    • Unscrew the 5mm screw holding the CD player in place.

Abschluss

To reassemble your device, follow these instructions in reverse order.

Team

UMass Dartmouth, Team 4-5, Catania Fall 2016 Mitglied von UMass Dartmouth, Team 4-5, Catania Fall 2016

UMASSD-CATANIA-F16S4G5

3 Mitglieder

6 Anleitungen geschrieben

0 Kommentare

Kommentar hinzufügen

Seitenaufrufe:

Letzte 24 Stunden: 0

Letzte 7 Tage: 1

Letzte 30 Tage: 1

Insgesamt: 144