Zum Hauptinhalt wechseln

HP Pavilion 14-bk061st Motherboard Replacement

Was du brauchst

  1. HP Pavilion 14-bk061st Motherboard Replacement, Back Panel: Schritt 1, Bild 1 von 2 HP Pavilion 14-bk061st Motherboard Replacement, Back Panel: Schritt 1, Bild 2 von 2
    • Remove the three 5.7 JIS #1 screws from the bottom of the laptop.

    • Remove the two 6.7mm JIS #1 screws from underneath the feet of the laptop close to the exhaust vent.

  2. HP Pavilion 14-bk061st Motherboard Replacement: Schritt 2, Bild 1 von 1
    • Unclip the back plate using a plastic opening tool.

  3. HP Pavilion 14-bk061st Motherboard Replacement: Schritt 3, Bild 1 von 1
    • Carefully remove the back plate from the laptop.

  4. HP Pavilion 14-bk061st Motherboard Replacement, RAM Card: Schritt 4, Bild 1 von 1
    • Use the hook end of the Halberd spudger to pull back the clamps holding the card in place.

    • Take care when pulling the second clamp as the card has a tendency to jump out.

  5. HP Pavilion 14-bk061st Motherboard Replacement: Schritt 5, Bild 1 von 1
    • Remove the card by pulling it up and away from the slot.

  6. HP Pavilion 14-bk061st Motherboard Replacement, WLAN Card: Schritt 6, Bild 1 von 2 HP Pavilion 14-bk061st Motherboard Replacement, WLAN Card: Schritt 6, Bild 2 von 2
    • Disconnect the two Wi-Fi and Bluetooth antenna wires by gently pulling them away from the board.

  7. HP Pavilion 14-bk061st Motherboard Replacement: Schritt 7, Bild 1 von 1
    • Remove the JIS #1 screw from the WLAN card.

  8. HP Pavilion 14-bk061st Motherboard Replacement: Schritt 8, Bild 1 von 1
    • Remove the card by pulling it away from the slot.

  9. HP Pavilion 14-bk061st Motherboard Replacement, Heat Sink: Schritt 9, Bild 1 von 2 HP Pavilion 14-bk061st Motherboard Replacement, Heat Sink: Schritt 9, Bild 2 von 2
    • Remove the four 2.9mm JIS #1 screws from each of the four corners of the fan.

  10. HP Pavilion 14-bk061st Motherboard Replacement: Schritt 10, Bild 1 von 1
    • Carefully grab the heat sink from any side and lift straight up while trying to avoid touching other components.

    • Avoid bending the heat-pipe at all costs to keep it functional.

  11. HP Pavilion 14-bk061st Motherboard Replacement, Fan: Schritt 11, Bild 1 von 1
    • Remove the three 2.9mm JIS #1 screws surrounding the fan.

  12. HP Pavilion 14-bk061st Motherboard Replacement: Schritt 12, Bild 1 von 2 HP Pavilion 14-bk061st Motherboard Replacement: Schritt 12, Bild 2 von 2
    • Carefully lift up the fan without tugging out the attached wire, and lay it on the motherboard.

    • Use tweezers to gently unplug the power connector wire.

    • Remove the fan from the laptop.

  13. HP Pavilion 14-bk061st Motherboard Replacement, Motherboard: Schritt 13, Bild 1 von 1
    • Remove the seven screws from the motherboard using a JIS #1 screwdriver.

  14. HP Pavilion 14-bk061st Motherboard Replacement: Schritt 14, Bild 1 von 2 HP Pavilion 14-bk061st Motherboard Replacement: Schritt 14, Bild 2 von 2
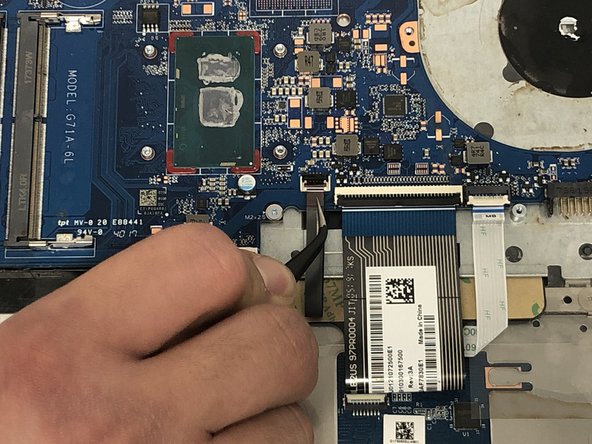
    • Remove the nine cables from the motherboard by carefully lifting the black tab on each connector.

  15. HP Pavilion 14-bk061st Motherboard Replacement: Schritt 15, Bild 1 von 1
    • Carefully remove the motherboard from the casing.

Abschluss

To reassemble your device, follow these instructions in reverse order.

3 weitere Nutzer:innen haben diese Anleitung absolviert.

Mehrab Daemi

Mitglied seit: 01/22/20

596 Reputation

4 Anleitungen geschrieben

Team

York University, Team S8-G3, Turner Winter 2020 Mitglied von York University, Team S8-G3, Turner Winter 2020

YORK-TURNER-W20S8G3

4 Mitglieder

11 Anleitungen geschrieben

0 Kommentare

Kommentar hinzufügen

Seitenaufrufe:

Letzte 24 Stunden: 0

Letzte 7 Tage: 1

Letzte 30 Tage: 5

Insgesamt: 895