Zum Hauptinhalt wechseln

HP Pavilion 17-g119dx Hard Drive Replacement

Was du brauchst

  1. HP Pavilion 17-g119dx Hard Drive Replacement, Battery: Schritt 1, Bild 1 von 1
    • Close your laptop and turn it over so that the bottom is facing up.

  2. HP Pavilion 17-g119dx Hard Drive Replacement: Schritt 2, Bild 1 von 2 HP Pavilion 17-g119dx Hard Drive Replacement: Schritt 2, Bild 2 von 2
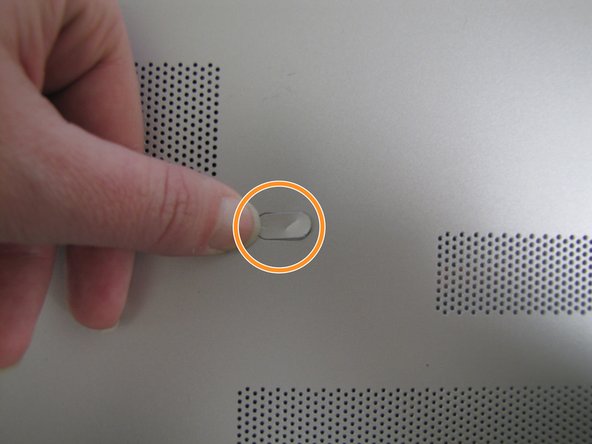
    • In the upper left hand corner, slide the bar with the lock icon to the right. This will unlock the battery.

  3. HP Pavilion 17-g119dx Hard Drive Replacement: Schritt 3, Bild 1 von 2 HP Pavilion 17-g119dx Hard Drive Replacement: Schritt 3, Bild 2 von 2
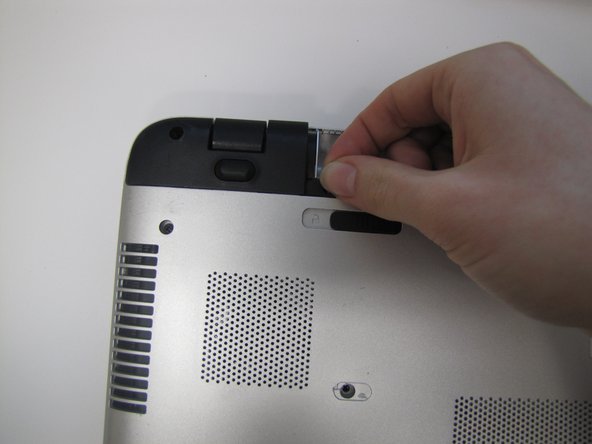
    • Slide the bar with the battery icon, on the right of your laptop, to the left to release the battery.

  4. HP Pavilion 17-g119dx Hard Drive Replacement: Schritt 4, Bild 1 von 2 HP Pavilion 17-g119dx Hard Drive Replacement: Schritt 4, Bild 2 von 2
    • Grab the battery and remove it from the laptop.

  5. HP Pavilion 17-g119dx Hard Drive Replacement, Hard Drive: Schritt 5, Bild 1 von 3 HP Pavilion 17-g119dx Hard Drive Replacement, Hard Drive: Schritt 5, Bild 2 von 3 HP Pavilion 17-g119dx Hard Drive Replacement, Hard Drive: Schritt 5, Bild 3 von 3
    • Remove the twenty 6.5mm screws using the Phillips #00 screwdriver.

    • Two of these 6.5mm screws are covered by a silver sticker. Remove the sticker by gently scraping your finger nail under the sticker and then remove the screws.

  6. HP Pavilion 17-g119dx Hard Drive Replacement: Schritt 6, Bild 1 von 3 HP Pavilion 17-g119dx Hard Drive Replacement: Schritt 6, Bild 2 von 3 HP Pavilion 17-g119dx Hard Drive Replacement: Schritt 6, Bild 3 von 3
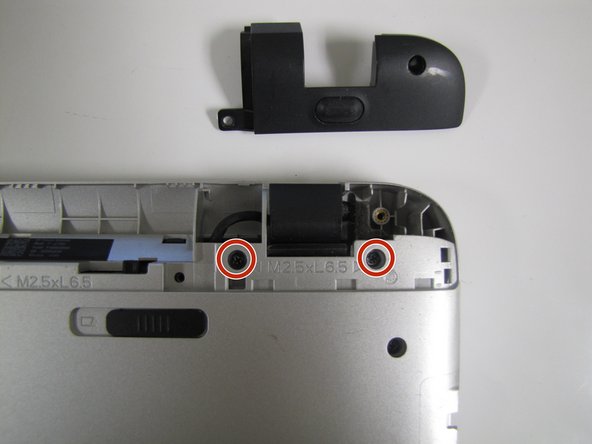
    • Remove the black corner covers on either side of the battery to reveal four additional 6.5mm Phillips #00 screws.

  7. HP Pavilion 17-g119dx Hard Drive Replacement: Schritt 7, Bild 1 von 3 HP Pavilion 17-g119dx Hard Drive Replacement: Schritt 7, Bild 2 von 3 HP Pavilion 17-g119dx Hard Drive Replacement: Schritt 7, Bild 3 von 3
    • Remove the four 6.5mm Phillips #00 screws that were underneath the black corner covers.

  8. HP Pavilion 17-g119dx Hard Drive Replacement: Schritt 8, Bild 1 von 3 HP Pavilion 17-g119dx Hard Drive Replacement: Schritt 8, Bild 2 von 3 HP Pavilion 17-g119dx Hard Drive Replacement: Schritt 8, Bild 3 von 3
    • On the right-hand corner of the laptop, remove the CD-ROM by pressing the small button on the side. Pull it out of the laptop, and set it to the side.

  9. HP Pavilion 17-g119dx Hard Drive Replacement: Schritt 9, Bild 1 von 3 HP Pavilion 17-g119dx Hard Drive Replacement: Schritt 9, Bild 2 von 3 HP Pavilion 17-g119dx Hard Drive Replacement: Schritt 9, Bild 3 von 3
    In diesem Schritt verwendetes Werkzeug:
    iFixit Opening Tool
    $1.99
    Kaufen
    • Make sure that all screws and the CD-ROM Drive are removed before trying to complete this step to prevent damaging your laptop. During this step, you will likely hear loud crackling noises. This is normal.

    • Flip the computer back over with the screen facing up and open the laptop.

    • Use the Plastic Opening Tool to separate the face plate from the backing.

  10. HP Pavilion 17-g119dx Hard Drive Replacement: Schritt 10, Bild 1 von 2 HP Pavilion 17-g119dx Hard Drive Replacement: Schritt 10, Bild 2 von 2
    • After running the opening tool along the sides, you can gently pop the keyboard open to access the Hard Drive.

    • The Hard Drive is located to the right of the RAM and above the Motherboard.

  11. HP Pavilion 17-g119dx Hard Drive Replacement: Schritt 11, Bild 1 von 3 HP Pavilion 17-g119dx Hard Drive Replacement: Schritt 11, Bild 2 von 3 HP Pavilion 17-g119dx Hard Drive Replacement: Schritt 11, Bild 3 von 3
    • To remove the Hard Drive, disconnect it from the cable by pulling out the base. Do not pull on the ribbon.

Abschluss

To reassemble your device, follow these instructions in reverse order.

18 weitere Nutzer:innen haben diese Anleitung absolviert.

Kathryn

Mitglied seit: 10/30/17

766 Reputation

3 Anleitungen geschrieben

Team

2 Kommentare

Very helpful, thank you!

TCATDI - Antwort

Thnx indeed very helpful.

Willem Zweedyk - Antwort

Kommentar hinzufügen

Seitenaufrufe:

Letzte 24 Stunden: 2

Letzte 7 Tage: 16

Letzte 30 Tage: 55

Insgesamt: 11,159