Diese Version enthält möglicherweise inkorrekte Änderungen. Wechsle zur letzten geprüften Version.
Was du brauchst
-
Dieser Schritt ist noch nicht übersetzt. Hilf mit, ihn zu übersetzen!
-
Unplug laptop from adapter and all other devices.
-
-
Dieser Schritt ist noch nicht übersetzt. Hilf mit, ihn zu übersetzen!
-
Flip the laptop over with battery facing you.
-
-
Dieser Schritt ist noch nicht übersetzt. Hilf mit, ihn zu übersetzen!
-
Slide the battery lock on the right side open.
-
Slide the Battery release latch on the left side.
-
-
Dieser Schritt ist noch nicht übersetzt. Hilf mit, ihn zu übersetzen!
-
Remove the two 6.5mm Phillips #1 keyboard screws from bottom of laptop.
-
-
-
Dieser Schritt ist noch nicht übersetzt. Hilf mit, ihn zu übersetzen!
-
Push screwdriver through screw hole top pop the keyboard.
-
-
Dieser Schritt ist noch nicht übersetzt. Hilf mit, ihn zu übersetzen!
-
Remove keyboard wire by popping latch under blue plastic
-
-
Dieser Schritt ist noch nicht übersetzt. Hilf mit, ihn zu übersetzen!
-
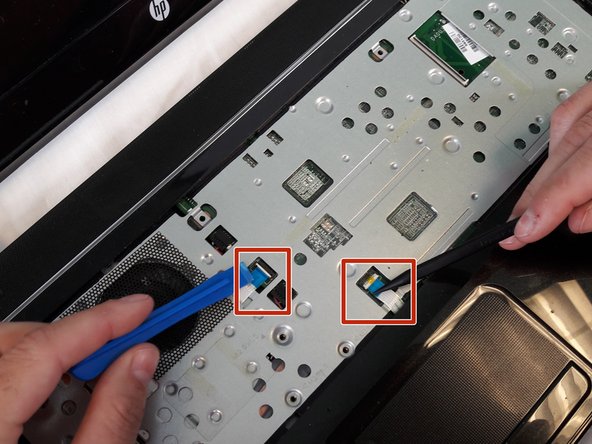
Using the spudger to lift up on the white tabs
-
Pull horizontally on the blue ribbon to disconnect the cables
-
-
Dieser Schritt ist noch nicht übersetzt. Hilf mit, ihn zu übersetzen!
-
Remove the five 5.5mm Phillips #1 screws from the case
-
-
Dieser Schritt ist noch nicht übersetzt. Hilf mit, ihn zu übersetzen!
-
Remove eight 6.5mm Phillips #1 screws from the back cover
-
-
Dieser Schritt ist noch nicht übersetzt. Hilf mit, ihn zu übersetzen!
-
Starting at a top corner, use the pry tool to split the case.
-
Slowly work around the case, pulling up gently to release the clips.
-
-
Dieser Schritt ist noch nicht übersetzt. Hilf mit, ihn zu übersetzen!
-
Remove the 4 x 5.5 mm screws connecting the hard drive tot he case.
-
-
Dieser Schritt ist noch nicht übersetzt. Hilf mit, ihn zu übersetzen!
-
Remove hard drive from bracket being careful of it's cable.
-
-
Dieser Schritt ist noch nicht übersetzt. Hilf mit, ihn zu übersetzen!
-
Disconnect cable from hard drive.
-


Team

USF Tampa, Team S11-G2, Cheng Spring 2018 Mitglied von USF Tampa, Team S11-G2, Cheng Spring 2018
USFT-CHENG-S18S11G2
4 Mitglieder
10 Anleitungen geschrieben