Zum Hauptinhalt wechseln

HP Pavilion Sleekbook 15-b000 Screen Replacement

Was du brauchst

  1. HP Pavilion Sleekbook 15-b000 Screen Replacement, Battery: Schritt 1, Bild 1 von 1
    • Unplug laptop from adapter and all other devices.

  2. HP Pavilion Sleekbook 15-b000 Screen Replacement: Schritt 2, Bild 1 von 1
    • Flip the laptop over with battery facing you.

  3. HP Pavilion Sleekbook 15-b000 Screen Replacement: Schritt 3, Bild 1 von 2 HP Pavilion Sleekbook 15-b000 Screen Replacement: Schritt 3, Bild 2 von 2
    • Slide the battery lock on the right side open.

    • Slide the Battery release latch on the left side.

  4. HP Pavilion Sleekbook 15-b000 Screen Replacement: Schritt 4, Bild 1 von 1
    • Pull battery out.

  5. HP Pavilion Sleekbook 15-b000 Screen Replacement, Keyboard: Schritt 5, Bild 1 von 1
    • Remove the two 6.5mm Phillips #1 keyboard screws from bottom of laptop.

  6. HP Pavilion Sleekbook 15-b000 Screen Replacement: Schritt 6, Bild 1 von 1
    • Push screwdriver through screw hole top pop the keyboard.

    • Make sure the screen is open.

  7. HP Pavilion Sleekbook 15-b000 Screen Replacement: Schritt 7, Bild 1 von 1
    • Pry up the keyboard.

    • The keyboard is still attached by it's ribbon.

  8. HP Pavilion Sleekbook 15-b000 Screen Replacement: Schritt 8, Bild 1 von 1
    • Remove keyboard wire by popping latch under blue plastic

  9. HP Pavilion Sleekbook 15-b000 Screen Replacement, Case: Schritt 9, Bild 1 von 1
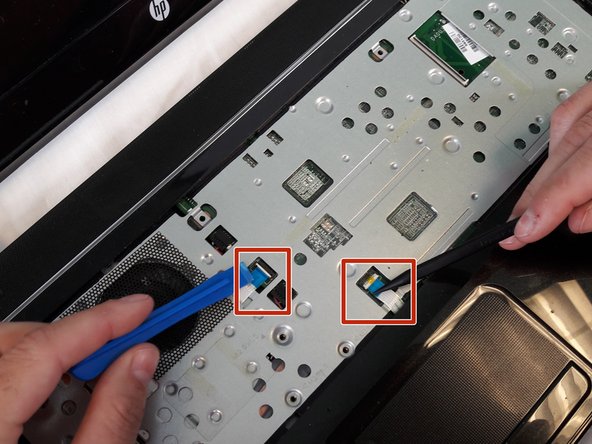
    • Using the spudger to lift up on the white tabs

    • Pull horizontally on the blue ribbon to disconnect the cables

  10. HP Pavilion Sleekbook 15-b000 Screen Replacement: Schritt 10, Bild 1 von 1
    • Remove the five 5.5mm Phillips #1 screws from the case

  11. HP Pavilion Sleekbook 15-b000 Screen Replacement: Schritt 11, Bild 1 von 1
    • Remove eight 6.5mm Phillips #1 screws from the back cover

  12. HP Pavilion Sleekbook 15-b000 Screen Replacement: Schritt 12, Bild 1 von 3 HP Pavilion Sleekbook 15-b000 Screen Replacement: Schritt 12, Bild 2 von 3 HP Pavilion Sleekbook 15-b000 Screen Replacement: Schritt 12, Bild 3 von 3
    • Starting at a top corner, use the pry tool to split the case.

    • Slowly work around the case, pulling up gently to release the clips.

  13. HP Pavilion Sleekbook 15-b000 Screen Replacement, Screen: Schritt 13, Bild 1 von 1
    • Remove the four 5.5mm Phillips #1 screws attaching the screen.

  14. HP Pavilion Sleekbook 15-b000 Screen Replacement: Schritt 14, Bild 1 von 1
    • Remove the two 3.5mm Phillips #1 screws from the bottom of the screen.

  15. HP Pavilion Sleekbook 15-b000 Screen Replacement: Schritt 15, Bild 1 von 1
    • Remove the screen from it's case.

    • Screen is still connected to it's case by a wire.

  16. HP Pavilion Sleekbook 15-b000 Screen Replacement: Schritt 16, Bild 1 von 1
    • Lay the screen face down on a surface where it ill not scratch

  17. HP Pavilion Sleekbook 15-b000 Screen Replacement: Schritt 17, Bild 1 von 2 HP Pavilion Sleekbook 15-b000 Screen Replacement: Schritt 17, Bild 2 von 2
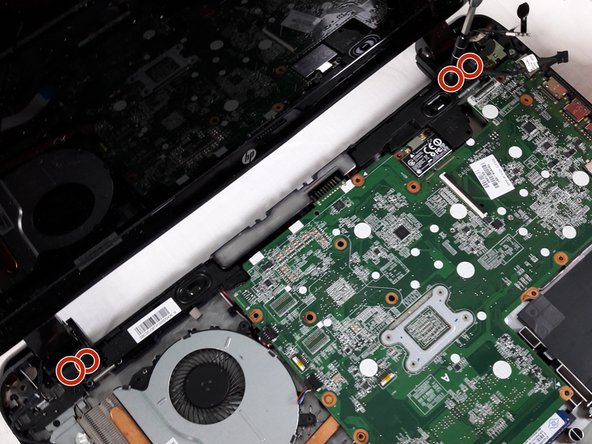
    • Lift up plastic over latch for the screen.

    • Pull the connector away from the screen to disconnect it.

Abschluss

To reassemble your device, follow these instructions in reverse order.

Sam Barkley

Mitglied seit: 02/13/18

983 Reputation

8 Anleitungen geschrieben

Team

USF Tampa, Team S11-G2, Cheng Spring 2018 Mitglied von USF Tampa, Team S11-G2, Cheng Spring 2018

USFT-CHENG-S18S11G2

4 Mitglieder

10 Anleitungen geschrieben

0 Kommentare

Kommentar hinzufügen

Seitenaufrufe:

Letzte 24 Stunden: 0

Letzte 7 Tage: 1

Letzte 30 Tage: 3

Insgesamt: 220