Einleitung
This guide will go through the steps required to disassemble the computer in order to reach the fan to clean or replace it.
You will need:
- Phillips #00 screwdriver
- Plastic Prying Tool
- Spudger
- If you are cleaning the fan, cotton swabs and rubbing alcohol.
Was du brauchst
-
-
Shut down the computer and unplug it from the outlet.
-
Disconnect the power supply cord from the side of the laptop.
-
-
-
Remove the battery by sliding and holding the battery release latch to the left.
-
While holding the release, lift the battery away from the battery bay and set aside.
-
-
-
Remove four screws from the battery bay, using the Phillips #00 screwdriver.
-
The screws are 4 mm long and the heads are 4 mm wide.
-
-
-
Starting with the four corners of the laptop, remove all remaining screws from the computer. There will be ten total screws to remove.
-
-
-
Loosen the screws from the hard drive bay cover.
-
Remove the hard drive bay cover and set aside.
-
-
-
Remove the hard drive by using the Mylar tab and lifting gently, as it is still connected to the system board by the hard drive cable.
-
-
-
Disconnect the hard drive from the hard drive cable by pulling them apart at the connector. The cable can be difficult to loosen, so while being gentle, you will have to pull hard to disconnect the hard drive.
-
-
-
Loosen the screws from the memory module compartment cover.
-
Remove the memory module compartment cover and set aside.
-
-
-
Remove the two memory modules by spreading apart the two silver retaining tabs, using your thumb and index finger. Pull and lift the green memory module upward at a 45-degree angle, then pull the memory module out of the computer.
-
Repeat for the second memory module located directly underneath the first.
-
-
-
Disconnect both the black and white (or grey) WLAN antenna cables attached to the WLAN module by lifting gently at the gold base.
-
-
-
Remove the single silver screw from the WLAN module, and pull the module away from the slot at a 45-degree angle.
-
The screw is 4 mm long and the head is 4 mm wide.
-
-
-
Remove the hard drive connector from the system board by lifting the Mylar tab.
-
-
-
Remove the screw that secures the optical drive to the computer.
-
The screw is 7 mm long and the head is 4 mm wide.
-
-
-
Insert a paperclip into the disk tray release access hole of the optical drive. The disk tray will eject automatically when the paperclip reaches the release.
-
-
-
-
Remove the 4 screws marked with keyboard symbols. One is located to the left of the memory module, two are in the hard drive bay, and one is in the battery bay.
-
The screws are 7 mm long and the heads are 4 mm wide.
-
-
-
Using the plastic opening tool, loosen the switch cover by inserting the tool under the cover and gently pulling up until the switch cover releases. Begin at the top right-hand corner of the keyboard.
-
-
-
While holding the switch cover up, remove the 3 silver screws underneath that connect the keyboard to the computer.
-
The screws are 4 mm long and the heads are 4 mm wide.
-
-
-
Set the switch cover down, resting on the computer.
-
Lift the keyboard from the base. It will still be attached to the system board.
-
-
-
Tilt the bottom edge of keyboard up toward the display. Pull up the black tab to allow removal of the keyboard cable connector. Then pull the cable gently by holding the blue area to remove the cable entirely.
-
Place the keyboard and connector aside.
-
-
-
Disconnect the LED board cable from the connector on the system board by pulling the blue Mylar tab in the direction of the display (away from you).
-
-
-
Disconnect the power button board cable from the connector on the system board by pulling the blue Mylar tab toward the display (away from you).
-
Place the switch cover aside.
-
-
-
In the upper left-hand corner of the laptop, disconnect the display panel cable by lifting the Mylar tab upwards toward the screen to release from the connector.
-
-
-
Lift up the yellow tape attached to reveal the webcam/microphone cable. Release the cables from under the grey clip built in to the top cover by gently pushing them away with the spudger.
-
Use the flat end of the spudger to detach the silver webcam/microphone cable from the system board by pulling the white connector away from the system board.
-
-
-
Disconnect the power connector cable by using the flat end of the spudger tool. Gently pry the cable until it completely disconnects, or you are able to grab the plastic piece, NOT the wires, to remove the cable.
-
-
-
Disconnect the TouchPad cable from the system board by pulling the blue Mylar tab toward you.
-
-
-
Remove the 4 screws that fasten the display assembly to the computer. Carefully lift the display assembly off the computer and set aside.
-
The screws are 4 mm long and the heads are 4 mm wide.
-
-
-
On the side of the computer farthest away from you, remove the 3 black screws from the top cover.
-
The screws are 4 mm long and the heads are 4 mm wide.
-
-
-
Turn the computer over so the bottom is facing up and the battery bay is facing away from you.
-
Remove the screw directly above the Intel card next to the TV symbol.
-
The screw is 7 mm long and the head is 4 mm wide.
-
-
-
Disconnect the TouchPad cable from the system board by pulling the blue Mylar tab toward you.
-
-
-
Starting in the optical drive area, slide the plastic opening tool under the top cover, prying up each side to loosen it from the computer.
-
Remove the screw attaching the cover to the system board.
-
The screw is 4 mm long and the head is 5 mm wide.
-
-
-
Now that the top cover is removed, check for debris or food particles that may have become trapped underneath the top cover's TrackPad button area.
-
Optional: Use compressed air to clean out dust and debris.
-
If the TrackPad button is broken, you will need to replace the entire top cover piece purchase and install HP spare part number 518789-001.
-
-
-
Orient the computer so that the display assembly area is facing away from you.
-
Disconnect the modem cable from the green modem module by using your thumb and forefinger to free the black connector from the modem module.
-
-
-
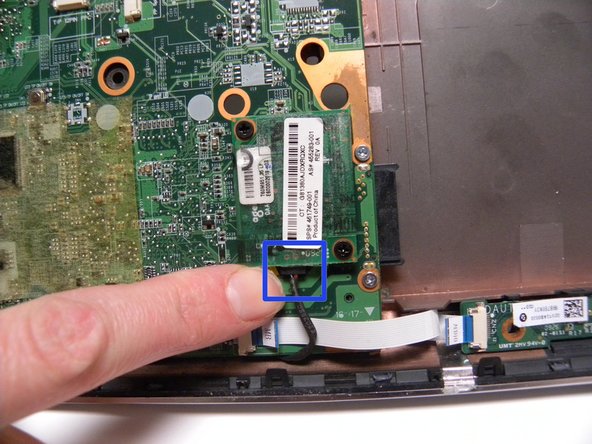
On the side facing closest to you, pull right on the blue tab of the audio/infrared board cable to release from the connector on the system board.
-
-
-
Remove the black screw on the bottom right corner of system board.
-
The screw is 7 mm long and the head is 4 mm wide.
-
-
-
Holding the right side of the system board at the optical drive area, lift the right-side edge up at an angle. Continue lifting the board up and slide it out at at angle to remove.
-
Set the outer cover aside.
-
-
-
Turn the system board over, and unscrew the three silver screws attached to the fan.
-
The screws will not come all the way out.
-
-
-
Disconnect the connector from the system board by pulling the white tab with your thumb and forefinger.
-
Set the system board aside.
-
-
-
Carefully clean the fan using cotton swabs dipped in rubbing alcohol to lightly sweep away dust and debris.
-
If you need to replace a broken fan, purchase and install HP spare part number 512830-001.
-


To reassemble your device, follow these instructions in reverse order.
To reassemble your device, follow these instructions in reverse order.
Rückgängig: Ich habe diese Anleitung nicht absolviert.
9 weitere Personen haben diese Anleitung absolviert.
Team

New Mexico State, Team 1-3, Sheppard Spring 2014 Mitglied von New Mexico State, Team 1-3, Sheppard Spring 2014
NMSU-SHEPPARD-S14S1G3
4 Mitglieder
4 Anleitungen geschrieben