Zum Hauptinhalt wechseln

HP Pavilion dv7t-7000 Heat Sink Replacement

Was du brauchst

  1. HP Pavilion dv7t-7000 Heat Sink Replacement, Battery: Schritt 1, Bild 1 von 1
    • Turn the computer off and disconnect if from all power sources.

  2. HP Pavilion dv7t-7000 Heat Sink Replacement: Schritt 2, Bild 1 von 1
    • Slide the battery release switch to the left.

  3. HP Pavilion dv7t-7000 Heat Sink Replacement: Schritt 3, Bild 1 von 1
    • Hold the release switch all of the way to the left and your other hand to pull the battery out.

  4. HP Pavilion dv7t-7000 Heat Sink Replacement, Back Panel: Schritt 4, Bild 1 von 1
    • Unscrew the single Phillips #00 screw.

    • Screw will not come out, it is connected to the panel

  5. HP Pavilion dv7t-7000 Heat Sink Replacement: Schritt 5, Bild 1 von 2 HP Pavilion dv7t-7000 Heat Sink Replacement: Schritt 5, Bild 2 von 2
    • Remove service hatch by sliding away from the computer and lifting up.

  6. HP Pavilion dv7t-7000 Heat Sink Replacement, CD Drive: Schritt 6, Bild 1 von 2 HP Pavilion dv7t-7000 Heat Sink Replacement, CD Drive: Schritt 6, Bild 2 von 2
    • Remove the single Phillips #00 screw.

  7. HP Pavilion dv7t-7000 Heat Sink Replacement: Schritt 7, Bild 1 von 2 HP Pavilion dv7t-7000 Heat Sink Replacement: Schritt 7, Bild 2 von 2
    • Pull CD drive out to remove.

  8. HP Pavilion dv7t-7000 Heat Sink Replacement, RAM: Schritt 8, Bild 1 von 2 HP Pavilion dv7t-7000 Heat Sink Replacement, RAM: Schritt 8, Bild 2 von 2
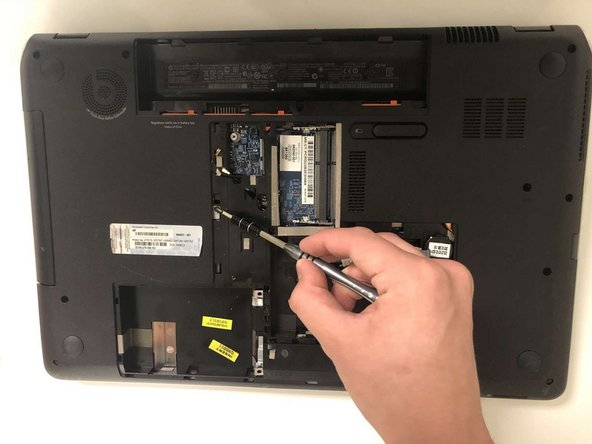
    • Push the retraining springs away from the RAM at the same time to unlock the RAM.

  9. HP Pavilion dv7t-7000 Heat Sink Replacement: Schritt 9, Bild 1 von 2 HP Pavilion dv7t-7000 Heat Sink Replacement: Schritt 9, Bild 2 von 2
    • Pull the RAM out.

    • Follow the same procedure for the additional RAM.

  10. HP Pavilion dv7t-7000 Heat Sink Replacement, Hard Drive: Schritt 10, Bild 1 von 1
    • Remove the two Phillips #00 screws holding in the hard drive.

  11. HP Pavilion dv7t-7000 Heat Sink Replacement: Schritt 11, Bild 1 von 2 HP Pavilion dv7t-7000 Heat Sink Replacement: Schritt 11, Bild 2 von 2
    • Grab the black tab on the hard drive and pull left and then upwards to remove.

  12. HP Pavilion dv7t-7000 Heat Sink Replacement: Schritt 12, Bild 1 von 1
    • Remove the four Phillips #00 screws holding the hard drive to its case.

  13. HP Pavilion dv7t-7000 Heat Sink Replacement: Schritt 13, Bild 1 von 2 HP Pavilion dv7t-7000 Heat Sink Replacement: Schritt 13, Bild 2 von 2
    • Slide the casing off of the hard drive.

  14. HP Pavilion dv7t-7000 Heat Sink Replacement: Schritt 14, Bild 1 von 1
    • Unplug the hard drive from the device.

  15. HP Pavilion dv7t-7000 Heat Sink Replacement, Wi-Fi Card: Schritt 15, Bild 1 von 2 HP Pavilion dv7t-7000 Heat Sink Replacement, Wi-Fi Card: Schritt 15, Bild 2 von 2
    • Use the flat end of a spudger to pop off the antenna connectors.

  16. HP Pavilion dv7t-7000 Heat Sink Replacement: Schritt 16, Bild 1 von 3 HP Pavilion dv7t-7000 Heat Sink Replacement: Schritt 16, Bild 2 von 3 HP Pavilion dv7t-7000 Heat Sink Replacement: Schritt 16, Bild 3 von 3
    • Remove single Phillips #00 screw.

    • Pull the card out by hand.

  17. HP Pavilion dv7t-7000 Heat Sink Replacement, Keyboard: Schritt 17, Bild 1 von 2 HP Pavilion dv7t-7000 Heat Sink Replacement, Keyboard: Schritt 17, Bild 2 von 2
    • Remove the single Phillips #00 screw.

    • Flip the laptop over.

  18. HP Pavilion dv7t-7000 Heat Sink Replacement: Schritt 18, Bild 1 von 3 HP Pavilion dv7t-7000 Heat Sink Replacement: Schritt 18, Bild 2 von 3 HP Pavilion dv7t-7000 Heat Sink Replacement: Schritt 18, Bild 3 von 3
    • Wedge a spudger in between the keyboard and the upper bezel (nearest the screen).

    • Pry upward to release the keyboard clips.

    • The keyboard is plugged into the motherboard, so be careful not to pull out while lifting keyboard.

  19. HP Pavilion dv7t-7000 Heat Sink Replacement: Schritt 19, Bild 1 von 1
    • Use the flat end of a spudger to flip up the black tab on the ZIF connectors.

    • Pull the ribbon cables out of the ZIF connectors.

    • Remove the keyboard.

  20. HP Pavilion dv7t-7000 Heat Sink Replacement, Palm Rest: Schritt 20, Bild 1 von 3 HP Pavilion dv7t-7000 Heat Sink Replacement, Palm Rest: Schritt 20, Bild 2 von 3 HP Pavilion dv7t-7000 Heat Sink Replacement, Palm Rest: Schritt 20, Bild 3 von 3
    • Flip the keyboard back over.

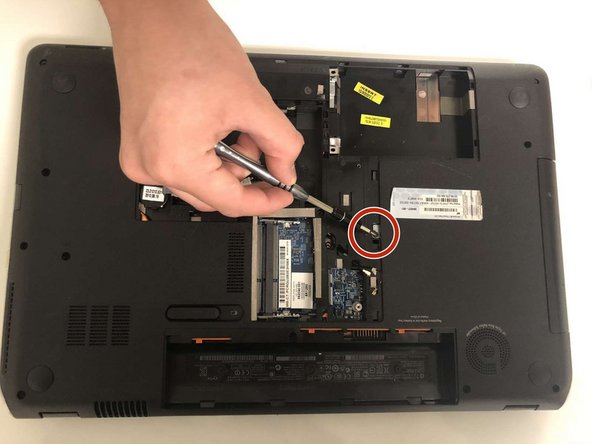
    • Remove the single Phillips #00 screw holding in the CD drive.

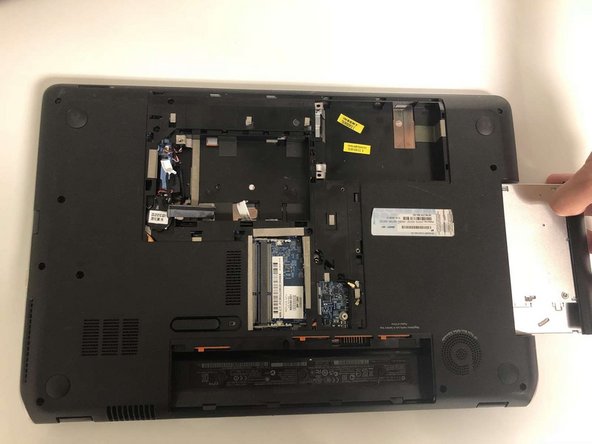
    • Pull out the CD drive.

  21. HP Pavilion dv7t-7000 Heat Sink Replacement: Schritt 21, Bild 1 von 1
    • Remove the seventeen Phillips #00 screws securing the back panel to the laptop.

  22. HP Pavilion dv7t-7000 Heat Sink Replacement: Schritt 22, Bild 1 von 2 HP Pavilion dv7t-7000 Heat Sink Replacement: Schritt 22, Bild 2 von 2
    • Flip the laptop over.

    • Remove the single Phillips #00 screw.

  23. HP Pavilion dv7t-7000 Heat Sink Replacement: Schritt 23, Bild 1 von 1
    • Remove the panel by lifting it up.

  24. HP Pavilion dv7t-7000 Heat Sink Replacement, Motherboard: Schritt 24, Bild 1 von 1
    • Remove the eleven Phillips #00 screws.

  25. HP Pavilion dv7t-7000 Heat Sink Replacement: Schritt 25, Bild 1 von 3 HP Pavilion dv7t-7000 Heat Sink Replacement: Schritt 25, Bild 2 von 3 HP Pavilion dv7t-7000 Heat Sink Replacement: Schritt 25, Bild 3 von 3
    • Use the flat end of a spudger to disconnect all wires connected to the motherboard.

  26. HP Pavilion dv7t-7000 Heat Sink Replacement: Schritt 26, Bild 1 von 2 HP Pavilion dv7t-7000 Heat Sink Replacement: Schritt 26, Bild 2 von 2
    • Lift up the black tab on the ZIF connector with the flat end of a spudger.

    • Pull the ribbon cable out of the ZIF connector.

    • Remove the fan from the laptop.

  27. HP Pavilion dv7t-7000 Heat Sink Replacement, Heat Sink: Schritt 27, Bild 1 von 2 HP Pavilion dv7t-7000 Heat Sink Replacement, Heat Sink: Schritt 27, Bild 2 von 2
    • Once you have removed the motherboard, the heat sink is attached.

    • Flip over the motherboard/heat sink assembly.

  28. HP Pavilion dv7t-7000 Heat Sink Replacement: Schritt 28, Bild 1 von 3 HP Pavilion dv7t-7000 Heat Sink Replacement: Schritt 28, Bild 2 von 3 HP Pavilion dv7t-7000 Heat Sink Replacement: Schritt 28, Bild 3 von 3
    • Remove the six screws holding the heat sink onto the motherboard.

    • Unplug the cord supplying power to the fan.

    • Pull the two pieces apart.

Abschluss

To reassemble your device, follow these instructions in reverse order.

2 weitere Nutzer:innen haben diese Anleitung absolviert.

0 Kommentare

Kommentar hinzufügen

Seitenaufrufe:

Letzte 24 Stunden: 0

Letzte 7 Tage: 0

Letzte 30 Tage: 5

Insgesamt: 660