Einleitung
This guide helps you with removal and replacing the Screen for HP Pavilion x360 14m-cd0003dx laptop. If your computer powers on, but you see a blank screen or glitches, the screen may need to be replaced.
For further information to determine if the Screen needs to be replaced, please refer to this troubleshooting guide.
Was du brauchst
-
-
Turn off the computer.
-
Disconnect the power cord and any external devices connected to the computer.
-
-
-
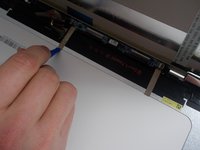
Use a plastic opening tool to carefully separate the screen from the plastic frame.
-
Work along the top first, and then down the left and right sides.
-
-
-
The screen can then be separated from the frame and laid flat on top of the keyboard.
-
-
-
-
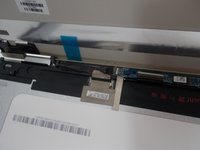
The next few steps involve disconnecting the screen from the laptop in several places.
-
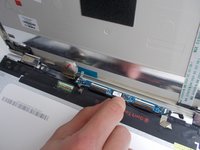
The first place is connected to the left side of the thin blue board at the top.
-
Peel back the clear adhesive and remove the pin header from the port on the blue board.
-
-
-
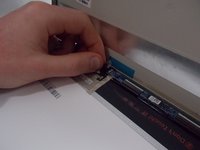
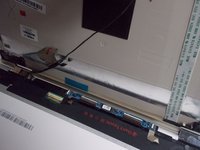
The next place is underneath the gray adhesive. Peel back this adhesive to expose the connection underneath.
-
Disconnect the gold pin header from its port.
-
-
-
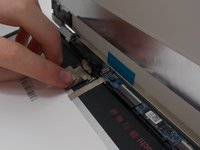
Repeat Step 4 for the connection on the right side.
-
Peel the clear adhesive and remove connection.
-
-
-
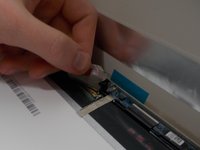
Peel the thin gray adhesive strips.
-
Pull out the thin black cable underneath these strips. It is the same black cable that was disconnected in the previous steps.
-


To reassemble your device, follow these instructions in reverse order.
To reassemble your device, follow these instructions in reverse order.
Rückgängig: Ich habe diese Anleitung nicht absolviert.
Eine weitere Person hat diese Anleitung absolviert.

Team

UMass Dartmouth, Team 7-4, Sinclaire Spring 2022 Mitglied von UMass Dartmouth, Team 7-4, Sinclaire Spring 2022
UMASSD-SINCLAIRE-S22S7G4
6 Mitglieder
6 Anleitungen geschrieben