Zum Hauptinhalt wechseln

HP Slate 7 Extreme 4400US Charging port and Audio Jack Circuit Board Replacement

Was du brauchst

  1. HP Slate 7 Extreme 4400US Charging port and Audio Jack Circuit Board Replacement, Back Cover: Schritt 1, Bild 1 von 3 HP Slate 7 Extreme 4400US Charging port and Audio Jack Circuit Board Replacement, Back Cover: Schritt 1, Bild 2 von 3 HP Slate 7 Extreme 4400US Charging port and Audio Jack Circuit Board Replacement, Back Cover: Schritt 1, Bild 3 von 3
    • Use the plastic opening tool to separate the back cover from the tablet. Carefully use the tool to pry open the sides, going around the entire tablet to lift the sides up.

    • Once all sides have been pried up, pull the cover off and place it to the side.

  2. HP Slate 7 Extreme 4400US Charging port and Audio Jack Circuit Board Replacement, Charging port and Audio Jack Circuit Board: Schritt 2, Bild 1 von 2 HP Slate 7 Extreme 4400US Charging port and Audio Jack Circuit Board Replacement, Charging port and Audio Jack Circuit Board: Schritt 2, Bild 2 von 2
    • Use the PH #000 phillips head screw driver to remove one 5.0 mm screw.

    • Move plastic housing and rear facing camera to expose silver bracket.

  3. HP Slate 7 Extreme 4400US Charging port and Audio Jack Circuit Board Replacement: Schritt 3, Bild 1 von 2 HP Slate 7 Extreme 4400US Charging port and Audio Jack Circuit Board Replacement: Schritt 3, Bild 2 von 2
    • Use the PH #000 phillips head screw driver to remove three 3.0mm screws. Remove the silver bracket.

  4. HP Slate 7 Extreme 4400US Charging port and Audio Jack Circuit Board Replacement: Schritt 4, Bild 1 von 3 HP Slate 7 Extreme 4400US Charging port and Audio Jack Circuit Board Replacement: Schritt 4, Bild 2 von 3 HP Slate 7 Extreme 4400US Charging port and Audio Jack Circuit Board Replacement: Schritt 4, Bild 3 von 3
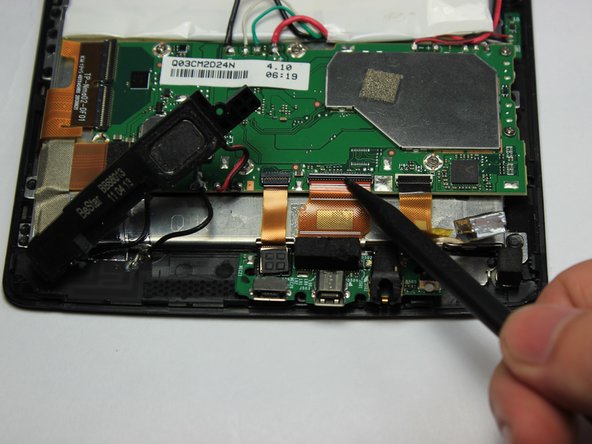
    • Use the nylon spudger to flip up the black retaining flap of the zero insertion force (ZIF) connector holding the strip in place.

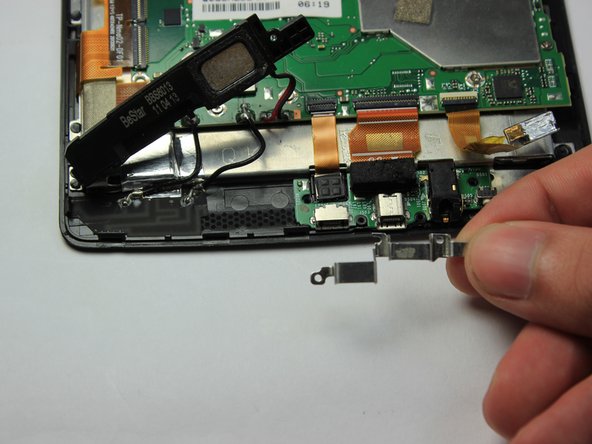
    • Grab the green circuit board and pull directly up to separate the glued down power strip.

    • Gently pull the circuit board out of its connector.

Abschluss

To reassemble your device, follow these instructions in reverse order.

Ein:e weitere:r Nutzer:in hat diese Anleitung absolviert.

Brandon Ko

Mitglied seit: 09/15/16

698 Reputation

6 Anleitungen geschrieben

Team

USF Tampa, Team 11-4, Blackwell Fall 2016 Mitglied von USF Tampa, Team 11-4, Blackwell Fall 2016

USFT-BLACKWELL-F16S11G4

4 Mitglieder

16 Anleitungen geschrieben

5 Kommentare

where can i get the part at?

cat jones - Antwort

Where do you even get the part at??

Mountiansurfer Gaming - Antwort

Where do I even get the part at???

Mountiansurfer Gaming - Antwort

Can you let us know where to get the replacement part from?

ypk77 - Antwort

This is completely useless information without a source for the shoddy HP part!

Brian Burke - Antwort

Kommentar hinzufügen

Seitenaufrufe:

Letzte 24 Stunden: 0

Letzte 7 Tage: 1

Letzte 30 Tage: 4

Insgesamt: 1,986