Diese Version enthält möglicherweise inkorrekte Änderungen. Wechsle zur letzten geprüften Version.
Was du brauchst
-
Dieser Schritt ist noch nicht übersetzt. Hilf mit, ihn zu übersetzen!
-
Gently insert an iPod opening tool between the rear panel and the inner rear frame near the headphone jack.
-
Use your iPod opening tool to pry up the rear case around the perimeter of the Evo.
-
-
Dieser Schritt ist noch nicht übersetzt. Hilf mit, ihn zu übersetzen!
-
Lift the rear panel off of the inner rear frame.
-
-
Dieser Schritt ist noch nicht übersetzt. Hilf mit, ihn zu übersetzen!
-
Using the tip of your finger, lift the battery from the end closest to the camera.
-
Remove the battery from the rear inner frame.
-
-
Dieser Schritt ist noch nicht übersetzt. Hilf mit, ihn zu übersetzen!
-
Use the flat end of a spudger to pry up the red MicroSD retainer attached to the inner frame.
-
-
Dieser Schritt ist noch nicht übersetzt. Hilf mit, ihn zu übersetzen!
-
Use a pair of tweezers to carefully pull the MicroSD card out of its slot in the inner rear frame.
-
-
Dieser Schritt ist noch nicht übersetzt. Hilf mit, ihn zu übersetzen!
-
Remove six T5 Torx screws securing the rear inner frame to the inner case.
-
-
-
Dieser Schritt ist noch nicht übersetzt. Hilf mit, ihn zu übersetzen!
-
Gently insert an iPod opening tool between the rear inner frame and its plastic surround near the Micro HDMI port.
-
Carefully pry the top edge of the rear inner frame away from the front surround of the Evo.
-
-
Dieser Schritt ist noch nicht übersetzt. Hilf mit, ihn zu übersetzen!
-
Insert the iPod opening tool between the rear inner frame and its plastic surround and pry up at several points along the left edge of the Evo.
-
-
Dieser Schritt ist noch nicht übersetzt. Hilf mit, ihn zu übersetzen!
-
Continue the prying procedure, now focusing on detaching the plastic surround from the bottom of the Evo.
-
Pry up the rear inner frame along the right edge using the method described in previous steps.
-
Eventually work around the entire perimeter of the rear inner frame until it is lifted slightly from the inner case.
-
-
Dieser Schritt ist noch nicht übersetzt. Hilf mit, ihn zu übersetzen!
-
Remove the rear inner frame from the rest of the Evo.
-
-
Dieser Schritt ist noch nicht übersetzt. Hilf mit, ihn zu übersetzen!
-
Remove the single Phillips screw securing the motherboard to the inner case near the headphone jack.
-
-
Dieser Schritt ist noch nicht übersetzt. Hilf mit, ihn zu übersetzen!
-
Use the flat end of a spudger to pry the motherboard off the posts securing it to the metal display tray.
-
-
Dieser Schritt ist noch nicht übersetzt. Hilf mit, ihn zu übersetzen!
-
Carefully peel the device information sticker off the left edge of the motherboard and EMI shield to reveal three connectors covered with tape.
-
-
Dieser Schritt ist noch nicht übersetzt. Hilf mit, ihn zu übersetzen!
-
Remove the pieces of tape covering the following ribbon cables:
-
Front-facing camera
-
Front panel ribbon cable
-
Display ribbon cable
-
-
Dieser Schritt ist noch nicht übersetzt. Hilf mit, ihn zu übersetzen!
-
Using the tip of an iPod opening tool, flip up the front-facing camera ribbon cable retaining flap.
-
Be very careful and gentle with these flaps. They are very easy to break or dislodge and equally difficult to reinstall.
-
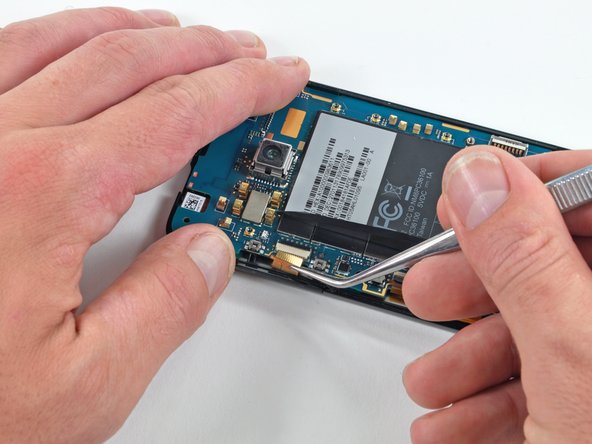
Use a pair of tweezers to pull the front-facing camera ribbon cable straight out of its socket.
-
-
Dieser Schritt ist noch nicht übersetzt. Hilf mit, ihn zu übersetzen!
-
Using the tip of an iPod opening tool, flip up the front panel ribbon cable retaining flap.
-
Use a pair of tweezers to pull the front panel ribbon cable straight out of its socket.
-
-
Dieser Schritt ist noch nicht übersetzt. Hilf mit, ihn zu übersetzen!
-
Using the tip of an iPod opening tool, flip up the display ribbon cable retaining flap.
-
Grasp the display ribbon cable with a pair of tweezers and pull it straight out of its socket.
-
-
Dieser Schritt ist noch nicht übersetzt. Hilf mit, ihn zu übersetzen!
-
Carefully lift the motherboard out of the inner case, minding any cables that may get caught.
-


Rückgängig: Ich habe diese Anleitung nicht absolviert.
18 weitere Nutzer:innen haben diese Anleitung absolviert.

Ein Kommentar
My we girl dropped her HTC fine their is lines going down the screen does anyone no if the fine can be fixed