Einleitung
Wenn du Probleme mit dem Akku des HTC One - so wie bei den Lösungen beschrieben - hast wird hier der Austausch gezeigt.
Was du brauchst
-
-
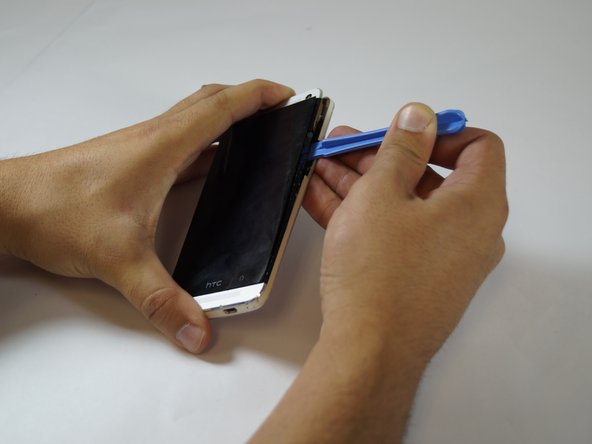
In diesem Schritt wirst du die Glasscheibe anheben. Sei SEHR vorsichtig damit sie nicht bricht. Setze einen Plastiköffner zwischen den schwarzen Rahmen und den Rand der Glasscheibe entlang und löse allmählich den Kleber. Die Scheibe soll am unteren Rand noch befestigt sein so wie an einem Scharnier.
-
-
-
Zwänge den Plastiköffner in den Spalt um die Scheibe am oberen Ende und an beiden Seiten.
True -can’t believe this was included as a step. Just separate the bottom of the trim under the LCD from the back metal cover er ...carefully and in a manner than implies you have all day to do it. Rushing this procedure will only gain you additional damage that will be your reminders from when you tried too hard to get your phone apart. That is unless you’re like me and keep the whole thing in an Otterbox.
-
-
-
-
Die Rückseite ist mit acht Laschen und Kleber an der Scheibenblende befestigt. An der Seite mit der Lautstärkewippe ist eine darüber und drei darunter; auf der SIM-Seite sind alle unter der SIM. Schiebe den Plastiköffner zwischen den Gehäuserand und Rahmen um das Rückteil nach außen zu drücken und so den Kleber und die Laschen zu lösen.
The best 'in' for prying open the screen bezel from the back (or in other words, to pry off the back cover) is to insert a pick or pry tool just where the sim card slot is. The plastic here is a little more flexible and allows more freedom of movement. Don't apply too much force unless you don't mind the plastic snapping at the sim port. It won't be much more than cosmetic damage.
Move the prier towards the bottom. There is one of the holding clips just below the sim port and is rarely held by glue making it the easiest to pry apart. The next clip is about 2inches down from there.
Once the left side is pried apart fully (keep pulling the back case away till the glue snaps - there are no cables attached to worry about) force the back case to the right to remove it away from the clips on the right hand side. This is relatively easy in comparison to opening the left side.
This step scared the shiznit outta me and I take small electronics apart for a living; just not phones and especially not MINE. In my opinion, this was by-far the hardest step as the seam between the bottom of the plastic trim under the LCD and the back cover is infinitesimally small. It is also the most cosmetically visible once you’ve completed the procedure, so take your time and do it right. The idea is to make the tiny seam big enough to slide a spudger down the seam line which slowly pushes the 2 sides apart. There are “clip points” all around this device (already described). Wedging and prying will only leave marks; even with a spudger or similar plastic tool. Unlike SeaniePie I used the screw holes at the top of the phone to get my “in” and work on it until the gap got bigger then slid several plastic tools down the seam. It was very slow going, but my reward is that it’s hardly visible that I had the phone open. keep with it, it feels impossible for a while.
Also make sure you get the right seam, my battery was already swelling which made the LCD bulge up in 1 place which made it tempting to separate it from the trim, however it’s the wrong 2 surfaces. You want the bottom of the trim piece and the metal back cover to separate I checked the photo twice before proceeding just to make sure I was separating the right sections.
-
-
-
Hebele die Rückseite auf, wenn sie erst mal gelöst ist. Sie wird allmählich befreit werden.
-
-
-
Entferne die Schrauben mit einem PH000 Schrauber.
There's about a billion (minor exaggeration) steps missing here! Watch the video from 2m30s to see the plethora of ribbons and screws to remove. In fact, for replacing the battery most of the marked screws don't need removing. Concentrate on everything connected to just the top board (which sits on top of the battery).
-
-
-
Hebe die Hauptplatine mit einer Pinzette ganz aus dem Smartphone. Am unteren Ende kann sie noch mit einem Klebeband verbunden bleiben).
-
-
-
Hebele den Akku mit dem Plastiköffner aus dem Gehäuse.
When i change battery finish.
Do I have to use glue to put the screen back on the body?
what is the serial number for the new battery i need ! or do i need to take the phone apart to get a serial number off the old battery !
My phone is the same as shown in your demo
what is the serial number of the battery i need ! or do i need to take the phone apart to get the serial number off the old battery
My phone is the same as shown in your demo
I wouldn’t do that Viriya, there will still be some residual “stick” left anyway, but if you ever have to go back into it, you’ll hate yourself for that additional glue you added.
It’s weird this DIY write-up is the same one, but the comments are different. During this step another commenter saved my butt by adding a warning about how a cable went over the battery. Which was true, the upper corner of the battery nearest to the LEDs/Flash has a delicate cable precariously going over the corner of the battery. The only way to not damage this is to gently get the adhesive detached from the bottom of the battery using a long spudger without removing it. You only lift the battery enough to get the spudger in and then gently separate the two surfaces. When you’re sure that nothing else is holding the battery in, you add gentle, careful pressure to the corner of the battery that has the cable going over it. This will push the battery out enough to clear the overlap of the cable and then you insert the new battery in the same manner that you removed the old one. I am grateful to say for all the eggshells I walked on during this procedure that all functions work as before & no damage done -yay
-


Um dein Gerät wieder zusammen zu setzen folge den Schritten in umgekehrter Reihenfolge.
Um dein Gerät wieder zusammen zu setzen folge den Schritten in umgekehrter Reihenfolge.
Rückgängig: Ich habe diese Anleitung nicht absolviert.
48 weitere Nutzer:innen haben diese Anleitung absolviert.
Besonderer Dank geht an diese Übersetzer:innen:
100%
VauWeh hilft uns, die Welt in Ordnung zu bringen! Wie kann ich mithelfen?
Hier starten ›

Team

USF Tampa, Team 12-1, Blackwell Fall 2014 Mitglied von USF Tampa, Team 12-1, Blackwell Fall 2014
USFT-BLACKWELL-F14S12G1
4 Mitglieder
7 Anleitungen geschrieben
9 Kommentare
Removing the screen first may make it easier to insert the plastic tool between the bezel and the case, however in my instance despite being as careful as I was able I still damaged the screen whilst doing this.
Furthermore, since both the bezel and the case edge are plastic I found that they were not strong enough to withstand damage whilst I loosened the glue that held them together. Whilst I was able to access and replace the battery, cosmetically speaking the phone is a ruin.
Hardest device disassembly I have _ever_ attempted.
I got away without prying the LCD off (omitting step 2+3). I was lucky and the back coverpopped off rather easily. All in all it took me about an hour.
If i change batterry finish.
Do I have to use glue to put the screen back on the body?
Is the battery for HTC one and HTC M7 similar?
They are both the same phone
the worst guide out there
My old HTC One x died after 8 years, several years ago. It was my favorite phone. Unfortunately I lost all my pictures that were on it. Is there a SIM card reader that can read the unusual size SIM card ? The old card is too big to fit in a newer phone.
It is not required to remove the display!!! Skip this step!
Christian Stangier - Antwort